Foundation Game Design with ActionScript 3.0, Second Edition (24 page)
Read Foundation Game Design with ActionScript 3.0, Second Edition Online
Authors: Rex van der Spuy

By linking layers you can select all the graphics on those layers just by selecting one of them. You can then move, resize, or rotate all those layers as a group. When I was working on my cat character, I linked the white and black shapes that make up the cat's eyes. That made it easy to move the eyes around the canvas because I didn't need to select the black and white parts separately.
To link layers together, hold down the Shift key and click on all the layers that you want to link. (Holding down Shift lets you select multiple items.) Then click the chain button at the bottom of the Layers panel.
Figure 2-79
illustrates this.
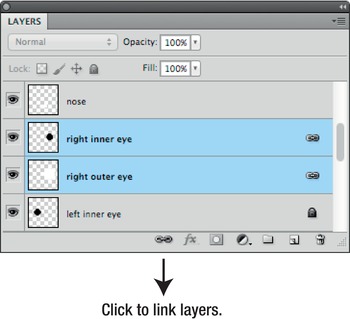
Figure 2-79.
Link layers to work with them as a single unit.
Another option is to group layers together. By grouping layers you can create a folder in the Layers panel and organize related layers into them. You can then open and close the folder to reduce clutter in the Layers panel.
To group two or more layers, select the layers by holding down the Shift key and clicking with the left mouse button. Select Layer Group Layers from Photoshop's main menu. You'll then see that your selected layers are organized into a folder in the Layers panel. Click the small triangle next to the folder name to open and close it. Give the folder a name to remind you which layers are inside.
Figure 2-80
shows how I've organized the feet layers of my cat character into their own folder.
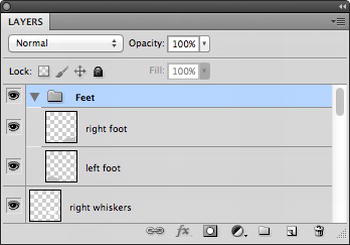
Figure 2-80.
Group related layers to reduce clutter in the Layers panel.
After you've created a group, you can move layers into it by holding down Alt (Windows) or Option (Mac OS X) and dragging the layer into the group.
Ungroup layers by selecting the name of the group and choosing LayerUngroup Layers from Photoshop's main menu.
When you're finished working on your character, save it following the same steps you used to save the background image. Make sure that you save two versions of the file: the PSD file and the PNG file. Make sure these two files are named character.psd and character.png.
In
Chapter 3
, you're going to build an interactive toy that lets you control your game character by clicking on buttons. You need some buttons to click, so you're going to make those buttons next. In
Chapter 3
, you're going to attach some AS3.0 programming code to these buttons to make them work.
You need six buttons that will look like those in
Figure 2-81
.
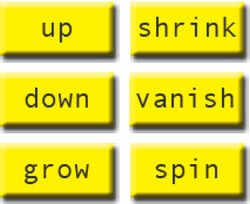
Figure 2-81.
Six buttons
They'll be easy to make because you can make them all in one Photoshop file. Let's see how.
You should be getting pretty good at this by now, but let's go over the basics of creating a new Photoshop document again just to make sure you don't miss something important.
Select FileNew from Photoshop's main menu.
Give this new file the name “buttons.”
Set the width to 100 px and the height to 50 px
Set the Background Contents to Transparent.
Click the OK button to open a new blank canvas.
There are two ways that you can make square or circular shapes in Photoshop: using the Shape tools or the Selection tools. You've used both in this chapter.
But there's one important difference between them. When you create shapes with the Selection tools, Photoshop makes the shapes by drawing pixels on the canvas—tiny little squares. When you use the Shape tools, it doesn't do this. The shapes created by the Shape tools are made using
vectors
, which are mathematical formulas based on lines. Zoom into the shapes as much as you like, and you'll never see any pixels. Shapes made with vectors are a little easier to edit because Photoshop doesn't have to recalculate the positions of all the pixels, and possibly distort them slightly, if you resize a shape.
But there is one disadvantage to vector shapes. Out of the box, you can't use them in combination with layer effects, like bevel, emboss, or drop shadows. That's because those layer effects only work on pixels, not vector shapes. You need to make a slight change to the Shape Tool options so that those layer effects will work. You need to force the Shape Tools to use pixels instead of vectors. I'll show you how to do this while you make your buttons in the steps that follow.
- Select the Rectangle Shape from the Tools panel.
- Choose a nice bright yellow color in the Foreground color box in the Tools panel.
- In the Options bar, click the Fill pixels button. This is the magic button that lets you use the Shape tools to draw pixels.
- Draw a yellow rectangle on the canvas. Leave a bit of space, about 4 or 5 pixels, on the right and bottom of the canvas. That's so you have room for the drop shadow effect that you'll add in the steps ahead.
Figure 2-82
shows what this process should look like.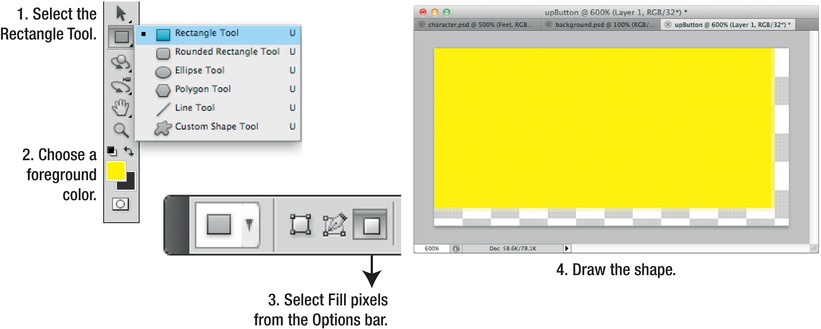
Figure 2-82.
Use the Fill pixels option to make the Shape tools use pixels.The shape is now filled with pixels, which means you can use any of the layer effects. In the next steps, you're going to add bevel and drop shadow effects.
- Click the FX button at the bottom of the Layers panel and choose Bevel and Emboss. Make any changes you like in the Layer Style window for a nice bevel effect.
- With the Layer Style window still open, click Drop Shadow in the left hand option menu. The Drop Shadow options will open. A
drop shadow
gives an image a slight shadow effect, which enhances its 3D appearance.Set the following Drop shadow options:
- Opacity: 75
- Angle: 120
- Distance: 4
- Size: 4
Figure 2-83
shows what the Drop Shadow options look like.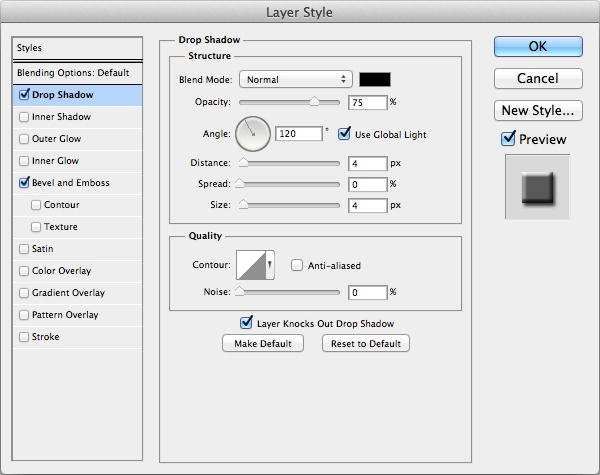
Figure 2-83.
Drop shadow optionsRemember, you can edit these effects at any time by double-clicking the effect name in the Layers panel.
- Opacity: 75
- Click OK in the Layer Style window when you're happy with the way the bevel and drop shadow effects look. When you're finished, your canvas and layers might now look something like
Figure 2-84
.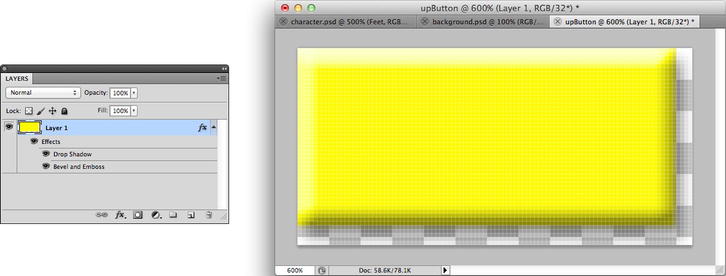
Figure 2-84.
The button so far with the bevel and drop shadow effect - Finally, give the layer a name, perhaps “button background,” and lock the layer to prevent further editing.