Foundation Game Design with ActionScript 3.0, Second Edition (19 page)
Read Foundation Game Design with ActionScript 3.0, Second Edition Online
Authors: Rex van der Spuy

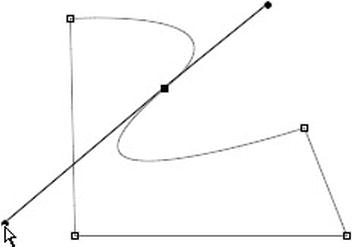
Figure 2-42.
Use the Convert Point Tool to drag and rotate the direction handles independently. This lets you fine tune the curve.
But what if you want to move both the direction handles at the same time again? You can do this with the Direct Selection Tool—the white arrow.
Select the white arrow from the Tools panel. Hold down the Alt key (Windows) or the Option key (OS X) and drag one of the direction handles. You'll see they both start moving together again. Release Alt/Option and you can use the white arrow to move the direction handles independently again (see
Figure 2-43
).

Figure 2-43.
Use the white arrow and hold down Alt (Windows) or Option (OS X) to move both direction handles together.
By using these techniques together, you can have very fine control over the curves of your shapes. Let's put them to use in this next step.
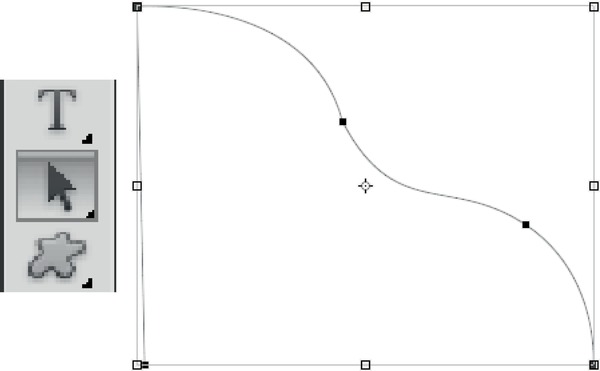
Use the techniques to make your shape look as close as possible to
Figure 2-44
. You want it to look a bit like a ski slope, as seen from the side.

Figure 2-44.
The finished shape path
If you're new to using the Pen Tool and direction handles, you probably won't get this right on your first attempt. In fact, you almost certainly won't. That's nothing to worry about! There's no magic formula for making shapes with curves; you just have to keep playing around with the tools until you're happy with the result. Use the History panel to undo any mistakes. But you can't really go wrong—just keep trying. Be disciplined about following these directions, and you'll soon get the hang of it. It takes a lot of practice to use the Pen Tool properly, but it's one of the most useful and powerful graphic design skills you can learn.
If you've made a path and want to make it bigger or smaller, select the black arrow from the Tools panel. Select the Show Bounding Box in the option bar at the top of Photoshop's workspace. Click on the finished path you've drawn with the black arrow. You'll see that it's surrounded by a bounding box with handles on the corners. Drag these handles to resize the path so that your shape is as large or small as you want it to be.
Figure 2-45
illustrates this.

Figure 2-45.
Use the black arrow to resize the path.
For the purpose of this project, make this path you've drawn quite big.
Resize the path and position it so that it fills the left size of the canvas. Remember to press the Enter key to apply the transformation after you've finished resizing and positioning it. Your canvas should now look similar to
Figure 2-46
.

Figure 2-46.
Resize and position the path.
The path you've just drawn represents the outline of the shape you want to make, but it's not going to be useful to you as a game graphic until you fill it with color. The Paths panel to the right of the Photoshop workspace lets you do this.
For this next trick to work, the path you drew in the previous section needs to be selected with the black arrow tool. Click on it once with the black arrow to select it. You can tell it's selected because the shape path will be surrounded by a black bounding box with drag handles on the corners, as shown in
Figure 2-47
.

Figure 2-47.
Make sure the shape path is still selected with the black arrow tool.
Before you can successfully apply a color to the path, there's one more important setting you need to make. With the black arrow tool still selected, click the “Add shape to area (+)” button in the Options bar at the top of Photoshop's workspace.
Figure 2-48
shows you where to find it. If this button isn't selected, the following steps won't work properly. It's this button that will allow you to fill the inside area of the shape path with color. (If the button is dimmed and you can't click it, it means that you didn't first select the path with the black arrow. Click the path with the arrow so that it's selected and try again.)

Figure 2-48.
Click the “Add shape to area (+)” button in the black arrow options.
Next, choose a color for your shape. Select a nice bright green color in the foreground color box in the Tools panel (
Figure 2-49
), using the techniques you learned earlier in this chapter.

Figure 2-49.
Select a green foreground color.
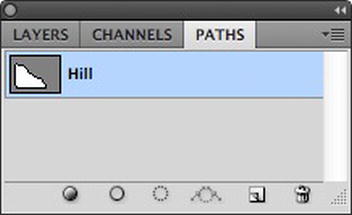
Open the Paths panel, which you'll find as a tab option in the same window that contains the Layers panel. As you can see in
Figure 2-50
, you'll find a small thumbnail image of the path that you just drew with some buttons along the bottom. Those buttons let you fill the path with color, outline it with a brush stroke, turn it into a selection, or delete it. If you give the path a unique name, Photoshop automatically saves the path with the document so that you can reuse it somewhere else if you ever need to. I've named my path “Hill.”

Figure 2-50.
The Paths panel lets you fill a path with color.
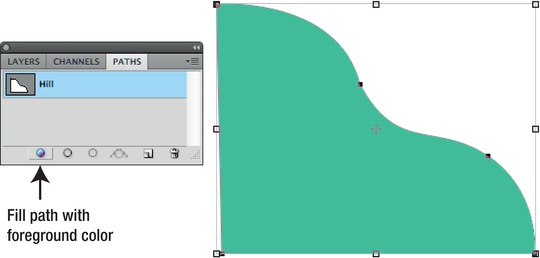
Click the Fill path with foreground color button at the bottom of the Paths panel. The shape path will be filled with the green foreground color, as shown in
Figure 2-51
.

