Foundation Game Design with ActionScript 3.0, Second Edition (27 page)
Read Foundation Game Design with ActionScript 3.0, Second Edition Online
Authors: Rex van der Spuy

Copy the following code into the ActionScript editor widow.
package
{
  import flash.net.URLRequest;
  import flash.display.Loader;
  import flash.display.Sprite;
  import flash.events.MouseEvent;
  [SWF(width="550", height="400",
    backgroundColor="#FFFFFF", frameRate="60")]
  public class GameWorld extends Sprite
  {
    public function GameWorld()
    {
      trace("This is the game world!");
    }
  }
}
Confirm that your editor window looks like
Figure 3-6
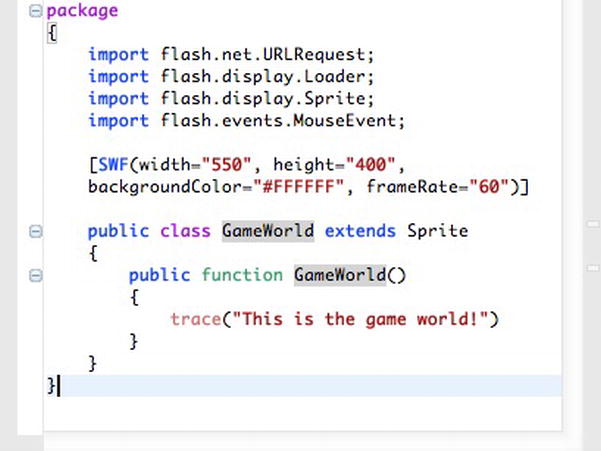
Figure 3-6.
The start of the program
Compile the program. In Flash Builder, that means hit the debug button. (If you're using Flash Develop, select Project![]() Test Movie.) You should see a blank Flash Player window and the trace message “This is the game world!”. If you didn't see this or received some error messages, double check that you haven't mistyped anything and compare your work against the file in the GameWorldSetup project folder in the chapter's source files.
Test Movie.) You should see a blank Flash Player window and the trace message “This is the game world!”. If you didn't see this or received some error messages, double check that you haven't mistyped anything and compare your work against the file in the GameWorldSetup project folder in the chapter's source files.
We're now ready to add the meat of our program. But before we do, let's find out what all these new pieces of code to.
You'll notice that the code we wrote is very similar to the code in the HelloWorld program from
Chapter 1
. You should recognize all the main sections: The package, the import statement that loaded the Sprite, the class definition and constructor method. The structure is identical. The only difference is that I've slipped a
bit of new code into the package block. It's important, and it's code you're going to be using for many of the projects in this book, so let's see what it does.
You'll recall from
Chapter 1
that theimportstatement is used to load code from the Library. The Library is a vast, cavernous storehouse of pre-written code that's part of the Flex SDK. You can import any of these bits of code to use in your programs if there are particular tasks that you need your program to do. These “bits of code” are called
classes
. You can always spot a class because its name starts with a capital letter. The HelloWorld program we wrote in
Chapter 1
is a class, and the GameWorld program we're writing in this chapter is also a class.
Our program imports four classes.
import flash.net.URLRequest;
import flash.display.Loader;
import flash.display.Sprite;
import flash.events.MouseEvent;
The last items,Sprite,Loader,URLRequest,andMouseEventare the names of the classes. You'll never see the actual classes themselves, nor do you need to. They're invisibly imported into your program and run in the background. All you need to know are the names of the classes you want to use. Don't worry, I'll keep you posted about exactly what they are and when you'll need them. You'll soon start to recognize the usual suspects.
Preceding the class names are words with dots between them, likeflash.displayandflash.events. These are the folders in the Library where the classes can be found.
These import statements can be in any order you like.
We can see that our program is going to import four classes. Here's what they do:
- Sprite
: Containers that help you control and display your images on the stage. - Loader
: A temporary container that loads your image from your project directory into your AS3.0 program. - URLRequest
: Understands a directory location on your computer, such as ../images/background.png. - MouseEvent
: Code that lets you interact with game objects using the mouse.
All the code that we're going to write in this chapter is going to require the help of these classes.
You'll have noticed that when you compile your programs a blank Flash Player window opens. The Flash Player window has certain properties that you can control. For example, how big you do you want to make it? What should its background color be? How often should it update its display for animations? All of these properties, and quite a few more, are controlled with a
metadata tag
. In our program, this is what it looks like:
[SWF(width="550", height="400",
  backgroundColor="#FFFFFF", frameRate="60")]
It creates a Flash Player window that's 550 pixels wide and 400 pixels high. It fills the Flash Player window with a white background color, and updates it at the rate of 60 frames per second.
Metadata tags are framed with square brackets, like this:
[Anything inside these square brackets is metadata]
In this case, the metadata tag is describing properties of the SWF file that your program will create when you compile it. All the SWF properties, and the values you give them, are contained in the inner parenthesis.
[SWF(set all the swf file properties here)]
Take a good look at the metadata tag. Can you see the four properties it's setting? Here they are:
- width:
How wide the Flash player window should be, in pixels. - height:
The height of the Flash Player window, in pixels - backgroundColor:
The background color of the Flash Player window. The strange string of characters you see here, #FFFFFF, is a
hexadecimal
color code. Hexadecimal codes are a standardized way of describing colors using a combination of letters and numbers. #FFFFFF is the code for white. It's telling the SWF file to display a white background when the Flash Player launches.
A web search for “hexadecimal color chart” will bring up a comprehensive list of colors and their respective hexadecimal codes, and you can also find them in Photoshop's color palette, that we looked at in
Chapter 2
.Here are the codes for a few common colors:
Black: #000000
White: #FFFFFF
Red: #FF0000
Blue:#0000FF
Green: #00FF00
Yellow: #FFFF00
Orange: #FF9900
Violet: #CC33FF
Note: You can shorten black to #000 and White to #FFF. If all 6 characters in the hexadecimal code are the same, you only need to use the first 3 characters.
- frameRate:
How often the SWF display is updated. “60” means that it's updated 60 times per second, or
frames per second
(fps). This determines how smoothly animation is displayed. Any number between 30 and 60 will give you smooth animation for your games. A higher frame rate will make your computer's processor work a little harder to display game animations, but they'll look better. 60 frames per second looks great for Flash games, and it's not too taxing on the CPU.
Try making a few changes to the metadata tag, and you'll immediately see the effect it has on the Flash player. Try changing the values of the properties, shown in bold text, in the metadata tag:
[SWF(width="100", height="200",
backgroundColor="#000", frameRate="60")]
Compile the program again, and you'll see that the Flash Player is now just 100 pixels wide, 200 pixels high, and filled with a black background color, as shown in
Figure 3-7
. Make sure you change it back to its original values when you're done.
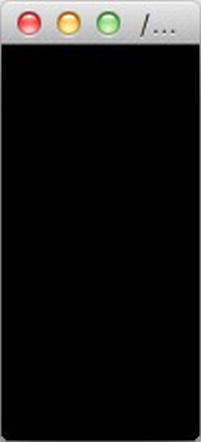
Figure 3-7.
Use a metadata tag to change the properties of the SWF that runs in the Flash Player.
Why did we set the width and height properties to 550 by 400? Because those are exactly the same dimensions as the background.png image file that we created in
Chapter 2
. You could of course use any width and height that you like for your games.
Metadata tags can also be used to embed images, sounds and fonts into your game, and we'll look at some of these uses of metadata tags later in the book. However, this SWF metadata tag, that we've just looked at, will be a standard fixture of all the programs we'll write, and you probably won't need to change any of its properties.
Always make sure that the SWF metadata tag comes directly after the import statements and just before the class definition. This is the only place in the program where it will work properly.
We're now ready to load our first image, background.png, into our program. Let's add the new code to our program to see if it works. I'll explain each detail of the code in the pages ahead.
Add the following in bold text to the GameWorld.as file (your ActionScript editor window will look like
Figure 3-8
when you're done. Note that the originaltracedirective has been removed.):
package
{
  import flash.net.URLRequest;
  import flash.display.Loader;
  import flash.display.Sprite;
  import flash.events.MouseEvent;
  [SWF(width="550", height="400",
    backgroundColor="#FFFFFF", frameRate="60")]
  public class GameWorld extends Sprite
  {
    //Declare the variables we need
    public var backgroundURL:URLRequest;
    public var backgroundLoader:Loader;
    public var background:Sprite;
    public function GameWorld()
    {
      //Add the background to the stage
      backgroundURL = new URLRequest();
      backgroundLoader = new Loader();
      background = new Sprite();
      backgroundURL.url = "../images/background.png";
      backgroundLoader.load(backgroundURL);
      background.addChild(backgroundLoader);
      stage.addChild(background);
    }
  }
}
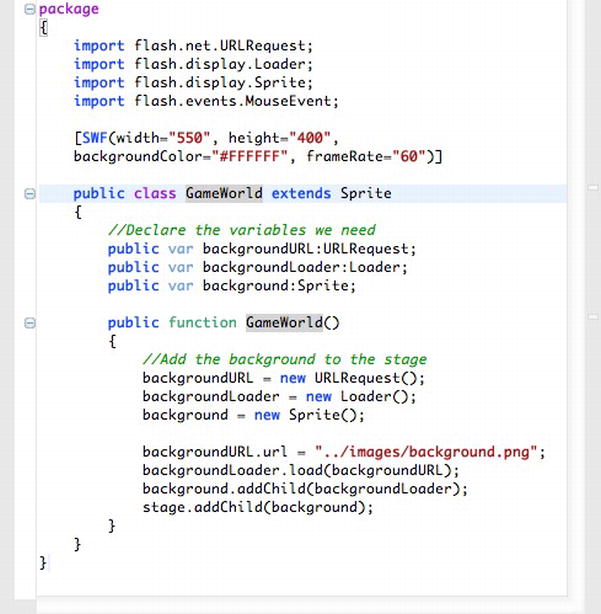
Figure 3-8.
Add new code to the program.
Remember that any lines of code that begin with a double forward slash, //, are comments. They aren't part of the program, they're just notes about what the code does. You don't have to include the comments in the program – they won't affect how it runs at all.
Compile the program. If background.png file is in the correct folder in the project directory, and you've copied the code exactly as it appears here, you'll see the Flash Player open and display the background image, as shown in
Figure 3-9
.