Foundation Game Design with ActionScript 3.0, Second Edition (26 page)
Read Foundation Game Design with ActionScript 3.0, Second Edition Online
Authors: Rex van der Spuy

Figure 2-90.
Hide all the text except for “down.”
Select File Save for Web and Devices. The PNG-24 option should already be set. Click the Save button.
Choose a save location and give the new file the name “downButton.” Follow the same lowerCamelCase naming convention. Click the Save button to create the PNG file.
Do you see a pattern developing here? You should! Follow the same system for creating button PNG files for the four remaining button labels. Save the PNG files with the names “grow.png,” “shrink.png,” “vanish.png,” and “spin.png.”
When you're finished, you should have the “buttons.psd” file and the six PNG files saved somewhere on your computer.
You did a lot of work in this chapter! Before you go any further, double check to make sure that you've got the following files saved somewhere on your computer:
- A file called background.psd and its accompanying PNG file called background.png.
- A file called character.psd and its accompanying PNG file called character.png.
- A file called buttons.psd and its six accompanying PNG files called up.png, down.png, grow.png, shrink.png, vanish.png, and spin.png.
The PNG files are the most important of these because you're going to use them in the next chapter to make an interactive game world with AS3.0 programming code.
Figure 2-91
shows what the PNG files should look like and what their file names should be.

Figure 2-91.
The PNG files you produced by the end of this chapter
If your files match this, you're all set to go to start programming in
Chapter 3
!
There's much more to learn about Photoshop; what you've covered in this chapter really just scratches the surface. You've looked at most of the important techniques you need to know to start making professional-looking game graphics, and these skills may be all you need. But there's more to learn if you're curious'which you should be! The best place to start is probably Adobe's excellent document,
Using Photoshop
. You can download it as a PDF file from
http://help.adobe.com/en_US/photoshop/cs/using/photoshop_cs5_help.pdf
(The latest version, at time of publication, was for Photoshop CS5. Search Adobe's site if you're looking a version of the document that matches the version of Photoshop you're using.)
Using Photoshop
goes into exhaustive detail about all of Photoshop's many features, including painting and image editing which I don't have space to cover in this book. If you have any detailed questions about any aspect of how Photoshop works or what it can do, you'll find it in this document.
You'll also find many more help resources at Adobe's Photoshop's help site, including an HTML version of the same document, at
http://help.adobe.com/en_US/photoshop/cs/using/index.html
If you've worked through this chapter, you'll be able to make good use of all these resources and be well on your way to becoming a Photoshop expert.
If you're new to making computer graphics, I hope you enjoyed this chapter on how to draw basic game objects and characters. Photoshop's drawing and design tools give you a great deal of control and are very easy to use with a bit of practice. For designing game characters and environments, they're ideal.
I covered quite a lot of new material very quickly, so if this is your first time using Photoshop, you might want to take a short break and experiment further. Create a new blank PSD file and create a few objects and characters. You'll soon become comfortable with it and, if you're like me, Photoshop will soon become your favorite drawing application.
Chapter 7
will introduce an alternative graphics and illustration application, Adobe Illustrator, which is just as much fun to use.
In this chapter, you made some basic game graphics. In the next chapter, you'll bring these graphics to life with a bit of simple programming magic.

Programming Objects
In
Chapter 2
, you created a game character, a game world background, and some buttons. This chapter shows you how to use AS3.0 programming code to start programming those images. Make them do something useful!
This chapter covers some very important AS3.0 programming concepts and techniques:
- How to load image files into the Flash Player
- How to position objects on the stage
- What variables are and how to use them
- Variable types
- How to make objects that you can target with programming code
- Dot notation
- Method calls and function definitions
- Method arguments and parameters
- Event listeners
- How to program buttons to control objects on the stage.
After you finish the chapter, you'll have a completely interactive game character that you control by clicking buttons.
Figure 3-1
shows what you'll be able to make.

Figure 3-1.
Control a game character with buttons.
Although I'll introduce a lot of important programming theory in this chapter, the most important thing you should come away with is how the programming code you type in the ActionScript editor window changes the behavior of the objects on the stage. The theory is important, but if you don't understand it all right away, don't worry. It takes a lot of practice for this stuff to sink in. We're going to look at many practical examples and you'll have ample opportunity to try out your new skills. Just take it slowly, and don't jump ahead until you feel ready.
Just as having a general idea of how the engine of a car works is a good idea for any driver, you don't have to become a mechanical engineer if all you want to do is drive a car. You can always come back to this theory later if you have some specific questions about how some detail of the code works. If you generally understand how the code you type affects the objects on the stage and can use that code with confidence in your projects, you're more than in the game.
Always remember that programming is a creative tool to help you express yourself, just as a paintbrush is a creative tool for an artist. It can help create the painting, but is of no use at all without the imagination of the artist—you!
This is really a two-part chapter. In the first part, I'm going to show you how to load images from a file and display them in the Flash Player. In the second part I'm going to show you how to program your objects to bring them to life.
So how do we get our images that we created in
Chapter 2
and display them in the Flash Player?
Before we start any programming, let's look at the problem we have to solve.
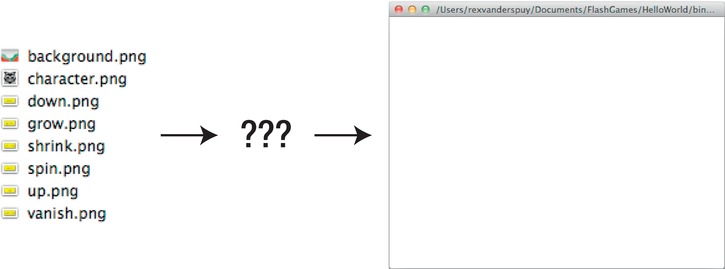
Somewhere on your computer you've got some PNG files that you want to display in the Flash Player window. How do we get them from the folder where they're sitting into the Flash Player?
Figure 3-2
illustrates our conundrum.

Figure 3-2.
How do you load image files into the Flash Player?
It turns out to be a four-part problem:
First, we need to know the location on your computer where the image is stored, and get its address.
Next, you need to send the image's location address to something called a
loader
. A loader is a temporary container that uses the address to load files from anywhere on your computer into your program.
After an image is in the loader, the next step is to copy it into a Sprite. Remember sprites? We talked a bit about them in
Chapter 1
. Sprites make game magic, and they're going to be at the heart of your games. You can think of a sprite as a box that contains your image and knows how to talk to the rest of the game. When an image is copied into a Sprite, you can attach AS3.0 programming code to it so that you can completely control its behavior in the Flash Player.
The last step is to add the Sprite to the
stage
. The stage is what you've seen as the blank Flash Player window. The stage is where all the action happens. You won't be able to see any of your game sprites until you add them to the stage.
So first you need to get the image's address, retrieve the image with a loader, copy it into a Sprite, and finally add it to the stage. We're going to do all this next with AS3.0 code.
Figure 3-3
illustrates this basic concept.

Figure 3-3.
The general process of loading and displaying images in the Flash Player
Sprites are what you'll be using for most of the projects of this book, but you should also know that there are two other options. After an image is loaded, you can also copy it into a MovieClip or a Bitmap. We won't be looking at Bitmap objects in this book, but you can find out all about MovieClip objects in the download chapter “Using Flash Professional and Publishing Your Games.” MovieClip objects are identical to Sprites, with the one addition that they can contain pre-planned scenes of animation.
Before we start programming, we're going to create a new AS3.0 project and copy the image files we created in
Chapter 2
into its project directory.
Create a new ActionScript project in your IDE, either Flash Builder or Flash Develop, and give it the name “GameWorld” Refer back to
Chapter 1
if you're a bit hazy about how to create AS3.0 projects. If you're using Flash Builder, you'll have a project directory that looks similar to
Figure 3-4
.
Note: Alternatively, if you're using Flash Builder, you can import the GameWorldSetup folder from this chapter's source files. This contains the basic setup files that we're going to use to start this project, including all the example images. To import a project into Flash Builder, select File Import Flash Builder Project from Flash Builder's main menu. Select Project folder from the new window that opens. Browse to the folder, select it, and click the Open button. Click Finish in the import window to load the project.
However, resist the temptation to do this! At this stage of your learning, you need the practice of methodically typing out code by hand. It's the best way to get under the skin of the code and start developing a relationship with it. You'll also certainly make a few small mistakes while you type it out, and you're going to need to learn what those mistakes are and how to fix them.

Figure 3-4.
Your default project directory when you create a new ActionScript project with Flash Builder
In the GameWorld folder, create a new subfolder called images. Copy all the PNG files that you made in
Chapter 2
into this new images folder. Your GameWorld project folder should now look like
Figure 3-5
. Take care that your PNG image files have exactly the same names as you see them here, otherwise the steps ahead won't work.

Figure 3-5.
Create an images folder and copy the PNG files into it.
We're now ready to start adding some programming code. The job of this first bit of code is just to set up the program with some basic settings so that we're ready to start working. You won't understand any of it yet, but you will in just a few short pages from now. Type out the code blindly for the moment, and I'll explain everything ahead.
