Foundation Game Design with ActionScript 3.0, Second Edition (25 page)
Read Foundation Game Design with ActionScript 3.0, Second Edition Online
Authors: Rex van der Spuy

Your button is almost finished; all you need to do next is add some text.
Photoshop's Type tools are extremely easy to use. You're going to use the Horizontal Type Tool to add the word “up” to the button.
Select the Horizontal Type Tool from the Tools panel. The Options bar lets you choose the font, size, and color. Choose a nice large font and make sure it's black. (The default color will be the same foreground color that you just used, so you'll need to change it if you want to see the text against the button background.)
If you ever need to add text that runs vertically down the canvas, select the Vertical Type Tool.
Click the canvas and type the word “up.” As soon as you click the canvas to add text, Photoshop creates a new layer for you automatically. Use the Move Tool to position the text to the centre of the button.
Figure 2-85
shows what my button looks like and the text options I used.

Figure 2-85.
Set the Type Tool options and add some text to the button.
When you add text to the canvas, Photoshop automatically creates a new layer for it with the same name as the text you wrote. However, this will only happen if you switch tools, like selecting the Move Tool, before adding some more text. If you don't switch tools, Photoshop will add the new text to the same layer. In that case, create the new layer manually by selecting the Create new layer button at the bottom of the Layers panel.
That's one button finished. Now let's make the rest of them.
You need to make six buttons in total. You need buttons with the labels “up,” “down,” “grow,” “shrink,” “vanish,” and “spin.” They'll all look exactly the same; the only change will be the text. You could make all these buttons as individual PSD files. That's fine, but you'll then end up with six different Photoshop files to manage, as well as the six accompanying PNG files. There's a way to simplify this a bit.
I'm going to show you a well worn trick to keeping all the buttons in one PSD file. You'll then use that one PSD file to make the six different PNG files that you'll need—one for each button.
It works like this: The button background will be on the bottom layer. You'll then have six text layers above the background, each with different button label text. All the text layers will be hidden using the eye icon, except for one of them. That means only one button label will be visible at any one time. You'll then create that button's PNG file using the button background and the single visible text label. After that PNG file has been made, you'll hide the visible text and display the next label on the layer above. You'll then use that state to make the next button PNG file.
It's easier to understand this when it's put in practice, so let's get to work!
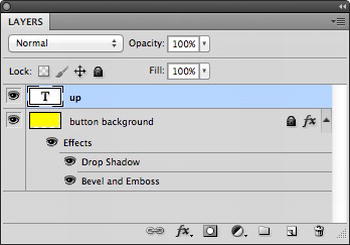
First, make sure that your layers looks similar to mine in
Figure 2-86
. You should have one text layer above the button background and the button background should be locked.

Figure 2-86.
Your button layers so far
Click the eye icon next to the “up” layer to hide it. The text will disappear from the canvas.
Select the Horizontal Type Tool and type the word “down” on the Canvas. Your canvas and layers should now look similar to
Figure 2-87
.

Figure 2-87.
Add new next above the hidden layer.
If you want to make sure that you align the new text correctly, temporarily make the “up” layer visible and position the “down” text directly above it. Make the up layer invisible again when you're done.
Next, hide the “down” layer that you just created so that the text disappears from the canvas.
Select the Horizontal Text Tool again and type the word “grow” on the canvas. Your canvas and layers should now look similar to
Figure 2-88
.

Figure 2-88.
Add another layer of button text, which should be the only one visible.
Do you see a pattern developing? All the button labels will be added like this, but only one will be visible at any given time. Keep doing this till you've added the text for all the buttons you need.
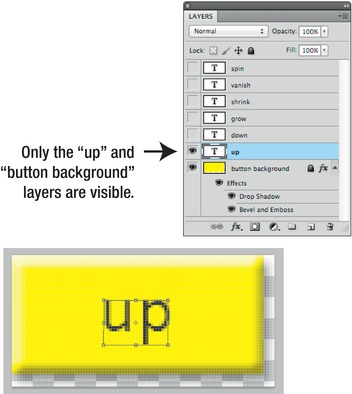
Add more text layers for the words “shrink,” “vanish,” and “spin.” When you're done, make all the layers invisible except the “up” layer and the “button background” layer. Your finished layers and canvas should now look like
Figure 2-89
.

Figure 2-89.
Your finished buttons
You now have one Photoshop document that contains all the graphics you need to make your buttons. First, save it in PSD format so you don't accidentally lose all your hard work. Select File Save As from the main menu. Find a convenient location to save this file.
You can now use this file to make six PNG files, one for each button. Start with the “up” button.
Select File Save for Web and Devices. Set the Preset option to PNG-24.
If for some reason the “Save for Web and Devices” option is dimmed and you can't select it, you might be accidentally working in 32-bit color mode. Select Image Mode and choose either the 16bits/channel option or 8bits/channel. Photoshop will then ask you if you wish to merge the layers—don't do this! Merging layers compresses all your layers into one, which makes it impossible to selectively hide and display them. Click the Don't Merge button. The “Save for Web and Devices” option will now be available again.
Click the Save button and name the PNG file “upButton.” Make sure the “u” is lowercase, the “B” is upper case, and that there is no space between the words. This is an example of the lowerCamelCase naming convention that you looked at in
Chapter 1
. From now on, you're going to use this naming convention for all the images you make in this book.
Photoshop's main workspace will now be visible again. Hide the “up” layer by clicking the eye icon next to it.
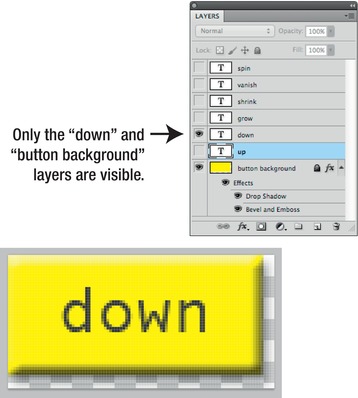
Make the “down” layer visible by clicking its eye icon. You should now just see the text “down” over the button background, as shown in
Figure 2-90
.

