Foundation Game Design with ActionScript 3.0, Second Edition (67 page)
Read Foundation Game Design with ActionScript 3.0, Second Edition Online
Authors: Rex van der Spuy

Now add some rivets in the box's corners.
- Select the Ellipse Tool from the Tools bar. It's part of the same button set as the Rectangle Tool. Give it a dark green fill color.
- While holding down the Shift key, click and drag to draw a small circle in the outer square's top left corner.
Figure 2-21
illustrates this. Holding down Shift while drawing with the Ellipse Tool lets you makes perfect circles.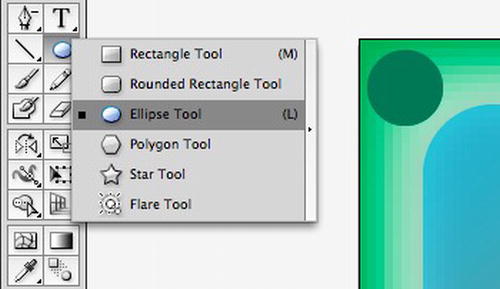
Figure 7-21.
Draw a circle in the top left corner. - Use your newly acquired gradient skills to fill the dark green circle with a linear gradient. It should be dark at the top and light at the bottom. Your final result should look something like
Figure 7-22
.
Figure 7-22.
Draw a circle in the top left corner. - Draw a smaller dark green circle inside the first circle, as shown in
Figure 7-23
.

Figure 7-23.
Add a smaller circle.
If you ever need to perfectly align two or more objects, you can use Illustrator's Alignment buttons. To use them, hold down Shift and click on all the objects you want to align with the black arrow. Alignment buttons will appear in the Control Panel at the top of the workspace. Click any of the buttons, and you'll see your objects magically align in the proper positions.
If you need to center a smaller object inside a bigger object, as you do to make these rivets, make sure both circles are selected and click the Horizontal Align Center button and then the Vertical Align Center button.
Make a few more copies of this rivet for the other three corners.
- Holding down the Shift key while clicking with the black arrow lets you select multiple objects. Select both the inner circle and the outer circle together. You'll know that you've done this correctly if you see blue bounding boxes appear around both circles, as shown in
Figure 7-24
.
Figure 7-24.
Hold down the Shift key and click to select multiple objects. - Select Object
 Group from the main menu. Grouping objects lets you treat multiple objects as one. It means that you can move, copy, and paste a group of objects around the artboard, and they'll stay together as a single unit. You can edit individual units in the group by double-clicking on them. You can ungroup objects by selecting ObjectUngroup.
 - Now that the two circles are grouped as one unit, select EditCopy (or use the keyboard shortcuts: Ctrl+C for Windows, Command+C for OSX). Select EditPaste in Front (or the shortcuts: Ctrl+F for Windows, Command+F for OSX). This makes a duplicate of the group and pastes it directly on top of the original.
- Move the duplicated group to the square's top right corner, as shown in
Figure 7-25
.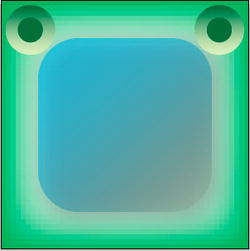
Figure 7-25.
Duplicate the grouped circles with the Copy/Paste In Front command and move the new copy to the square's top right corner. - Use Paste In Front two more times, and move the duplicated rivets to the square's bottom corners, as shown in
Figure 7-26
.
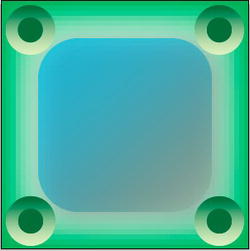
Figure 7-26.
Make two more copies of the rivets and move them into position.
Your all-purpose video game box is now finished!
However, you've been doing all your drawing using vectors. The final PNG image that you're going to use in the game will be made out of pixels. What will this look like? To find out, select View![]() Pixel Preview from Illustrator's main menu. You'll see exactly what the pixels in your 50 by 50 pixel game box will look like, as you can see in
Pixel Preview from Illustrator's main menu. You'll see exactly what the pixels in your 50 by 50 pixel game box will look like, as you can see in
Figure 7-27
.