Windows Server 2008 R2 Unleashed (82 page)
Read Windows Server 2008 R2 Unleashed Online
Authors: Noel Morimoto

➥WAS-ProcessModel;WAS-NetFxEnvironment;WAS-ConfigurationAPI
Alternatively, the following syntax can be used to install all of the IIS 7.5 features and
functionality:
388
CHAPTER 12
Internet Information Services
start /w pkgmgr /iu:IIS-WebServerRole;IIS-WebServer;IIS-CommonHttpFeatures;
➥IIS-StaticContent;IIS-DefaultDocument;IIS-DirectoryBrowsing;
➥IIS-HttpErrors;IIS-HttpRedirect
start /w pkgmgr /iu:IIS-ApplicationDevelopment;IIS-ASPNET;
➥IIS-NetFxExtensibility;IIS-ASP;IIS-CGI;IIS-ISAPIExtensions;
➥IIS-ISAPIFilter;IIS-ServerSideIncludes;IIS-HealthAndDiagnostics;
➥IIS-HttpLogging;IIS-LoggingLibraries;IIS-RequestMonitor;IIS-HttpTracing;
➥IIS-CustomLogging;IIS-ODBCLogging;IIS-Security;IIS-BasicAuthentication
start /w pkgmgr /iu:IIS-WindowsAuthentication;IIS-DigestAuthentication;
➥IIS-ClientCertificateMappingAuthentication;
➥IIS-IISCertificateMappingAuthentication;IIS-URLAuthorization;
➥IIS-RequestFiltering;IIS-IPSecurity
start /w pkgmgr /iu:IIS-Performance;IIS-HttpCompressionStatic;
➥IIS-HttpCompressionDynamic;IIS-WebServerManagementTools;
➥IIS-ManagementConsole;IIS-ManagementScriptingTools;
➥IIS-ManagementService;IIS-IIS6ManagementCompatibility;IIS-Metabase;
➥IIS-WMICompatibility;IIS-LegacyScripts;IIS-LegacySnapIn;
ptg
➥IIS-FTPPublishingService;IIS-FTPServer;IIS-FTPManagement;
➥WAS-WindowsActivationService;WAS-ProcessModel;WAS-NetFxEnvironment;
➥WAS-ConfigurationAPI
Upgrading from Other Versions of IIS
In many situations, a fresh installation of IIS 7.5 and Windows Server 2008 R2 will not
occur because organizations might want to preserve the existing IIS settings and content.
Therefore, organizations must upgrade their existing IIS infrastructure to IIS 7.5. With the
upgrade of the previous version of Windows to Windows Server 2008 R2, IIS is also auto-
matically upgraded, allowing web content to be preserved, translated, and, finally, transi-
tioned. However, you should note early in the process that Windows Server 2008 R2 only
supports a direct upgrade path from Windows Server 2008 and Windows Server 2003,
which means only an in-place upgrade from IIS 6.0 or IIS 7.0 is supported. Likewise, if
legacy versions of IIS need upgrading such as IIS 5.0, you must first upgrade the operating
system to Windows Server 2003 and then to Windows Server 2008.
NOTE
IIS 7.5 no longer uses a metabase as in IIS 6.0. The IIS 7.5 XML configuration files
replace the legacy IIS 6.0 metabase.
The upgrade process for IIS is conducted in three major phases. In the first phase, the new
operating system detects and performs an inventory of IIS components and features
already installed on the operating system. The second phase of the upgrade process
Installing and Configuring Websites
389
involves upgrading the legacy operating system to Windows Server 2008 R2. After the
Windows Server 2008 R2 upgrade is complete, the final phase kicks in and automatically
translates the IIS 6.0 metabase information gathered in the first step, upgrades the legacy
IIS metabase to IIS 7.5, and installs the appropriate IIS 7.5 features.
NOTE
12
For more information on how to upgrade a system to Windows Server 2008 R2, see
Chapter 3, “Installing Windows Server 2008 R2 and Server Core.”
As is typically the case with most revised products, Windows Server 2008 R2 IIS is inher-
ently superior to its previous versions. In particular, it lays claim to being more secure.
This is witnessed during upgrades of websites to IIS 7.5. Website services are stopped after
the upgrade and must be manually restarted, thus minimizing IIS security vulnerabilities
due to previous Windows defaults. To allow for more clarity, suppose you have a Windows
server with IIS installed, but it isn’t supposed to be serving as a web server; the server will
be more secure by default after you upgrade to IIS 7.5 because it will not be turned on
automatically and made a subject for attacks.
Another appealing reason for upgrading from previous versions of IIS is that the IIS 7.5
ptg
installation process is granular and modularized. After upgrading, it is best to only install
the features you require to reduce the surface area utilized. With that said, be aware that
after upgrading to IIS 7.5, a majority of the web server features are installed right out of
the gate as many legacy versions were not granular.
Installing and Configuring Websites
As mentioned earlier, IIS can support thousands of websites on a single web server. The
number of websites that you have depends on the way the system is configured, including
the number of processors, the amount of RAM, bandwidth, and more. For every website
that the system supports for the Internet, there must be a public IP address and registered
domain name. However, if you have only one public IP address and you want to support
other websites, you can also create virtual directories or leverage host headers to have
those sites serving users on the Internet.
Creating a Website with IIS 7.5
The Default Web Site is located within the Web Sites folder in the IIS snap-in. You can use
the Default Web Site to publish content, but it is possible to create and configure a sepa-
rate website.
To begin creating a new website, do the following:
1. In Internet Information Services (IIS) Manager, right-click on the Sites node in the
Connections pane, and click Add Web Site.

390
CHAPTER 12
Internet Information Services
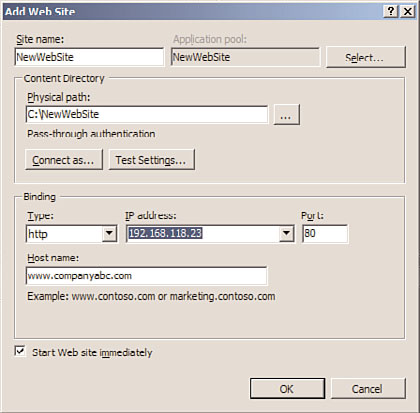
2. The Add Web Site page is opened; enter a website name such as NewWebSite.
3. If desired, click the Select button in the Application Pool section to modify the
Application Pool settings for this new site. The default application pool drop-down
option available is DefaultAppPool.
4. In the Content Directory section, enter the physical path to where the Web Sites
folder resides. Alternatively, navigate to the folder by clicking the ellipses button.
NOTE
A user can also choose a remote share when providing the location of the content
directory’s physical path. If a remote share is used, you must ensure IIS has access to
that folder by clicking the Connect As button and specifying connectivity to the remote
share by choosing a specific user account that has appropriate permissions or you can
select the Pass-Through Authentication option.
5. You must now specify whether this new site will use HTTP or HTTPS, provide an IP
address to the new site or leave the IP Address setting unassigned, and indicate
which port this new site will listen on. These settings are configured in the Binding
ptg
section of the Add Web Site page.
6. An optional setting can be configured before completing the page. A user can enter a
host header for the new site, such as www.companyabc.com.
7. Check the option to start the website immediately.
8. Review all the configuration settings inputted, as illustrated in Figure 12.5, and then
click OK to finalize the creation of the new website.
FIGURE 12.5
Reviewing the settings in the Add Web Site dialog box.

Installing and Configuring Websites
391
Creating a Virtual Directory
Virtual directories extend the home directory of your website by providing an alias linking
another directory not contained within the home directory. This alias will appear to users
as simply a subfolder to the website even though it might be located on an entirely differ-
ent server.
12
The virtual directory can contain documents and other information for the website as well
as a new website. For example, if CompanyABC’s website (www.companyabc.com) wants
to host a temporary website for another organization, it could use a virtual directory to
contain the website. In this scenario, CompanyXYZ would have its own website located at
www.companyabc.com/companyxyz/. You must have Web Server Administrator, Web Site
Administrator, or Web Applications Administrator privileges to create a virtual directory.
To create a virtual directory using the IIS Manager, do the following:
1. Select Start, All Programs, Administrative Tools, Internet Information Services (IIS)
Manager.
2. In the Connections pane, expand the IIS server, and then expand the Sites node
within the tree.
3. Select the desired website that will contain the new virtual directory. Right-click the
ptg
website, and select Add Virtual Directory.
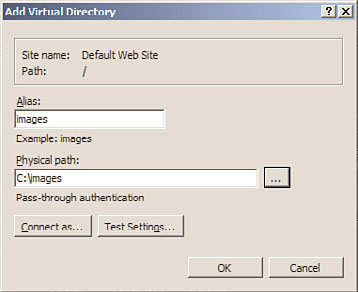
4. Enter the virtual directory’s alias, such as Images.
5. Enter the physical path to the content folder of the virtual directory, or alternatively,
navigate to the folder by clicking the ellipses button.
6. Review the settings, as displayed in Figure 12.6, and click OK to finalize the creation
of the virtual directory.
FIGURE 12.6
Add Virtual Directory dialog box.
392
CHAPTER 12
Internet Information Services
NOTE
If the content folder specified is a remote share, click Connect As and enter credentials
for an account that has permissions to access the remote share. Alternatively, select
the application user (Pass-Through Authentication) option.
Configuring IIS 7.5 Website Properties
In the not-so-distant past, right-clicking a website or default website in IIS Manager and
then selecting Properties gave you options for modifying the default settings and proper-
ties for a website. This is no longer the case as the property pages and tabs have been over-
hauled in IIS 7.5. In their place are feature icons in the central pane and tasks in the
Actions pane. For simplicity, this section describes only the feature icons–associated prop-
erties pages in IIS 7.5.
The Features View tab is located in the Central Details pane. Some of the feature icons are
connected to this tab for the purpose of configuring properties associated with a website.
From here, you can control everything associated with application development, HTTP
features, health, diagnostics, performance, and security. These options are as follows:
ptg
. IIS 7.5 Features Associated with ASP.NET
. IIS 7.5 Features Associated with IIS
. Management Features
IIS 7.5 Features Associated with ASP.NET
The following bullets highlight the feature icons and respective configuration pages associ-
ated with an ASP.NET configuration:
.
.NET Authorization Rules feature page—
Use this page to control access to a
website and application by configuring Allow and Deny rules and specifying users,
roles, and user groups.
.
.NET Compilation feature page—
Use this page to configure ASP.NET configura-
tion settings. Settings are configured based on the following high-level elements:
Batch, Behavior, General, and Assemblies.
.
.NET Error Pages feature page—
This page is used to configure HTTP error
responses for when an error occurs on a website or application.
.
.NET Globalization feature page—
This page controls international settings
tailored toward local language and cultural environments. As the world converges
and the global climate is getting smaller, this is a great feature to leverage to trans-
late and format content by reutilizing the existing code and automatically present-
ing it to different geographical locations.
