Windows Server 2008 R2 Unleashed (246 page)
Read Windows Server 2008 R2 Unleashed Online
Authors: Noel Morimoto

specific folder on a local volume is selected, this offers no automated offsite backup. Using
a shared network folder can enable offsite backup if the destination system is located in a
ptg
remote data center, and the backup window and bandwidth between the sites can tolerate
the over the wire network backup. To select a shared network folder as a backup destina-
tion for a manual backup as an example, perform the following steps:
1. Log on to the Windows Server 2008 R2 system with an account with administrator
privileges.
2. Click Start, click All Programs, click Administrative Tools, and select Windows
Server Backup.
3. In the Actions pane, click on the Backup Once link to start the Backup Once Wizard.
4. On the Select Backup Configuration page, select either the Full Server
(Recommended) option button to back up all of the drives on the Windows Server
2008 R2 system, including the System State, or select the Custom option button to
select specific volumes and include or exclude certain files, folders, or backup items.
For this example, select Full Server (Recommended), and click Next.
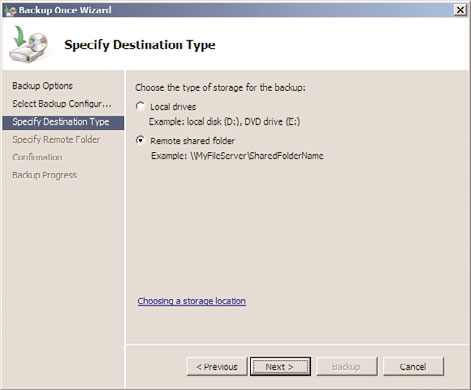
5. On the Specify Destination Type page, select Remote Shared Folder, and click Next,
as shown in Figure 30.5.
6. On the Specify Remote Folder page, type in the UNC path of the remote server
share, and select the Do Not Inherit option button to set the permissions on the
destination folder that will be created and will store the backup.
7. Click Next on the Specify Remote Folder page. A window might open, asking for
credentials to use when connecting to the share. Enter the appropriate username
and password that can create subfolders and write to the share, and click OK.
Using Windows Server Backup
1245
FIGURE 30.5
Selecting to store the backup on a remote shared folder.
NOTE
ptg
If a remote folder is specified as the backup destination, ensure that the folder does
not already contain a WindowsImageBackup folder as the permissions might be over-
written by the new backup. If the permissions are not a worry and will remain as is,
selecting the Inherit option button on the Specify Remote Folder page is preferred.
8. On the Confirmation page, review the settings and click Backup to start the
manual backup.
9. On the Backup Progress page, the progress can be viewed in real time, or the Close
button can be clicked and the progress can be tracked in the tasks pane back in the
Windows Server Backup console. Click Close when the backup completes.
Storing a Backup on DVD
On a Windows Server 2008 R2 system with a local DVD writer drive, backups can be
directed to a DVD for storage. Backups stored on DVD media can be used to restore the
30
entire system or entire volumes; files and folders or any other granular restores cannot be
performed using a DVD backup media.
When an administrator has a DVD backup of a system, it can be used to restore the entire
system, but the Windows Server 2008 R2 bootable installation media must also be avail-
able. With a DVD backup, additional steps and documentation will be required to restore
1246
CHAPTER 30
Backing Up the Windows Server 2008 R2 Environment
a system from a failed state back into operation. As a best practice, whenever a system
contains a DVD writer drive, create a full system backup to DVD upon initial server
deployment and when disks are changed, and create DVD backups regularly.
To create a backup on DVD media, perform the following steps:
1. Log on to the Windows Server 2008 R2 system with an account with administrator
privileges.
2. Click Start, click All Programs, click Administrative Tools, and select Windows
Server Backup.
3. In the Actions pane, click on the Backup Once link to start the Backup Once Wizard.
4. When the Backup Once Wizard opens, select the Different Options option button,
and click Next. Running a manual backup and selecting the Different Options
option is the only way to store a backup on DVD.
5. On the Select Backup Configuration page, select either the Full Server
(Recommended) option button to back up all of the drives on the Windows Server
2008 R2 system or select the Custom option button to select specific volumes, files,
folders, or other backup items. For this example, select Full Server (Recommended),
and click Next.
6. On the Specify Destination Type page, select the Local Drives option button, and
ptg
click Next.
7. On the Backup Destination page, select the DVD drive from the pull-down menu,
check the Verify After Writing (Recommended) check box, and click Next.
8. On the Confirmation page, review the settings and click Backup to start the manual
backup to DVD.
9. On the Backup Progress page, a shadow copy of the volumes is created first. After the
shadow copy is created, a window opens prompting the administrator to insert a
labeled DVD in the drive. Label the DVD with the name presented in the window;
then insert the blank DVD and click OK to continue.
10. If additional DVDs are required, label them and place them in the drive as prompted.
11. Overall backup progress should be viewed in real time, and the window can be
closed after the backup completes.
Managing Backups Using the Command-Line Utility
wbadmin.exe
and PowerShell Cmdlets
Windows Server 2008 R2 systems can use either the Windows Server Backup command-
line tool, wbadmin.exe, or the PowerShell Windows Server Backup cmdlets. The command-
line backup tool used for this example is named wbadmin.exe and can be accessed using a
Command Prompt window. Wbadmin.exe is very functional and can be used to perform
most of the functions available in the GUI.
Managing Backups Using the Command-Line Utility wbadmin.exe and
1247
PowerShell Cmdlets
NOTE
If a full GUI edition of Windows Server 2008 R2 is deployed on the network, the
Windows Server Backup console can be used to remotely manage a Server Core back-
up to keep management simple.
Understanding and becoming familiar and fluent with the command-line options of
wbadmin.exe is very useful for administrators who need to manage Windows Server 2008
R2 Server Core systems or who need advanced automation capabilities. The following
sections detail a few common tasks that can be performed using wbadmin.exe.
Viewing Backup History
To view the backup history of a system, perform the following steps:
1. Log on to the Windows Server 2008 R2 system with an account with administrator
privileges.
2. Open a command prompt.
3.
ptg
Type in wbadmin.exe Get Versions and press Enter to list the backup history.
To perform the same task using Windows PowerShell, perform the following steps:
1. Log on to the Windows Server 2008 R2 system with an account with administrator
privileges.
2. Click Start, click All Programs, click Accessories, click the Windows PowerShell
folder, right-click on Windows PowerShell, and select Run As Administrator.
3. Type cd \ and press Enter.
4. Type Add-PsSnapin Windows.ServerBackup and press Enter.
5. To get the list of all of the available Windows Server Backup PowerShell cmdlets,
type the command Get-Command *wb* -Commandtype cmdlet and press Enter.
6. To get the history list, type Get-WbBackupSet and press Enter.
Running a Manual Backup to Remote Storage Using
wbadmin.exe
Using wbadmin.exe to run backups can be tedious. To understand each of the options
30
available for a manual backup in a Command Prompt window, type wbadmin.exe Start
Backup /? and press Enter. To run a manual backup and store it on a remote server share,
a few options are required. The data will be stored on the remote server share
\\Server30\NetworkBackup, the Bare Metal Recovery item, referred to as the AllCritical
option used in our example, will be selected for backup. This item includes all volumes in
1248
CHAPTER 30
Backing Up the Windows Server 2008 R2 Environment
use by the system, including volumes that contain applications and shared data folders, as
well as the System State. For this example, the companyabc\administrator account will be
used to connect to the remote share. To run the manual backup using the preceding crite-
ria, perform the following steps:
1. Log on to the Windows Server 2008 R2 system with an account with administrator
privileges.
2. Open a command prompt.
3. Type wbadmin.exe Start Backup –backuptarget:\\Server2\NetworkBackup
–AllCritical -user:companyabc\administrator –password:My$3cretPW! and press
Enter to start the backup.
4. The backup window will state that the network share cannot be securely protected,
press Y, and then press Enter to allow the backup to run to this network share.
5. The backup progress will be detailed in the Command Prompt window. After the
backup completes, type exit to close the Command Prompt window.
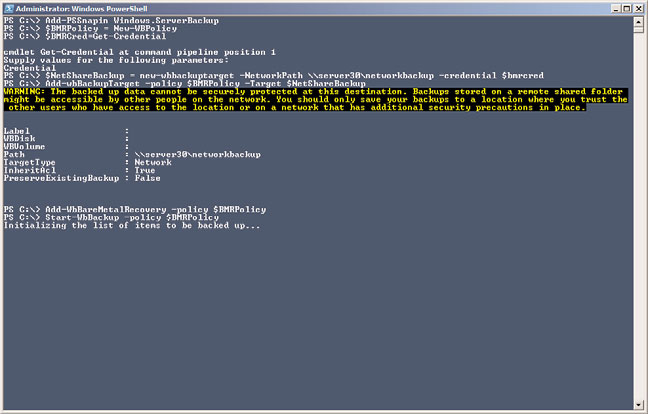
To perform the previous backup task using Windows PowerShell is a much more detailed
task and requires several steps to make this work. To perform a manual backup to a
network share capable of Bare Metal Recovery, perform the following steps:
1. Log on to the Windows Server 2008 R2 system with an account with administrator
ptg
privileges.
2. Click Start, click All Programs, click Accessories, click the Windows PowerShell
folder, right-click on Windows PowerShell, and select Run As Administrator.
3. Type cd \ and press Enter.
4. Type Add-PsSnapin Windows.ServerBackup and press Enter.
5. Type $BMRPolicy=New-WbPolicy and press Enter.
6. Type $BMRCred=Get-Credential and press Enter.
7. A Windows dialog box opens; enter the username and password combination that
will be used to connect to the network share, and click OK to save the credentials
and return to the PowerShell window.
8. Back in the PowerShell window, type $NetShareBackup=New-WbBackupTarget
–NetworkPath \\Server30\NetworkBackup -Credential $BMRCred and press Enter.
9. Type Add-WbBackupTarget –policy $BMRPolicy –Target $NetShareBackup and
press Enter.
10. Type Add-WbBareMetalRecovery –policy $BMRPolicy and press Enter.
11. Type Start-WbBackup –policy $BMRPolicy and press Enter. The backup should start,
as shown in Figure 30.6.
Backing Up Windows Server 2008 R2 Role Services
Many Windows Server 2008 R2 role services store configuration and status data in separate
files or databases located in various locations on the boot volume. If a scheduled backup is
configured to run a full backup or a Bare Metal Recovery backup, this includes all boot,
Backing Up Windows Server 2008 R2 Role Services
1249
FIGURE 30.6
Running a manual backup to a network share using PowerShell.
ptg
system, and data volumes used by the system as well as any application data and the
System State necessary for a complete PC restore. A few services also provide alternative
backup and restore options, and should be leveraged to provide additional recovery
options in the event of a service failure, as opposed to a full system failure.
Backing Up the System State
The System State of a Windows Server 2008 R2 system contains, at a minimum, the
system Registry, boot configuration files, system files that are protected by Windows File