Windows Server 2008 R2 Unleashed (249 page)
Read Windows Server 2008 R2 Unleashed Online
Authors: Noel Morimoto

DNS servers.
2. Click Start, click All Programs, click Accessories, and select Command Prompt.
3. Type Dnscmd /ZoneExport companyabc.com companyabc.com.txt and press Enter.
The previous example exports the companyabc.com DNS zone and the export file
named companyabc.com.txt will be saved to
c:\Windows\System32\DNS\companyabc.com.txt.
4. Repeat this command for any other DNS zones that will be backed up.
5. When completed, type exit and press Enter when completed.
NOTE
This method does not capture several elements of the zone, including security and del-
egate information. It also does not capture DNS server configuration information,
including primary/secondary relationships, forwarding, and the like.
30
Windows Internet Naming Service
Windows Internet Naming Service (WINS) is a database composed of NetBIOS names and
their corresponding IP addresses. The NetBIOS names include domain, server, and work-
station names, along with other records used to identify services such as the master
browser. The WINS database is backed up by performing a System State backup of the
WINS server or by initiating a backup using the WINS console.
1260
CHAPTER 30
Backing Up the Windows Server 2008 R2 Environment
Because the WINS database is populated by servers and workstations dynamically, in some
cases backing up might not be necessary. When WINS contains static mappings, a WINS
backup is essential because records will not be re-created automatically if the WINS data-
base is corrupted or rebuilt from scratch. To create a backup using the WINS console,
perform the following steps:
1. Log on to the Windows Server 2008 R2 WINS server system with an account with
administrator privileges.
2. Click Start, click All Programs, click Administrative Tools, and select WINS.
3. Double-click on the WINS server to initiate the connection in the console.
4. Right-click on the WINS server in the tree pane, and select Back Up Database.
5. Browse to the folder location to store the backup, and click OK. The default location
that should be specified is c:\windows\system32\WINS.
6. The backup will run and create a subfolder called wins_bak.
7. Click OK on the Confirmation page indicating that the backup was successful, and
close the WINS console.
8. Log off of the Windows Server 2008 R2 WINS server system.
Dynamic Host Configuration Protocol
ptg
The Dynamic Host Configuration Protocol (DHCP) server is responsible for assigning IP
addresses and options to devices on the network in need of network configuration. DHCP
allocates IP configurations, including IP addresses, subnet masks, default gateways, DNS
servers, WINS servers, WDS servers, TFTP servers, and boot filenames. Other IP options
can be configured, depending on the organization’s needs.
These IP address scope properties and options are stored in the DHCP database. This data-
base also stores the information concerning IP address leases and reservations. The DHCP
database is backed up with a server System State backup, but it can also be backed up
using the DHCP console.
To back up the DHCP database from the console, perform the following steps:
1. Log on to the Windows Server 2008 R2 DHCP server system with an account with
administrator privileges.
2. Click Start, click All Programs, click Administrative Tools, and select DHCP.
3. Double-click on the DHCP server to initiate the connection in the console.
4. Right-click on the DHCP server in the tree pane, and select Backup.
5. When the Browse for Folder window opens, it will default to the
systemroot\System32\DHCP\Backup folder; click OK to accept this location and
start the backup.
6. There will be no confirmation of a successful backup. To verify if a backup was
completed, open the folder and check the date and time stamps of the subfolders
and files. The default subfolder name will be New.
7. Log off of the DHCP server system.
Backing Up Windows Server 2008 R2 Role Services
1261
Distributed File System
The Distributed File System (DFS) is a Windows Server 2008 R2 service that improves file
share availability by providing a single unified namespace to access shared folders hosted
across different servers. When DFS domain namespaces are used, DFS folders can be
configured to replicate with one another using the DFS Replication service. Domain name-
spaces servers store the DFS folders, targets, and replication group configurations in Active
Directory. When a stand-alone namespace is used, the configuration is stored in the name-
space server’s Registry. Backing up the System State of a stand-alone DFS server backs up
the DFS configuration. For domain DFS namespaces, backing up the System State of a
domain controller accomplishes this task. More information on DFS can be found in
Chapter 28, “File System Management and Fault Tolerance.”
Internet Information Services
Internet Information Services (IIS) 7.5 is Windows Server 2008 R2’s web application and
FTP server. It is included on every version of the Windows Server 2008 R2 platform, but it
is not installed by default. IIS stores configuration information for web and FTP site
configurations and security in a set of XML files stored in the system root folder. The IIS
configuration is automatically backed up with full system backups and with separate
System State backups.
ptg
Windows SharePoint Services
Windows SharePoint Services (WSS) runs on top of IIS 6.x and 7.x. Version 3.0 with SP2
can be downloaded and installed separately for use with Windows Server 2008 and
Windows Server 2008 R2. WSS stores configuration- and site-related data (application
data) within Microsoft SQL databases or within the internal Windows Server 2008 R2 data-
base, also known as the SQL 2005 Express Edition. When WSS is installed, it can be
configured to use the internal database or it can be connected to a fully functional SQL
database server running on the local or a remote system.
Windows Server Backup currently supports the backup and restore of WSS configuration
and application data natively, if the data is stored within the internal database. For WSS
deployments or Microsoft Office SharePoint Server deployments that utilize SQL servers,
the databases need to be backed up using a compatible SQL backup agent, or the backup
functionality included within the SQL Management tools. To perform a manual backup of
Windows SharePoint Services, perform the following steps:
1. Log on to the Windows Server 2008 R2 Windows SharePoint Services server system
30
with an account with administrator privileges.
2. Click Start, click All Programs, click Administrative Tools, and select SharePoint 3.0
Central Administration.
3. When the browser opens, if prompted, enter a username and password for an
account with administrative privileges on the WSS server.
4. When the SharePoint 3.0 Central Administration website opens, select the
Operations tab.
1262
CHAPTER 30
Backing Up the Windows Server 2008 R2 Environment
5. Scroll down in the window, and on the right side, under the Backup and Restore
section, click on the Perform a Backup link.
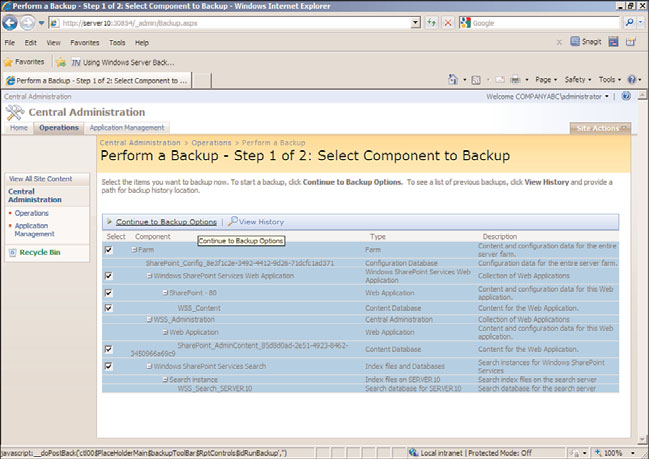
6. Near the top of the window, check the Farm check box to back up the entire
contents and configuration data for the Windows SharePoint Services on this server,
and click on the Continue to Backup Option link located right above the Farm check
box, as shown in Figure 30.12.
ptg
FIGURE 30.12
Performing a backup using SharePoint 3.0 Central Administration.
7. On the next page, scroll down and enter the UNC path to store the backup, and
click OK to start the backup.
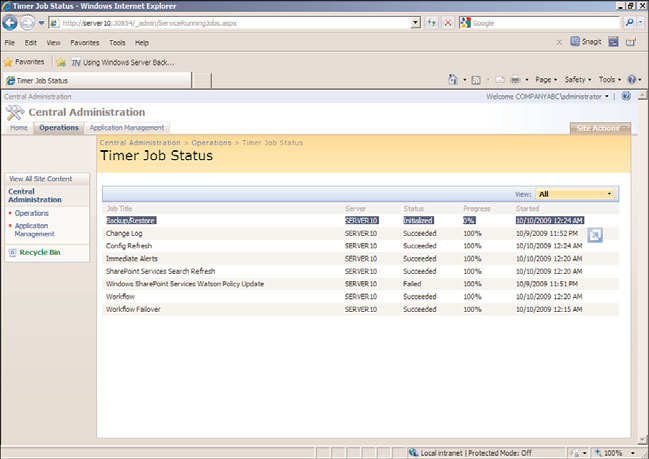
8. On the next page, click on the Timer Job Status link to view the status of the backup
job. When the new page opens, review the status of the backup job, as shown in
Figure 30.13, as an initialized job.
9. After the job has completed, it will be removed from the Timer page upon refresh.
Click the browser’s Back button to return to the Backup and Restore Status page, and
click the Refresh button. Scroll down on the page to review the result of the backup.
10. Close the browser and log off of the system.
Volume Shadow Copy Service (VSS)
Window Server 2008 R2 Volume Shadow Copy Service (VSS) provides some great features
that can be used to enhance backup and recovery for Windows disks. One great feature of
VSS, called Shadow Copies for Shared Volumes, captures and stores copies of the files and
folders at a specific point in time.
Volume Shadow Copy Service (VSS)
1263
FIGURE 30.13
Reviewing the backup job status using SharePoint 3.0 Central Administration.
ptg
Administrators and end users with the correct permissions can browse the shadow copies
based on the time and date of creation and essentially restore a specific folder, file, or
entire volume without restoring from tape. The shadow copies are very space efficient, as
the first copy is a complete compressed version of the data on the volume, and subse-
quent copies store only the changes made since the last shadow copy was created.
Another great feature of the VSS is the tight integration it provides for third-party software
vendors and to the Windows Server Backup tools. VSS enables manual backups created
using Windows Server Backup to store shadow copies on remote server shares. Windows
Server Backup also utilizes VSS to manage the storage space of the backup by using the
space-efficient and intelligent storage functions of VSS.
Enabling Shadow Copies for Shared Volumes
Enabling shadow copies on a volume can be very simple. Administrators have more
options when it comes to recovering lost or deleted data and, in many cases, can entirely
avoid restoring data to disk from a backup tape device or tape library. In addition, select
users can be given the necessary rights to restore files that they’ve accidentally deleted.
30
The Volume Shadow Copy Service is already installed and is automatically available using
NTFS-formatted volumes.
To enable and configure shadow copies, follow these steps:
1. Log on to the Windows Server 2008 R2 system with an account with administrator
privileges.
2. Click Start, click All Programs, click Administrative Tools, and select Server Manager.
1264
CHAPTER 30
Backing Up the Windows Server 2008 R2 Environment
3. In the tree pane, double-click the Storage node, and select Disk Management.
4. In the tasks pane, scroll down to locate the desired volume, right-click the volume,
and select Properties.
5. Select the Shadow Copies tab; in the Select a Volume section, click on the desired
volume, and click the Settings button.
6. The Settings page enables you to choose an alternate volume to store the shadow
copies. Select the desired volume to store the shadow copy and set the storage space
limit for the volume. The default is usually set to 10% of the volume size.
7. After the location and maximum size are configured, click the Schedule button and
define the schedule. The defaults create a shadow copy at 7:00 a.m. and 12:00 p.m.
8. Click OK to close the Schedule window, and click OK again to close the Volume
Shadow Copy Settings window. The shadow copy for the originally selected volume