Windows Server 2008 R2 Unleashed (241 page)
Read Windows Server 2008 R2 Unleashed Online
Authors: Noel Morimoto

1220
CHAPTER 29
System-Level Fault Tolerance (Clustering/Network Load Balancing)
FIGURE 29.17
Specifying the DNS/Internet name associated with an NLB cluster IP address.
10. If multiple IP addresses were defined on the previous page, the IP address can be
chosen from the IP address drop-down list, and the Internet name and cluster opera-
ptg
tion mode can be defined for each additional address. When all the IP addresses
have had their properties defined, click Next to continue.
11. On the Port Rules page, a default rule is precreated that allows all traffic on all ports
to be load-balanced across the NLB cluster between the cluster IP address and the
dedicated IP address of the local server’s dedicated IP address. Select this rule and
click the Remove button to delete it.
12. Click the Add button to create a new port rule.
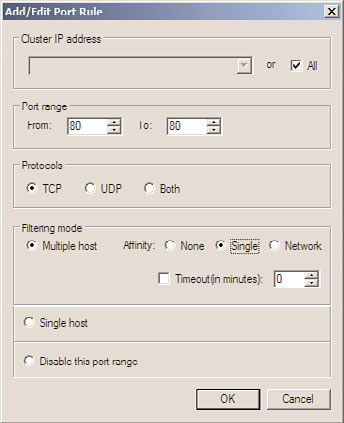
13. When the Add/Edit Port Rule window opens, type in the starting and ending port
range, for example 80 and 80 for a single HTTP port rule, but do not close the window.
14. Under protocols, select the TCP option button, but do not close the window.
15. In the Filtering Mode section, select Multiple Host, and select Single Affinity, but do
not close the window.
16. Finally, review the settings, and click OK to create the port rule, as shown in
Figure 29.18.
17. Back on the Port Rules page, click the Add button to create an additional port rule.
18. Specify the starting port as 0 and the ending port as 79, select Both for the protocol’s
configuration, select the Disable This Port Range Filtering mode, and click OK to
create the rule.
19. Back in the Port Rules page, click the Add button to create one more port rule.
20. Specify the starting port as 81 and the ending port as 65535, select Both for the
protocol’s configuration, select the Disable This Port Range Filtering mode, and click
OK to create the rule.

Deploying Network Load Balancing Clusters
1221
FIGURE 29.18
Defining a port rule for TCP port 80 with multiple host, single affinity.
ptg
21. Back on the Port Rules page, review the list of port rules and if the rules look correct,
click Finish.
22. Back in the Network Load Balancing Manager window, the cluster will be created
and brought online. The cluster IP addresses are automatically added to the TCP
properties of the designated network adapter. Close the NLB Manager and log off of
the server.
Adding Additional Nodes to an Existing NLB Cluster
After an NLB cluster is created, additional nodes can be added to it. To add nodes to an
existing cluster, perform the following steps:
1. Log on to the Windows Server 2008 R2 system with an account that has local
administrator rights.
29
2. Click Start, click All Programs, click Administrative Tools, and select Network Load
Balancing Manager.
3. When the Network Load Balancing Manager console opens, click the Cluster menu,
and select Connect to Existing.
4. When the Connect page opens, type in the hostname of a cluster node in the cluster
that will have nodes added to it. For this example, the hostname is NODE02. Type
in NODE02 and click Connect to retrieve a list of all NLB clusters running on the
specified host.
5. In the Clusters section of the Connect page, select the cluster that will be loaded
into the management console, and click Next.

1222
CHAPTER 29
System-Level Fault Tolerance (Clustering/Network Load Balancing)
6. Back in the Network Load Balancing Manager window, in the tree pane, select and
right-click the cluster, and select Add Host to Cluster.
7. When the Connect page opens, type in the hostname of the Windows Server 2008
R2 system that will be added to the cluster, and click Connect.
8. After the system is connected, a list of all of the available network adapters is shown.
Select the desired adapter to use for the NLB cluster, and click Next.
9. On the Host Parameters page, review the details of the page, and click Next to
continue. The default settings should be sufficient unless the Host ID needs to be
changed or if multiple IP addresses are already bound to the adapter; select the
desired IP address to use for dedicated NLB cluster communication, and click Next
to continue.
10. On the Port Rules page, the existing port rules for the cluster are listed. Unless this
node will handle different traffic on this cluster, accept the defaults and click Finish.
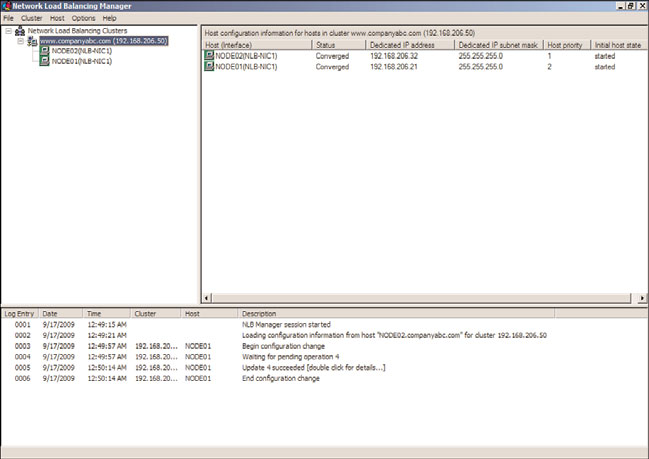
11. The node will be added to the cluster and if the node addition is successful, both
nodes will be listed under the cluster with a green background, as shown in Figure
29.19.
ptg
FIGURE 29.19
Verifying that all NLB cluster nodes are operating properly.
12. Close the Network Load Balancing Manager and log off of the server.
Managing NLB Clusters
1223
An NLB cluster can be managed using the Network Load Balancing Manager from a local
cluster node or from a remote machine with the Remote Administration tools installed.
Network Load Balancing can also be managed using the command-line tool NLB.exe and
by using some of the new PowerShell commands included with Windows Server 2008 R2.
Using the NLB Manager, a node can be added, removed, or suspended from cluster opera-
tion to perform maintenance, including hardware or software updates. Because data is not
replicated between cluster nodes, any data that is required by all nodes in the cluster
either needs to be replicated to each node or the application needs to be configured to
access data on a system that is not in the NLB cluster.
Backing Up and Restoring NLB Nodes
The procedure for backing up and restoring NLB nodes is no different than for standalone
servers. A full system backup using Windows Server Backup or the organization’s Windows
Server 2008 R2 approved backup software should be created before and after any major
server or NLB cluster configuration changes are implemented. An NLB configuration can
be restored when the System State of a particular node is restored. If a full node recovery is
necessary, the System State and local disks should be restored using a full system restore.
ptg
For detailed backup and restore procedures, refer to Chapters 30 and 31.
Performing Maintenance on an NLB Cluster Node
To perform maintenance on an NLB cluster node, the administrator can temporarily stop
the NLB service on the node in the cluster, perform the upgrade, and start it back up later.
Stopping the cluster node without impacting user connections requires the use of the
Drainstop option from the Network Load Balancing Manager. The Drainstop option
informs the NLB cluster that the particular node will be stopped and no new connections
should be directed toward this node. All existing connections will remain up and running
and when all of the sessions are closed, the NLB service will be shut down on the desig-
nated node. After the maintenance has completed, the NLB service can be restarted on the
NLB node and client connections can be initiated. To perform maintenance on a cluster
node, perform the following steps:
29
1. Log on to each Windows Server 2008 R2 system with an account that has local
administrator rights.
2. Click Start, click All Programs, click Administrative Tools, and select Network Load
Balancing Manager.
3. When the Network Load Balancing Manager console opens, click the Cluster menu,
and select Connect to Existing.
4. When the Connect page opens, type in the hostname of a cluster node in the cluster
that has the node that requires maintenance, and click the Connect button. Do not

1224
CHAPTER 29
System-Level Fault Tolerance (Clustering/Network Load Balancing)
type in the name of the node that will be taken down for maintenance as the NLB
manager will lose connections to the cluster.
5. After the system is connected, select the desired NLB cluster and click Finish to
connect to the NLB cluster.
6. In the tree pane, expand the cluster to reveal all of the nodes in the cluster.
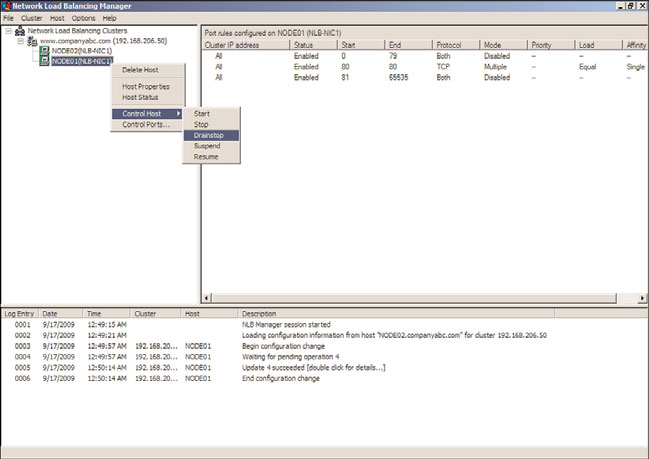
7. Locate the node that will be taken offline for maintenance. Right-click the node,
select Control Host, and select Drainstop, as shown in Figure 29.20.
ptg
FIGURE 29.20
Taking an NLB cluster node offline using the Drainstop option.
8. After all connections are closed, the node will be highlighted in red and the status
will be changed to “Host is Stopped.” Perform the necessary maintenance on the
NLB cluster node.
9. After the maintenance has been performed, open NLB Manager, connect to the
cluster, and expand the cluster to reveal the nodes.
10. Select the node that has been stopped, right-click the node, select Control Host, and
select Start.
11. After the host starts up, it will have a green background and will immediately be
ready to accept client connections.
12. Close the Network Load Balancing Manager and log off of the server.
To perform the Drainstop using PowerShell, perform the following steps:
1. Open PowerShell from the Accessories/System Tools folder in the All Programs Start
menu group on a Windows Server 2008 R2 system.
Best Practices
1225
2. Type the command import-module networkloadbalancingclusters and press Enter.
3. To stop the NLB service on NODE01, using Drainstop as an example, type the
command Stop-NlbClusterNode NODE01 –Drain and press Enter.
4. The PowerShell cmdlet will return the status of the command once the server has
stopped.
5. To resume operation on this node, type the command Start-NlbClusterNode
NODE01 and press Enter.
6. When completed, close the PowerShell window and log off of the server.
To get a list of all PowerShell NLB cmdlets, from within a PowerShell window after
running the import-module command for NLB, type the command Get-Command –Module
NetworkLoadBalancingClusters and press Enter.
Windows Server 2008 R2 provides two very different clustering technologies that enable
organizations to create system-level fault tolerance and provide high availability for
mission-critical applications and services. Although failover clusters and Network Load
ptg
Balancing are each characteristically different and are best deployed on very different
types of applications, between them they can increase fault tolerance for almost any
