Windows Server 2008 R2 Unleashed (247 page)
Read Windows Server 2008 R2 Unleashed Online
Authors: Noel Morimoto

Protection (WFP), and the COM+ class registration database. Backing up the System State
creates a point-in-time backup that can be used to restore a server to a previous working
state. Having a copy of the System State is essential if a server restore is necessary. A
System State backup is included in a full server backup and is also included in the Bare
Metal Recovery selection, but it can also be backed up separately. To create a separate
System State backup using the GUI, perform the following steps:
1. Log on to the Windows Server 2008 R2 system with an account with administrator
privileges.
30
2. Click Start, click All Programs, click Administrative Tools, and select Windows
Server Backup.
3. Click on Backup Once in the Actions pane.
4. On the Backup Options page, select the Different Options option button and click
Next to continue.
5. On the Select Backup Configuration page, select the Custom option button and click
Next to continue.
1250
CHAPTER 30
Backing Up the Windows Server 2008 R2 Environment
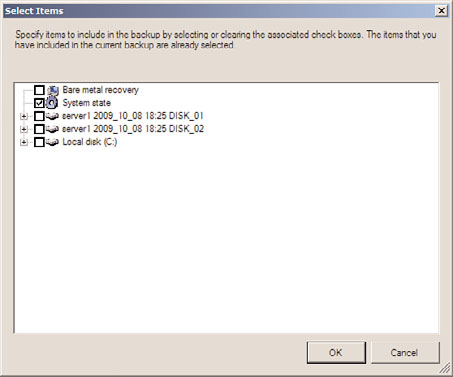
6. On the Select Items for Backup page, click the Add Items button. In the Select Items
window, check the box next to System State, as shown in Figure 30.7.
FIGURE 30.7
Selecting a System State only backup.
ptg
7. On the Select Items for Backup page, click Next to continue.
8. Complete the backup by selecting the desired destination for the backup and com-
plete the required steps.
Excluding Items from Backup
When full backups are not an option or if a particular folder on a volume needs to be
excluded from a backup, this can be accomplished by creating a custom backup set. As an
example, to back up the C volume and exclude the C:\Downloads folder, perform the
following steps:
1. Log on to the Windows Server 2008 R2 system with an account with administrator
privileges.
2. Click Start, click All Programs, click Administrative Tools, and select Windows
Server Backup.
3. Click on Backup Once in the Actions pane.
4. On the Backup Options page, select the Different Options option button and click
Next to continue.
5. On the Select Backup Configuration page, select the Custom option button and click
Next to continue.
6. On the Select Items for Backup page, click the Add Items button. In the Select Items
window, check the box next to Local Disk (C:) and click OK. This assumes that the C
volume does not have a custom volume label.
Backing Up Windows Server 2008 R2 Role Services
1251
7. Back on the Select Items for Backup page, click the Advanced Settings button.
8. On the Exclusions tab, click the Add Exclusions button. Select and expand the Local
Disk (C:), select the Downloads folder, and click OK.
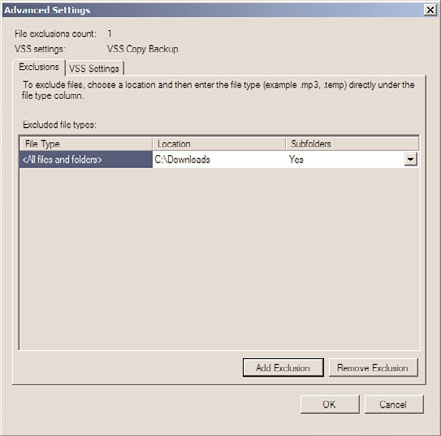
9. Back in the Advanced Settings window, the excluded folder should be listed, as
shown in Figure 30.8.
ptg
FIGURE 30.8
Excluding folders from backup.
10. Complete the backup by selecting the desired destination for the backup and com-
plete the required steps.
Backing Up Active Directory
Active Directory domain controllers contain a copy of the database that stores all Active
Directory-related information. This is stored by default on the C: drive but it is included
in the System State and Bare Metal Recovery backup. Also critical on Active Directory
30
servers are the files and folders stored in the sysvol folder on the boot drive. The sysvol
folder is also included in a System State backup. To properly back up a domain controller,
a full backup should be scheduled to run nightly or multiple times per day. In addition to
scheduled backups, text file exports and securing the most important objects can assist
with reliability as well as recovery efforts. If full backups cannot be performed daily due to
time or backup storage constraints, taking daily System State backups would be sufficient
for Active Directory recovery, but might not provide enough protection to recover the
entire domain controller after a hardware issue or serious software problem.
1252
CHAPTER 30
Backing Up the Windows Server 2008 R2 Environment
LDIFDE and CSVDE Command-Line Tools
Ldifde.exe and csvde.exe are two command-line utilities that can be used to export and
import Active Directory object information. For example, these tools can be used to export
a list of all user accounts, groups, organizational units (OUs), and computer objects in an
Active Directory domain.
When a restore of a deleted object is required, or when an object’s attribute or property
values are changed, having a text file export to reference the original location and distin-
guished name of the object, or the values of the object’s attributes, is very valuable. To
restore a single object, or an OU with all the objects contained within the OU, the distin-
guished name (DN) of the object is required. Using LDIFDE or CSVDE to export objects to
a text file will contain the DN for all objects in the query. Either tool can be run from the
command line. To export a list of all objects in Active Directory to a file called
AllObjects.ldf, perform the following steps:
1. Log on to the Windows Server 2008 R2 system with an account with administrator
privileges.
2. Click Start, click All Programs, click Accessories, and select Command Prompt.
3. Type cd \ and press Enter. The command prompt should reflect the local boot drive.
For this example, we assume that this drive is the C: drive.
4. Type ldifde.exe –f AllObjects.ldf and press Enter.
ptg
5. The root of the C: drive now contains a file named AllObjects.ldf. Open this file
using Notepad and review the export.
6. Back in the Command Prompt window, type ldifde.exe –f AllUsers.ldf –r
“(objectclass=user)” and press Enter.
7. The root of the C: drive now contains a file named AllUsers.ldf. Open this file
using Notepad and review the export to see that only the user objects have been
exported to this file.
8. Type logoff and press Enter to log off of the server.
Ldifde.exe and csvde.exe have similar switches, but the export file format will be differ-
ent. Also, each of these tools has a number of options that can be used to perform
advanced queries and only export a select list of objects. For more information on these
utilities, please reference the Help feature by typing ldifde /? or csvde /? and pressing
Enter in a Command Prompt window.
NOTE
This process does not include security information, nor does it change the backup date
on the database; therefore, it does not provide the same level of data protection as a
“real” backup.
Backing Up Windows Server 2008 R2 Role Services
1253
Exporting Active Directory Object Data Using PowerShell
Windows Server 2008 R2 includes many PowerShell cmdlets for managing Active
Directory. A few examples of these include the following cmdlets:
.
Get-AdObject—
This cmdlet is used to read AD object data and return it to the
screen for reading, exporting, or piping into another cmdlet as a variable value.
Some other useful cmdlets that are close in functionality include Get-AdUser, Get-
ADComputer, Get-AdGroup, and several more.
.
Set-AdObject—
This cmdlet enables administrators to update attribute values on
specified Active Directory objects. Some other useful cmdlets that are close in func-
tionality include Set-AdUser, Set-ADComputer, Set-AdOrganizationalUnit, and
several more.
.
Remove-ADObject—
This cmdlet can be used to delete an object or several objects
from Active Directory, provided of course that deletion protection is not configured
for the desired objects. Some other useful cmdlets that are close in functionality
include Remove-AdUser, Remove-ADGroupmember, Remove-AdOrganizationalUnit,
and several more.
.
New-AdObject—
This cmdlet can be used to create new Active Directory objects.
Some other useful cmdlets that are close in functionality include New-AdUser, New-
ptg
ADGroup, New-AdOrganizationalUnit, and several more.
.
Restore-AdObject—
This cmdlet can be used to restore an Active Directory object
that has been previously deleted granted that the Active Directory Recycle Bin has
been enabled before the object was deleted. More details on this particular cmdlet
are included in Chapter 31, “Recovering from a Disaster.”
More AD cmdlets that can be used for common tasks include Unlock-AdAccount, Search-
AdAccount, and several more. All in all, more than 50 Active Directory-related cmdlets are
included with Windows Server 2008 R2 PowerShell. To perform a few basic Active
Directory export tasks using PowerShell, perform the following steps:
1. Log on to the Windows Server 2008 R2 system with an account with administrator
privileges.
2. Click Start, click All Programs, click Accessories, click the Windows PowerShell
folder, right-click on Windows PowerShell, and select Run As Administrator.
3. Type cd \ and press Enter.
30
4. Type Import-Module ActiveDirectory and press Enter.
5. Type Get-Command *AD* -CommandType cmdlet and press Enter. This returns all the
Active Directory-related cmdlets and also returns a few more cmdlets not related to
Active Directory.
6. Type Get-ADObject –Filter * and press Enter. This returns all the Active Directory
objects to the PowerShell window with a default list of attributes.
1254
CHAPTER 30
Backing Up the Windows Server 2008 R2 Environment
7. Type Get-ADObject –Filter * | Export-csv All-ADObjects.csv and press Enter.
This returns all the Active Directory objects, writes the output to a .csv file instead
of the window, and includes a default list of attributes.
8. Type Get-ADObject –Filter * -Properties *| Export-csv All-ADObjects.csv
and press Enter. This returns all the Active Directory objects, writes the output to a
.csv file, and includes all populated attributes for each object.
The previous command is similar to the ldifde –f allobjects.ldf command run in the
previous section. For more granular exports, the following list provides a few more exam-
ples of Active Directory cmdlets commands that can be run in a PowerShell window with
the Active Directory module installed:
. get-adobject -LdapFilter “(&(objectcategory=person)(objectclass=user))” -
properties * |export-csv all-users.csv
. get-adobject -LdapFilter “(&(objectcategory=person)(objectclass=contact))”
|export-csv all-contacts.csv
. get-adobject -LdapFilter
“(&(objectcategory=computer)(objectclass=computer))” |export-csv all-
computers.csv
ptg
. get-adobject -LdapFilter “(&(objectcategory=group)(objectclass=group))”
|export-csv all-groups.csv
Accidental Deletion Protection
A feature first released with the Windows Server 2008 Active Directory Users and
Computers snap-in and included in the Windows Server 2008 R2 edition is an option to
protect an object from accidental deletion. Setting this option defines a Deny permission
to object deletion, so the result is not new, just the simplicity in configuring it is new. To
protect an object from accidental deletion, perform the following steps of configuring this
option on the Administrator user account: