Windows Server 2008 R2 Unleashed (174 page)
Read Windows Server 2008 R2 Unleashed Online
Authors: Noel Morimoto

Traditional VPN Scenario
891
24
ptg
FIGURE 24.21
VPN connection security options.
The connection is now ready for use. The next step is to test the connection.
Testing the VPN Connection
The next step in the working with a VPN connection is to test the configuration to
make sure the system can properly VPN into the network. To test the VPN connection,
do the following:
1. On the client, right-click on the Company ABC VPN Connection, and select Connect.
2. Click the Connect button.
3. Click OK to accept the credentials. The connection will be established.
The connection can be tested by pinging the domain controller dc1.companyabc.com.
Because the system passed the health validation checks, the connection is granted full
access to all intranet resources. To test the connection, complete the following steps:
1. With the Company ABC VPN Connection connected, select Start, All Programs,
Accessories, and click on Command Prompt.
2. Enter ping dc1.companyabc.com and press Enter.
3. You should get a reply from the IP address of DC1.
4. Select Start, Connect To and choose to open the Connections window.
5. Select the Company ABS VPN Connection, and click Disconnect.
6. Click Close.
892
CHAPTER 24
Server-to-Client Remote Access and DirectAccess
The NPS system presents a wealth of information on the connection that was sorely
lacking in previous versions of Windows. With Windows Server 2008 R2, troubleshooting
traditional VPN connection issues is a straightforward endeavor.
Controlling Unhealthy VPN Clients
The previous example had everything going smoothly with no health issues. However, if
the client had failed the health validation checks, the failing items will be remediated. The
health validation check that was configured was to check for Windows Firewall being
enabled. To test the health remediation capabilities, we’ll turn off the Windows Firewall
and then connect again:
1. On the VPN client, select Start, Control Panel.
2. Click on Security.
3. Click on Windows Firewall.
4. Click on Change Settings.
5. Select the Off (Not Recommended) option button, and click OK.
The client is now in an unhealthy state, as defined by the health policy. Let’s see what
ptg
happens when the client connects to the VPN:
1. On the client, select Start, Connect To, and then choose to open the Connections
window.
2. Right-click on the Company ABC VPN Connection, and select Connect.
3. Click the Connect button.
4. Click OK to accept the credentials.
5. The client firewall will be enabled by the NAP client and then connected to the VPN.
The NAP client continues enforcing the health policy even after the initial connection. You
can test this by leaving the connection active and then turning off the Windows Firewall:
1. On the VPN client, select Start, Control Panel.
2. Click on Security.
3. Click on Windows Firewall.
4. Click on Change Settings.
5. Select the Off (Not Recommended) option button, and click OK.
The Windows Firewall will be off briefly and then be turned back on. Just like magic, the
EAP agent will fix the problem to ensure that the client stays compliant with the health
policy even after the initial connection.
If the client should fall out of compliance with the health policy in such a way as to be
irremediable, the connection will drop to a reduced connectivity state as defined by the
health policies. For example, if an intrepid user disables the Windows Firewall, the EAP
Traditional VPN Scenario
893
agent will detect that condition and take the appropriate action. The following example
illustrates this:
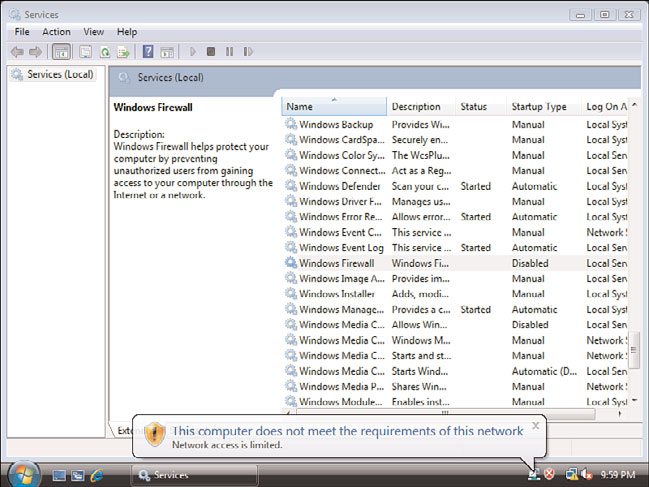
1. On the client, connect to the Company ABC VPN Connection.
2. Select Start, Run.
3. Enter services.msc and click OK.
24
4. Select the Windows Firewall service in the list of services.
5. Select Action, Properties.
6. Change the startup type to Disabled, and click OK.
7. Select Action, Stop to stop the Windows Firewall.
The connection icon will change to show a yellow warning triangle with an exclamation
point to indicate limited connectivity. As shown in Figure 24.22, a NAP agent icon will
appear in the system tray with the message: “This computer does not meet the require-
ments of this network. Network access is limited.”
ptg
FIGURE 24.22
Failed compliance.
Thus, even if the remediation steps fail, the internal network is protected from noncom-
pliant systems. Even better, when the client returns to compliance, the EAP agent detects
that and reestablishes full connectivity. To illustrate that, complete the following steps:
1. Select the Windows Firewall service in the list of services.
2. Select Action, Properties.
894
CHAPTER 24
Server-to-Client Remote Access and DirectAccess
3. Change the startup type to Automatic, and click OK.
4. Close the Services MMC.
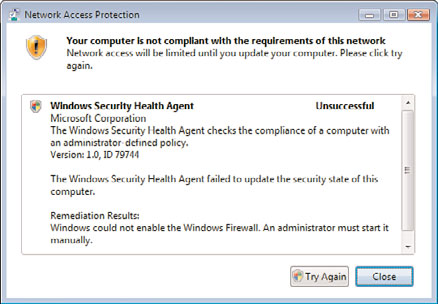
5. Click on the NAP agent icon in the system tray. A message will appear, indicating
that remediation had previously failed, as shown in Figure 24.23.
FIGURE 24.23
Network Access Protection remediation message.
ptg
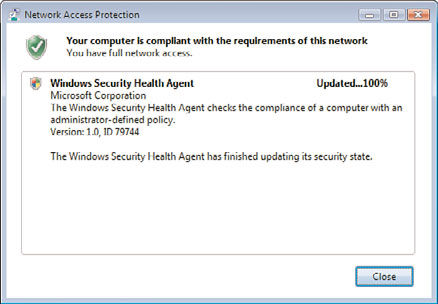
6. Click on the Try Again button to attempt the remediation.
7. The NAP agent will restart the service and update the compliance of the client,
showing a message similar to the one shown in Figure 24.24.
FIGURE 24.24
Successful compliance message.
8. Click Close to close the NAP agent window.
The NPS and NAP combination is a very powerful tool for ensuring the health of the
systems that are connecting to the VPN infrastructure.
Traditional VPN Scenario
895
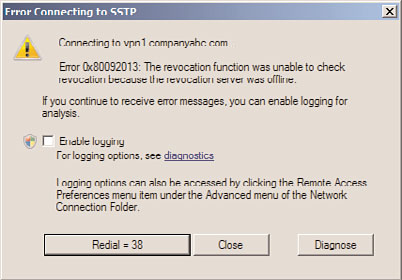
SSTP Troubleshooting
The VPN scenario up to now was using the PPTP protocol for establishing the tunnel. The
Secure Socket Tunneling Protocol (SSTP) is configured by default and should function;
however, there are frequently problems with the configuration and utilization of the
certificates. The two main problems are as follows:
24
. Incorrect RRAS Computer Certificate Bound to the Listener
. Certificate Revocation Site Not Available to VPN Clients
This section covers troubleshooting these common problems with SSTP.
The RRAS computer certificate must be added before the RRAS role is added to the VPN
server for SSTP to function properly. Otherwise, the wrong certificate will be bound to
the protocol.
You can check the listener using the following procedure:
1. On the RRAS server, open a command prompt.
2. Execute the command netstat –aon | findstr 443.
3. Verify that the command returns TCP [::]:443 [::]:0 LISTENING 4. This indicates that
the server is listening on port 443.
ptg
The next item to check is that the listener is bound to the correct certificate. The listener
can be bound to a certificate that no longer exists in the certificate store of the local
computer, which can be a troubleshooting headache.
You can check the SSL binding using the following procedure:
1. On the RRAS server, open a command prompt.
2. Execute the command netsh http show sslcert.
The result will show the SSL certificate bindings, similar to the following text:
SSL Certificate bindings:
IP:port : 0.0.0.0:443
Certificate Hash : f3919870176049e87b1ea2cf4bf148d1c3c6e922
Application ID : {ba195980-cd49-458b-9e23-c84ee0adcd75}
Certificate Store Name : MY
Verify Client Certificate Revocation : Enabled
Verify Revocation Using Cached Client Certificate Only : Disabled
Usage Check : Enabled
Revocation Freshness Time : 0
URL Retrieval Timeout : 0
Ctl Identifier : (null)
Ctl Store Name : (null)
DS Mapper Usage : Disabled
Negotiate Client Certificate : Disabled
IP:port : [::]:443
896
CHAPTER 24
Server-to-Client Remote Access and DirectAccess
Certificate Hash : 9be2b8db741e08838ede5ee83c62c7b3e5f7ac0b
Application ID : {ba195980-cd49-458b-9e23-c84ee0adcd75}
Certificate Store Name : MY
Verify Client Certificate Revocation : Enabled
Verify Revocation Using Cached Client Certificate Only : Disabled
Usage Check
: Enabled
Revocation Freshness Time : 0
URL Retrieval Timeout : 0
Ctl Identifier : (null)
Ctl Store Name : (null)
DS Mapper Usage : Disabled
Negotiate Client Certificate : Disabled
The relevant areas to check are the certificate hash and the application ID fields, which are
listed in two places. The application ID {ba195980-cd49-458b-9e23-c84ee0adcd75} in each
of the bindings indicates that it was added by the RRAS SSTP. The 40-character hexadeci-
mal certificate hash for both bindings needs to match the appropriate certificate in the
RRAS server certificate store. As you can see in the listing, one binding shows a hash value
of f3919870176049e87b1ea2cf4bf148d1c3c6e922 and the other binding shows a hash
value of 9be2b8db741e08838ede5ee83c62c7b3e5f7ac0b. Because they are different, it is
clear that one or both must be bound to the wrong certificate.
ptg
To get the certificate hash from the certificate store, execute the following steps:
1. Select Start, Run.
2. Type mmc and click OK.
3. Select File, Add or Remove Snap-ins.
4. Select the Certificates snap-in, and click the Add button.
5. Select Computer Account and click Next.
6. Click Next to select the Local computer.
7. Click OK.
8. Expand the Certificates (Local Computer) folder.
9. Expand the Personal folder.
10. Select the Certificates folder.
11. Right-click on the appropriate certificate, and select Open.
12. Select the Details tab.
13. Select the Thumbprint field and write down the 40-character hexadecimal value. In
the case of VPN1 in this example, the thumbprint is
f3919870176049e87b1ea2cf4bf148d1c3c6e922.
This is the certificate hash and should match the certificate hash from the previous Netsh
command. If it does, the correct certificate is bound to the listener. If the thumbprint does
not match the certificate hash, the binding can be corrected using the following steps.