Windows Server 2008 R2 Unleashed (175 page)
Read Windows Server 2008 R2 Unleashed Online
Authors: Noel Morimoto

Traditional VPN Scenario
897
In this case, the hash does not match, so the binding needs to be remediated. This will be
done by deleting the bindings and re-creating them. The four commands are as follows:
netsh http delete sslcert ipport=0.0.0.0:443
netsh http delete sslcert ipport=[::]:443
netsh http add sslcert ipport=0.0.0.0:443
24
certhash=f3919870176049e87b1ea2cf4bf148d1c3c6e922
appid={ba195980-cd49-458b-9e23-c84ee0adcd75} certstorename=MY
netsh http add sslcert ipport=[::]:443
certhash=f3919870176049e87b1ea2cf4bf148d1c3c6e922
appid={ba195980-cd49-458b-9e23-c84ee0adcd75} certstorename=MY
The first two commands delete the bindings and the second two commands re-create the
bindings with the correct certificate hash. We could have only done (deleted and added)
the “[::]:443” ipport binding because that was the incorrect one.
Finally, the Certificate Authority revocation list must be available for SSTP to function
correctly. If it is not available, SSTP clients will generate the error shown in Figure 24.25.
The solution to this is to make the Certificate Authority revocation site available to clients
over the Internet.
ptg
FIGURE 24.25
SSTP client revocation check error.
This is quite a stringent requirement and is due to the combination of the firewall pierc-
ing quality of SSTP and the potential to have disparate networks connected at Layer 3.
This revocation list requirement can present problems for organizations using internal
CAs, as the CA website must be published. This could potentially present a security risk
and would be an argument for using a third-party Certificate Authority for the SSTP
connections.
898
CHAPTER 24
Server-to-Client Remote Access and DirectAccess
Preventing SSTP Connections
The SSTP tunneling protocol can help VPN clients traverse through NATs and firewalls.
This is a huge benefit of the protocol, but this is also a potential security risk. This is
because it in effect creates an OSI Layer 3 connection between two networks, which might
be against the security policy of the originating network or destination network. For
example, a consultant might initiate a connection from a client site to their corporate
network, in effect connecting the two networks.
Because SSTP uses HTTPS (TCP port 443), a port-based firewall cannot block the protocol
without also blocking all other HTTPS traffic. This is widely used by secure websites, so
this is not normally an option. This is one of the benefits of the SSTP technology.
However, SSTP connections can be prevented if the client traffic passes through an appli-
cation-level web proxy, which is a common configuration for enterprises today. When a
VPN client using SSTP connects, the client will send an HTTP “CONNECT” request with a
custom HTTP header named “SSTPVERSION” with a value of “1.0.”
To prevent SSTP connection through a web proxy, simply block those requests with the
customer HTTP header to disable SSTP.
ptg
Although the prerequisites and associated technologies for DirectAccess can be difficult to
implement, DirectAccess configuration is fairly straightforward through a simple wizard.
The example walks through the DirectAccess Wizard in Windows Server 2008 R2.
The scenario accomplishes two major goals, as follows:
1. Allow a workstation to seamlessly move between internal, public, and home
networks while retaining access to application servers.
2. Enable IPv6 in an IPv4 network using IPv6 transition technologies.
It is important to note that the scenario does not require that you have deployed IPv6
throughout the internal network to begin using DirectAccess. The scenario leverages the
Windows Server 2008 R2 and Windows 7 technologies that will automatically enable and
configure IPv6 using transitional technologies like ISATAP, 6to4, and Teredo.
This scenario assumes that Windows Server 2008 R2 Active Directory and DNS are
already deployed. The DirectAccess server must have two physical network interfaces.
The first is connected directly to the Internet, no NAT, and must have two consecutive
public IP addresses. The second interface is connected to the internal network. This
scenario also assumes you have an internal enterprise PKI deployment with CRLs
published on the Internet.
DirectAccess Scenario
899
There are five servers and a client in the scenario shown in Figure 24.26. These are the
systems that will be configured and tested against during the scenario. The systems are
as follows:
.
DC1—
Domain controller, DNS, and enterprise Certificate Authority server running
Windows Server 2008 R2. The Active Directory domain is companyabc.com. The CA
24
must have an Internet available certificate revocation list (CRL). The DC1 IP address
is 192.168.3.200.
.
DA1—
DirectAccess server domain member running Windows Server 2008 R2, with
two network interface cards, and two public IP addresses (12.155.166.2 and
12.155.166.3) assigned. The internal IP address is 192.168.3.211. This server should
also have the Web Server role installed to support IP-HTTPS.
NOTE
The reason for two consecutive public IPv4 addresses on the DirectAccess server’s
public Internet interface is so that Teredo-based DirectAccess clients can detect the
type of NAT that they are located behind.
ptg
.
SERVER1—
The application server that the DirectAccess client is accessing. The
server also hosts the NLS role, using the URL https://nls.companyabc.com. The
application server has been assigned the internal IP address 192.168.3.201.
.
NS1—
External DNS server hosting the external companyabc.com zone. The NS1 IP
address is 12.155.166.1.
.
WS3—
DirectAccess client domain member running Windows 7. This system will
travel between the internal, public, and home networks.
192.168.3.201
Application Server
192.168.3.211
SERVER1
12.155.166.2
12.155.166.3
12.155.166.1
Internal Network
Public Network
DirectAccess Server
DNS
DA1
ns1.isp.amaris.org
192.168.3.200
NAT
NLS Server
https://nls.companyabc.com
Home Network
AD, DNS, and CA
DirectAccess Client
DC1
WS3
FIGURE 24.26
DirectAccess scenario.
900
CHAPTER 24
Server-to-Client Remote Access and DirectAccess
The scenario assumes that split-brain DNS is being used—that is, that there is an internal
companyabc.com zone and an external companyabc.com zone. There should be a DNS A
record for da1.companyabc.com (12.155.166.2) in the external companyabc.com zone, as
well as the DNS record for the CRL for the certificate authority (typically
crl.companyabc.com).
There are three networks in the scenario. The DirectAccess client is WS3 and will be
roaming between these networks, but must be able to access the application server no
matter which network they are in. The three networks are as follows:
.
Internal network—
This is the corporate network and is using an IPv4 address in
the 192.168.3.x range.
.
Public network—
This is the Internet, and the servers being configured are using
the IPv4 12.155.166.x range.
.
Home network—
This is a network behind a NAT firewall, and the IP address range
is not known.
The client WS3 will be tested while connected to the internal network, the public
network, and, finally, to the home network. In all cases, the client WS3 will seamlessly
transition between the networks with no interruption in access to internal resources.
ptg
Configuring the Infrastructure
Next, configure the DNS service to remove the ISATAP name from its default global block
list. This allows the DNS to service ISATAP requests.
To remove ISATAP from the DNS global query block list, complete the following steps:
1. On the domain controller server, open a command prompt.
2. In the Command Prompt window, enter the command dnscmd /config /global-
queryblocklist wpad and then press Enter.
3. Close the Command Prompt window.
The preceding command needs to be run on each DNS server.
This scenario assumes split-brain DNS—that is, there is a companyabc.com domain inter-
nally, and there is a companyabc.com on the Internet with a limited set of records.
The NLS record needs to be created in DNS. This supports the NLS URL that DirectAccess
clients use to determine if they are in the corporate network. The website used for the
NLS needs to support HTTPS and can be any website available internally, although it is a
best practice that it be highly available. To create an NLS DNS record, execute the
following steps:
1. On the domain controller DC1, launch Server Manager.
2. Expand Roles, DNS Server, DNS, DC1, Forward Lookup Zones, and select the compa-
nyabc.com zone.
3. Right-click company abc.com and then click New Host (A or AAAA).
DirectAccess Scenario
901
4. In the Name field, type nls. In the IP address field, type the IP address of the NLS
website, click Add Host, click OK, and then click Done.
The next step is to create a security group for DirectAccess client computers. This allows
the DirectAccess clients to be specified. The group will be named DirectAccessClients. To
create the group, execute the following steps:
24
1. On the domain controller, launch Server Manager.
2. Expand Roles, Active Directory Domain Services, Active Directory Users and
Computers, expand the companyabc.com domain, and select the Users container.
3. Right-click on Users, select New, and then click Group.
4. In the Group Name field, type DirectAccessClients and click OK.
This group will be used later to assign Group Policy to the DirectAccess clients.
Using a GPO to Configure Firewall Rules
The next step is to create and enable firewall rules for ICMPv4 and ICMPv6 traffic. ICMP
messages need to be sent and received to provide connectivity for Teredo-based
DirectAccess clients, which is needed if the DirectAccess clients will be behind a NAT.
ptg
The ICMP firewall rules will be deployed with a GPO named “DirectAccess Group Policy
Object.” To create and enable firewall rules for ICMPv4 and ICMPv6 traffic, execute the
following steps:
1. On the domain controller DC1, launch Server Manager.
2. Expand Features, Group Policy Management, Forest: companyabc.com, Domains,
and select companyabc.com.
3. In the console tree, right-click the domain companyabc.com and select Create a
GPO in the Domain and Link It Here.
4. Enter the name DirectAccess Group Policy Object and then click OK.
5. Right-click the DirectAccess Group Policy Object and select Edit.
6. In the console tree of the Group Policy Management Editor, expand Computer
Configuration, Policies, Windows Settings, Security Settings, Windows Firewall with
Advanced Security, and select Windows Firewall with Advanced Security.
7. In the console tree, select and then right-click Inbound Rules, and then click New Rule.
8. On the Rule Type page, click Custom, and then click Next and Next.
9. On the Protocols and Ports page, for Protocol Type, select ICMPv4, and then click
Customize.
10. In the Customize ICMP Settings dialog box, click Specific ICMP Types, select Echo
Request, and then click OK.
902
CHAPTER 24
Server-to-Client Remote Access and DirectAccess
11. Click Next, Next, Next, and Next.
12. On the Name page, in the Name field, type Inbound ICMPv4 Echo Requests, and
then click Finish.
13. In the console tree, right-click Inbound Rules, and then click New Rule.
14. On the Rule Type page, click Custom, and then click Next and Next.
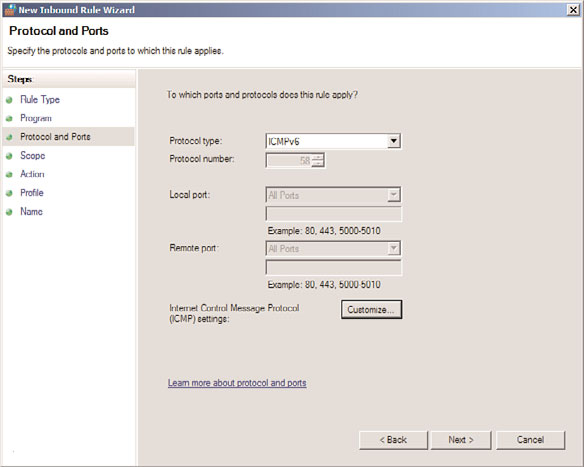
15. On the Protocols and Ports page, for Protocol Type, select ICMPv6 (shown in Figure
24.27), and then click Customize.
ptg
FIGURE 24.27
ICMPv6 inbound firewall rule.
16. In the Customize ICMP Settings dialog box, click Specific ICMP Types, select Echo
Request, and then click OK.