Windows Server 2008 R2 Unleashed (176 page)
Read Windows Server 2008 R2 Unleashed Online
Authors: Noel Morimoto

17. Click Next, Next, Next, and Next.
18. On the Name page, in the Name field, type Inbound ICMPv6 Echo Requests, and
then click Finish.
19. In the console tree, right-click Outbound Rules, and then click New Rule.
20. On the Rule Type page, click Custom, and then click Next and Next.
21. On the Protocols and Ports page, for Protocol Type, click ICMPv4, and then click
Customize.
22. In the Customize ICMP Settings dialog box, click Specific ICMP Types, select Echo
Request, and then click OK. Click Next and Next.
23. On the Action page, click Allow the Connection, and then click Next and Next.
DirectAccess Scenario
903
24. On the Name page, in the Name field, type Outbound ICMPv4 Echo Requests, and
then click Finish.
25. In the console tree, right-click Outbound Rules, and then click New Rule.
26. On the Rule Type page, click Custom, and then click Next and Next.
27. On the Protocols and Ports page, for Protocol Type, click ICMPv6, and then click
24
Customize.
28. In the Customize ICMP Settings dialog box, click Specific ICMP Types, select Echo
Request, and then click OK. Click Next and Next.
29. On the Action page, click Allow the Connection, and then click Next and Next.
30. On the Name page, in the Name field, type Outbound ICMPv6 Echo Requests, and
then click Finish.
31. Close the Group Policy Management Editor and Group Policy Management Console.
This new group policy will take effect on all domain computers, allowing ICMPv4 and
ICMPv6 through the operating system firewall.
Custom Certificate Template for IP-HTTPS
ptg
Next, create a certificate template so that requesting computers can specify the subject
name and subject alternative name of a certificate. This certificate will be used by the
DirectAccess server to set up IP-HTTPS sessions.
To create and enable a custom Web Server 2008 certificate template, execute the following
steps:
1. On the domain controller DC1, launch Server Manager.
2. Expand Roles, Active Directory Certificate Services, and select Certificate Templates.
3. In the contents pane, right-click the Web Server template, and then click
Duplicate Template.
4. Click Windows Server 2008 Enterprise, and then click OK.
5. In the Template Display Name field, type Web Server 2008.
6. Click the Security tab.
7. Click Authenticated Users, and then select Enroll in the Allow column.
8. Click the Add button, type Domain Computers, and then click OK.
9. Click Domain Computers, and then select Enroll in the Allow column.
10. Click the Request Handling tab.
11. Select Allow Private Key to Be Exported and click OK.
12. Select the companyabc-DC1-CA in the Active Directory Certificate Services, right-
click Certificate Templates, point to New, and then click Certificate Template To Issue.
13. In the list of certificate templates, click Web Server 2008, and then click OK.
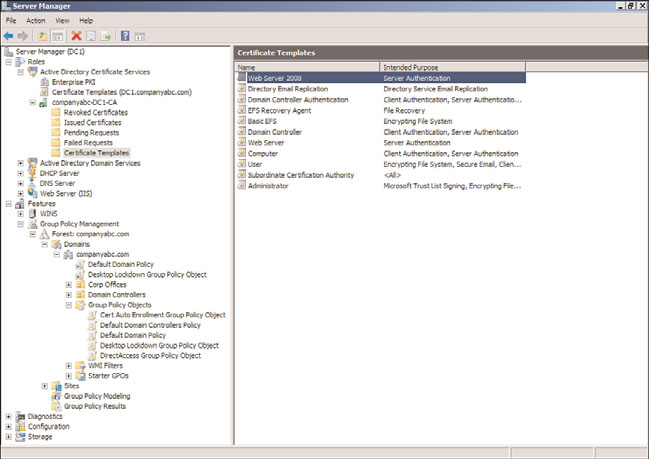
14. Confirm that the new certificate template, Web Server 2008, is listed (shown in
Figure 24.28).
904
CHAPTER 24
Server-to-Client Remote Access and DirectAccess
FIGURE 24.28
Web Server 2008 certificate.
ptg
Now the certificate server will be able to issue a Web Server 2008 certificate for the
DirectAccess server to use for IP-HTTPS. The certificate will be requested later in the process.
Certificate Autoenrollment
Next, configure the root CA so that computer certificates are issued automatically through
a group policy using a GPO named Cert Auto Enrollment Group Policy Object. These
certificates will be used to secure the IPSec tunnels established.
To configure computer certificate autoenrollment, complete the following steps:
1. On the domain controller DC1, launch Server Manager.
2. Expand Features, Group Policy Management, Forest: companyabc.com, Domains,
and select companyabc.com.
3. In the console tree, right-click the domain companyabc.com and select Create a
GPO in the Domain and Link It Here.
4. Enter the name Cert Auto Enrollment Group Policy Object and then click OK.
5. Right-click the Cert Auto Enrollment Group Policy Object and select Edit.
6. In the console tree of the Group Policy Management Editor, open Computer
Configuration, Policies, Windows Settings, Security Settings, and select Public Key
Policies.
7. In the details pane, right-click Automatic Certificate Request Settings, point to New,
and then click Automatic Certificate Request.
8. In the Automatic Certificate Request Wizard, click Next.
DirectAccess Scenario
905
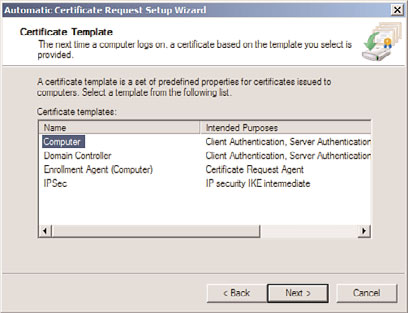
9. On the Certificate Template page, click Computer (shown in Figure 24.29), click
Next, and then click Finish.
24
FIGURE 24.29
Certificate autoenrollment.
10. Close the Group Policy Management Editor and Group Policy Management Console.
ptg
Now, each computer that is a member of the domain will be enrolled automatically with a
computer certificate.
IP-HTTP Certificate
Next, obtain an additional certificate for DA1 with a customized subject and alternative
name for IP-HTTPS connectivity. This certificate is in addition to the computer certificate
that was obtained through the autoenrollment configured earlier.
To obtain the additional certificate for the DirectAccess server DA1, execute the following
steps:
1. On the DirectAccess server DA1, click Start, type mmc, and then press Enter.
2. Click File and select Add/Remove Snap-Ins.
3. Select Certificates, click the Add button, select Computer Account, click Next, select
Local Computer, click Finish, and then click OK.
4. In the console tree of the Certificates snap-in, expand Local Computer, Personal, and
select Certificates.
5. Right-click Certificates, point to All Tasks, and then click Request New Certificate.
6. Click Next twice.
7. On the Request Certificates page, click Web Server 2008, and then click the button
More Information Is Required to Enroll for This Certificate.
8. On the Subject tab of the Certificate Properties dialog box, in the Subject Name
section, for Type, select Common Name.
906
CHAPTER 24
Server-to-Client Remote Access and DirectAccess
9. In the Value field, type da1.companyabc.com, and then click the Add button.
10. In the Alternative Name section, for Type, select DNS.
11. In the Value field, type da1.companyabc.com, and then click the Add button.
12. Click OK, click Enroll, and then click Finish.
13. In the details pane of the Certificates snap-in, verify that a new certificate with the
name da1.contoso.com was enrolled with Intended Purposes of Server
Authentication.
14. Right-click the certificate and select Properties.
15. In the Friendly Name field, type IP-HTTPS and click OK.
Installing the DirectAccess Feature on DA1
Before you can run the DirectAccess Setup Wizard, you must install the DirectAccess
feature on DA1. To install the DirectAccess feature, execute the following steps:
1. On the DirectAccess server DA1, launch Server Manager.
2. Right-click on Features and select Add Features.
3. On the Select Features page, select DirectAccess Management Console.
ptg
4. At the pop-up, click Add Required Features. This adds the Group Policy
Management feature.
5. Click Next.
6. Click Install.
7. Click Close to finish.
The DirectAccess feature has been installed, but still needs to be configured.
Configuring DirectAccess Feature
Next, run the DirectAccess Setup Wizard to configure DA1 and the Group Policy settings
for DirectAccess clients.
To run the DirectAccess Setup Wizard, complete the following steps:
1. On the DirectAccess server DA1, launch Server Manager.
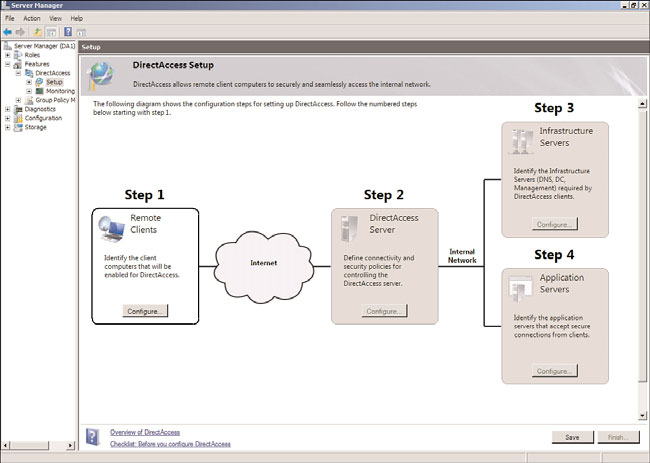
2. Expand Features, DirectAccess, and select the Setup node. The screen will show the
four-step DirectAccess setup, as shown in Figure 24.30.
3. On the Select Features page, select DirectAccess Management Console.
4. In Step 1 Remote Clients, click Configure.
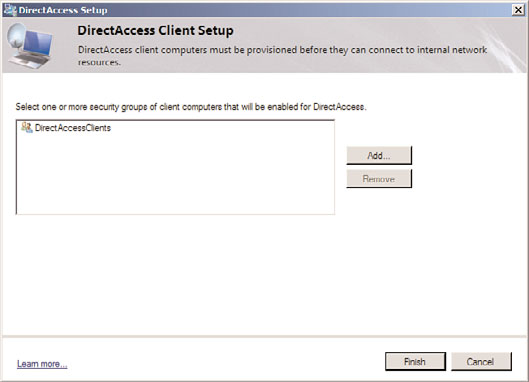
5. On the DirectAccess Client Setup page, click the Add button.
6. In the Select Group dialog box, type DirectAccessClients and click OK. The screen
will show the group, as shown in Figure 24.31.
7. Click Finish.
8. In Step 2 DirectAccess Server, click Configure.
DirectAccess Scenario
907
24
FIGURE 24.30
DirectAccess Setup screen.
ptg
FIGURE 24.31
DirectAccess Client Setup.
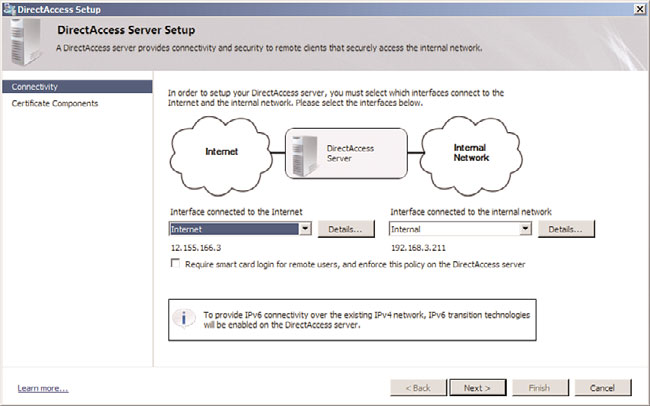
9. On the Connectivity page, for Interface Connected to the Internet, ensure that the
correct interface is selected. For Interface Connected to the Internal Network, ensure
that the correct interface is selected. The wizard will attempt to select the best inter-
faces based on the IP address ranges. In Figure 24.32, the public address 12.155.166.3
has been assigned to the Internet interface and the private address 192.168.3.211 has
been assigned to the internal interface.