Windows Server 2008 R2 Unleashed (261 page)
Read Windows Server 2008 R2 Unleashed Online
Authors: Noel Morimoto

Windows Server 2008 R2 media and product keys.
NOTE
Another alternative to performing a staged RODC installation is to have the branch
office prepare a base installation of the Windows Server 2008 R2 operating system.
After this installation is complete and the server is on the network, a domain adminis-
trator from the hub site can use the Remote Desktop Protocol (RDP) and remotely per-
form the dcpromo process. This strategy also eliminates the need to use branch
personnel in any facet of the domain controller installation process.
Complete the following steps to create an account for a Read-Only Domain Controller
(RODC). You will be using the Active Directory Users and Computers interface in the first
step of this staged approach.
1. On a writable Windows Server 2008 R2 domain controller, invoke Active Directory
Users and Computers by selecting it from the Administrative Tools.
2. In Active Directory Users and Computers, expand the domain tree, and then select
ptg
the Domain Controllers Organizational Unit folder.
3. Right-click the Domain Controllers OU container, and then select Pre-Create Read-
Only Domain Controller Account.
4. The Active Directory Domain Services Installation Wizard is invoked. Review the
Welcome page, and then click Next to continue.
5. On the Network Credentials page, specify the account credentials that will be used
to perform the installation. The options include either My Current Logged On
Credentials or Alternate Credentials. Click Next to continue.
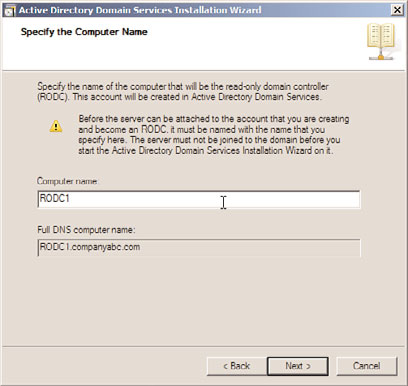
6. Enter a computer name for the RODC in the Computer Name text box located on
the Specify the Computer Name page. This is illustrated in Figure 32.5. Click Next.
NOTE
This procedure creates a computer account in Active Directory Domain Services. The
RODC computer name specified in this step should be the name of the server you plan
on promoting to an RODC. As part of the prerequisite tasks and also to minimize serv-
er name conflicts, do not join the server you plan on using as an RODC to the domain.
The server should reside in a workgroup.
7. On the Select a Site page, select a site for the new domain controller installation,
and then click Next.
8. On the Additional Domain Controller Options page, select the additional options for
the domain controller. Additional items could include a DNS server and a global
Installing a Read-Only Domain Controller
1321
32
FIGURE 32.5
Specifying the computer name of the RODC system.
catalog server. Also, notice that the Read-Only Domain Controller is selected auto-
matically and cannot be unselected.
ptg
NOTE
In general, to minimize unnecessary WAN utilization, it is a best practice to also make
the RODC a DNS server and a global catalog server.
9. On the Delegation of RODC Installation and Administration page, specify a user or
group who will ultimately manage and attach the server to the RODC account being
created. Do this by selecting Set and enter the desired user account or group. Click
Next to continue.
10. Review the summary of the Active Directory installation, and click Next on the
Summary page to finalize the inauguration of the RODC.
11. Click Finish to finalize the creation of the RODC account.
At this point, the RODC account has been created. The next step is to run the Active
Directory Domain Services Installation Wizard on a server that will eventually become the
RODC by leveraging the user or group the RODC installation was delegated to in the
previous steps. To attach a server to an RODC account, follow these simple steps:
1. Using someone with local administrative privileges, log on to the server that will be
the RODC in the branch office.
NOTE
To reaffirm, make sure this server is in a workgroup and not associated with the Active
Directory domain.
1322
CHAPTER 32
Optimizing Windows Server 2008 R2 for Branch Office
Communications
2. Click Start, Run, type the command dcpromo/UseExistingAccount:Attach, and
then click OK.
NOTE
The Active Directory Domain Services binaries will be installed. After this is complete,
the Active Directory Domain Services Installation Wizard will be invoked.
3. On the Welcome to the Active Directory Domain Services Installation Wizard page,
click Next to attach the server to a corresponding domain controller account created
in the previous steps.
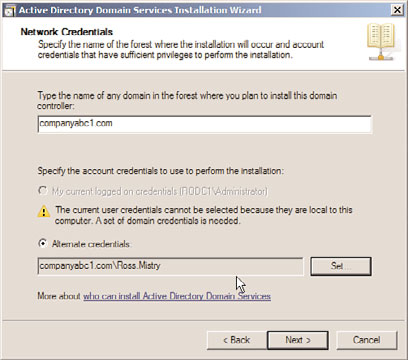
4. On the Network Credentials page, first specify the name of the forest where the
RODC installation will occur. Then click Set to specify the alternate account creden-
tials that will be used to perform the installation. Provide the username and pass-
word of the IT support personnel at the branch office, which was delegated in the
previous steps, as shown in Figure 32.6. Click Next.
ptg
FIGURE 32.6
Entering the domain and alternate credentials information for the RODC
installation.
NOTE
If the source server computer account name deviates from the RODC name that was
created in the previous step, the installation is sure to fail. The two account names
must be identical.
5. On the Select Domain Controller page, the wizard will automatically link and match
the server name to the account name of the RODC created in the previous step.
Understanding BitLocker Drive Encryption
1323
Ensure the Computer Name, DC Type, and Domain and Site information located in
the Account Details section is correct. If it is, click Next to continue.
6. Validate the folder location for the Database, Logs Files, and sysvol folder, and then
click Next.
7. Enter and confirm the password for the Directory Services Restore mode administra-
32
tor account, and click Next.
8. Review the summary of the Active Directory installation, and click Next on the
Summary page to finalize the inauguration of the RODC.
9. Click Finish and restart the RODC system.
Understanding BitLocker Drive Encryption
Microsoft added Windows BitLocker Drive Encryption to Windows Server 2008 mostly as a
result of organizations demanding protection not only for their operating systems in
remote locations, but also for the vital data stored on the system volume, data volumes,
and USB flash drives that were used in these locations. BitLocker Drive Encryption,
commonly referred to as just BitLocker, is a software-based Full Disk Encryption (FDE) data-
protection security feature included in all versions of Windows Server 2008 and Windows
ptg
Server 2008 R2, as well as in the Ultimate and Enterprise Editions of Windows Vista and
Windows 7. It is an optional component that must be installed if you choose to use it.
BitLocker increases data at rest protection for an operating system by merging two
concepts together: encrypting a volume and guaranteeing the integrity of the operating
system’s boot components. The first component, drive encryption, safeguards data resid-
ing on the system volume and configured data volumes by preventing unauthorized users
from compromising Windows system files encrypted with BitLocker. The second compo-
nent provides integrity verifications of the early boot components, which essentially refers
to components used during the startup process, by validating that the hard disk has not
been tampered with or removed from its original server. Equally important, when you use
BitLocker, confidential data on a protected server cannot be viewed even if the hard disks
are transferred to another operating system. If these two conditions are met, only then
will data on a BitLocker volume be accessible and the system allowed to boot.
If you have worked with previous versions of Windows Server, you will recognize immedi-
ately that BitLocker is a great addition to Windows Server 2008 R2 as it protects all of the
data residing on a server’s hard disks because everything written to the disk including the
operating system is encrypted. In previous versions of Windows Server, encryption based
on integration with integrity controls was not supported, which meant personal informa-
tion could be compromised. In addition, with BitLocker now on the map, branch offices
concerned over the physical security and theft of their domain controllers stand to benefit
the greatest from leveraging BitLocker because this feature further bolsters security and
ensures confidential data is not disclosed without authorization.
1324
CHAPTER 32
Optimizing Windows Server 2008 R2 for Branch Office
Communications
NOTE
Many professionals are posing questions as they wonder about the differences
between BitLocker and Encrypting File System (EFS). Both technologies offer tools for
encryption; however, BitLocker is intended to protect all personal and system files on a
system and after it is enabled, it is transparent as well as automatic. EFS, on the other
hand, encrypts individual files based on an administrator’s judgment call.
Examining BitLocker’s Drive Encryption
BitLocker was first introduced with the release of Windows Vista. Since entering the
Windows Server 2008 family of operating systems, Microsoft has continued to improve
BitLocker by adding new features, for example: support for data volumes, smart card certifi-
cates, data recovery agents, USB flash drives, a new RSAT BitLocker interface, and so on.
Understanding Its Benefits
By using BitLocker in conjunction with Windows Server 2008 R2, an organization can
enjoy a number of benefits:
. Prevention of unauthorized access to data at rest, which is located on Windows
managed system volumes, data volumes, and USB flash drives.
ptg
. Support for integrity checking of early boot components using Trusted Platform
Module (TPM) to ensure that a machine has not been tampered with and that
encrypted materials are located on the original machine.
. Protection against cold boot attacks by requiring an interactive form of authentica-
tion (including a PIN or a USB key) in addition to the presence of the TPM hardware
before a machine will boot or resume from hibernation.
. Support for escrow of BitLocker recovery materials in Active Directory.
. A streamlined recovery process, which can be delegated to non-Domain
Administrators.
. Windows Server 2008 R2 and Windows 7 automatically creates the necessary
BitLocker disk partitions during installation.
. Support for BitLocker protection on USB flash drives. This feature is called
BitLocker To Go.
. Lastly, support for Data Recovery Agent (DRA) support so that authorized IT admin-
istrators will always have access to BitLocker protected volumes.
Understanding TPM
The term Trusted Platform Module (TPM) is used to refer to both the name of a published
specification by the Trusted Computing Group for a secure cryptoprocessor and the imple-
mentation of that specification in the form of a TPM chip. A TPM chip’s main purpose in
life is the secure generation of cryptographic keys, the protection of those keys, and the
ability to act as a hardware pseudo-random number generator. In addition, a TPM chip
Understanding BitLocker Drive Encryption
1325
can also provide remote attestation and sealed storage. Remote attestation is a feature in
which a hash key summary is created based on a machine’s current hardware and software