Windows Server 2008 R2 Unleashed (172 page)
Read Windows Server 2008 R2 Unleashed Online
Authors: Noel Morimoto

19. When the installation finishes, click Close to close the wizard.
This certificate server will be used on each of the components in the VPN infrastructure.
Certificate Autoenrollment
Next, configure the root CA so that computer certificates are issued automatically through
a group policy using a GPO named Cert Auto Enrollment Group Policy Object.
To configure the computer certificate autoenrollment using the enterprise CA, use the
following steps:
1. On the domain controller DC1, launch Server Manager.
2. Expand Features, Group Policy Management, Forest: companyabc.com, Domains,
and select companyabc.com.
3. In the console tree, right-click the domain companyabc.com and select Create a
GPO in the Domain and Link It Here.
4. Enter the name Cert Auto Enrollment Group Policy Object and then click OK.
5. Right-click the Cert Auto Enrollment Group Policy Object and select Edit.
6. In the console tree of the Group Policy Management Editor, open Computer
Configuration, Policies, Windows Settings, Security Settings, and select Public Key
Policies.
7. In the details pane, right-click Automatic Certificate Request Settings, point to New,
and then click Automatic Certificate Request.
8. In the Automatic Certificate Request Wizard, click Next.
880
CHAPTER 24
Server-to-Client Remote Access and DirectAccess
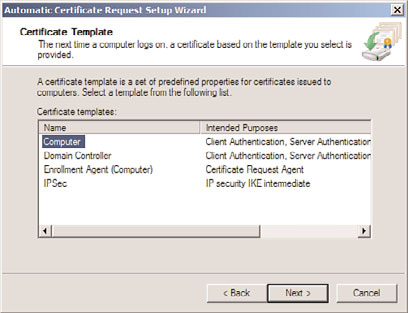
9. On the Certificate Template page, click Computer (shown in Figure 24.17), click
Next, and then click Finish.
FIGURE 24.17
Certificate autoenrollment.
ptg
10. Close the Group Policy Management Editor and Group Policy Management Console.
Now each computer that is a member of the domain will be enrolled automatically with a
computer certificate.
Setting Up the Network Policy Server
The next major step is to install the Network Policy Server (NPS) on the NPS1 server,
which will provide services to create and enforce NAP policies. To install the NPS,
complete the following steps:
1. Launch Server Manager.
2. In the Roles Summary pane, select Add Roles to start the wizard.
3. Click Next.
4. Select the Network Policy and Access Services role, and click Next.
5. Click Next.
6. Select the Network Policy Server role service, and click Next.
7. Click Install to install the role service.
8. When the installation finishes, click Close to exit the wizard.
The NPS role could be installed on the VPN server, which will be installed next. However,
the NPS system would likely be used by multiple entities, so a best practice is to host it on
a separate server.
Traditional VPN Scenario
881
Configuring the Network Policy Server
The next step is to configure the NPS with the appropriate policies to validate and enforce
security. This consists of the following elements:
. Health validators
24
. Health policy
. Network policy
. Connection request policies
. RADIUS client
Because of the interdependencies, they should be configured in the order presented. To set
up the health validators in the NPS, execute the following steps:
1. On the NPS system, select Start, Administrative Tools, Network Policy Server to
launch the MMC.
2. Expand the Network Access Protection folder, and expand the System Health
Validators folder.
3. Expand the Windows Security Health Validation folder and click Settings.
ptg
4. Right-click the default configuration and select Properties.
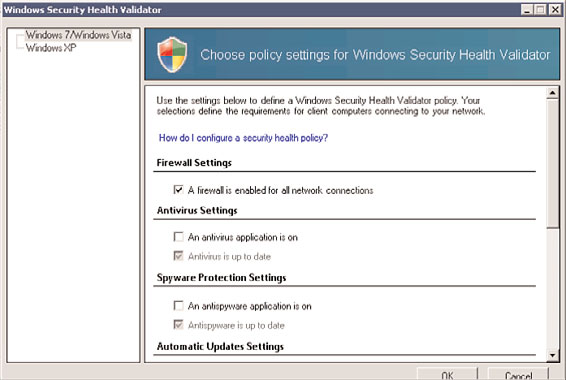
5. Uncheck all options except for the Firewall option. The configuration should look
like the example shown in Figure 24.18.
6. Click OK.
FIGURE 24.18
Validator configuration.
882
CHAPTER 24
Server-to-Client Remote Access and DirectAccess
The validator properties are now configured and a health policy needs to be created to use
the validator. To configure the health policy, execute the following steps:
1. In the Network Policy Server MMC, expand the Policies folder and select the Health
Policies folder.
2. Select Action, New to create a new health policy.
3. Enter Pass for the policy name.
4. Under Client SHV Checks, ensure that the Client Passes All SHV Checks is selected.
5. Select the Windows Security Health Validator in the SHVs Used in This Health
Policy window.
6. Click OK to save the health policy.
7. Select Action, New to create a new health policy.
8. Enter Fail for the policy name.
9. Under Client SHV Checks, ensure that the Client Fails One or More SHV Checks
option is selected.
10. Select Windows Security Health Validator in the SHVs Used in This Health Policy
window.
11. Click OK to save the health policy.
ptg
Now the conditions (that is, that the firewall is enabled) for the health of a connecting
system are established. Now the network policies for systems that pass or fail the health
validation need to be created. These policies are separate, so there will be one policy for
passing and one policy for failing.
The first part is to configure a network policy that will allow clients that pass the health
validation to connect to the network:
1. In the Network Policy Server MMC, expand the Policies folder, and select the
Network Policies folder.
2. Disable the two default policies in the middle pane by selecting each one and then
selecting Action, Disable. They should both show as grayed out when this is done.
3. Select Action, New to create a new network policy.
4. Enter Pass Allow Access for the policy name.
5. Select Remote Access Server (VPN Dial-Up) for the type of network access server.
6. Click Next.
7. Click the Add button to specify conditions.
8. Select Health Policies and click the Add button.
9. Select the previously created Pass health policy from the drop-down list, and click OK.
Traditional VPN Scenario
883
10. Click Next.
11. Leave the default Access Granted option, and click Next.
12. Leave the default authentication methods, and click Next.
13. Leave the default constraints, and click Next.
14. In the Configure Settings options, select NAP Enforcement.
24
15. Leave the default Allow Full Network Access, which will allow the clients that pass
the health validation to connect, and click Next.
16. Click Finish to complete the network policy.
The next step is to configure a network policy for those clients that fail the health valida-
tion:
1. With the Network Policies folder highlighted, select Action, New to create a new
network policy.
2. Enter Fail Limit Access for the policy name.
3. Select Remote Access Server (VPN Dial-Up) for the type of network access server.
4. Click Next.
5. Click the Add button to specify conditions.
ptg
6. Select Health Policies and click the Add button.
7. Select the previously created Fail Health Policy from the drop-down list, and click OK.
8. Click Next.
9. Leave the default Access Granted option, and click Next. It might be counterintu-
itive to grant access, but we will be configuring the policy to remediate the condi-
tion rather than deny access outright.
10. Leave the default authentication methods, and click Next.
11. Leave the default constraints, and click Next.
12. In the Configure Settings options, select NAP Enforcement.
13. Select Allow Limited Access, which will limit the clients that fail the health validation.
14. Ensure that the default Auto-remediation option is set to Enable Auto-remediation of
Client Computers.
15. Click the IP Filters option in the Settings window.
16. Click the Input Filters button in the IPv4 window.
17. Click New to add a filter for the domain controller DC1, which is 172.16.1.100 in
this example.
18. Check the Destination Network check box, and enter the IP address for the domain
controller (172.16.1.100) and a subnet mask of 255.255.255.255.
884
CHAPTER 24
Server-to-Client Remote Access and DirectAccess
NOTE
The subnet mask of 255.255.255.255 restricts the access to a single IP address. If a
range of IP addresses were needed—for example, a class C subnet (192.168.99.x)
that the quarantined client could access—then an address such as 192.168.99.0 and
a subnet mask of 255.255.255.0 could be used to permit the clients to access the
entire IP address range.
19. Click OK to close the window.
20. Select Permit Only the Packets Listed Below, and click OK.
21. Click the Outbound Filters button in the IPv4 window.
22. Click New to add a filter for the domain controller DC1.
23. Check the Source Network check box, and enter the IP address for the domain
controller (172.16.1.100) and a subnet mask of 255.255.255.255.
24. Click OK to close the window.
25. Select Permit Only the Packets Listed Below, and click OK.
26. Click Next.
ptg
27. Click Finish to complete the network policy.
Now that the health and network policies have been configured, the next step is to
configure the connection request policy. To configure the connection policy, execute the
following steps:
1. In the Network Policy Server MMC, expand the Policies folder, and select the
Connection Request Policies folder.
2. Highlight the Use Windows Authentication for All Users policy, and select Action,
Disable.
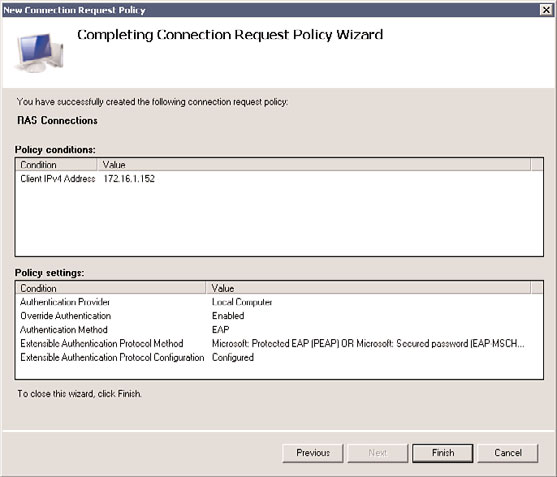
3. Select Action, New to create a new connection request policy.
4. Enter RAS connections for the policy name.
5. Select Remote Access Server (VPN Dial-Up) for the type of network access server, and
click Next.
6. In the Specify Conditions window, click the Add button to create a new condition.
7. Select Client IPv4 Address and click the Add button.
8. Enter the IP address of the RADIUS client, which is the VPN server VPN1 in this
example (172.16.1.152), and click OK.
9. Click Next.
10. Leave the default Authenticate Requests on This Server, and click Next.
11. In the Specify Authentication Methods window, check the Override Network Policy
Authentication Settings check box.
12. Click the Add button in the EAP Types window.
13. Select Microsoft: Protected EAP (PEAP), and click OK.
Traditional VPN Scenario
885
14. Click the Add button again in the EAP Types window.
15. Select Microsoft: Secured Password (EAP-MS-CHAP v2), and click OK.