Foundation Game Design with ActionScript 3.0, Second Edition (31 page)
Read Foundation Game Design with ActionScript 3.0, Second Edition Online
Authors: Rex van der Spuy

character.x = 275;
character.y = 200;
Sprites have properties calledxandy. Any number you assign to those properties will move the Sprite to that coordinate on the stage.
Figure 3-26
shows how our character would be positioned on the stage if we used the code above.
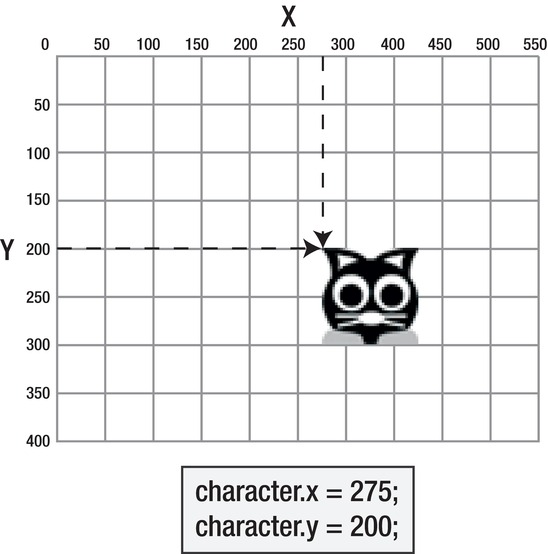
Figure 3-26
. Use the x and y properties to position a Sprite object.
But is the character centered? It definitely isn't! That's because the Sprite object is moved from its top left corner. This is called the
registration point
.
If you want to center a sprite, you have to subtract half its width and half its height from the x and y coordinates.
We know that the character Sprite is 100 pixels high and 100 pixels wide (that's how large we made the image in
Chapter 2
.) That means we have to subtract 50 from the x position and 50 from the y position if we want the character to be completely centered in the middle of the stage. The code we'd use would look like this:
character.x = 225;
character.y = 150;
Figure 3-27
shows that these x and y positions will exactly center the character on the stage.
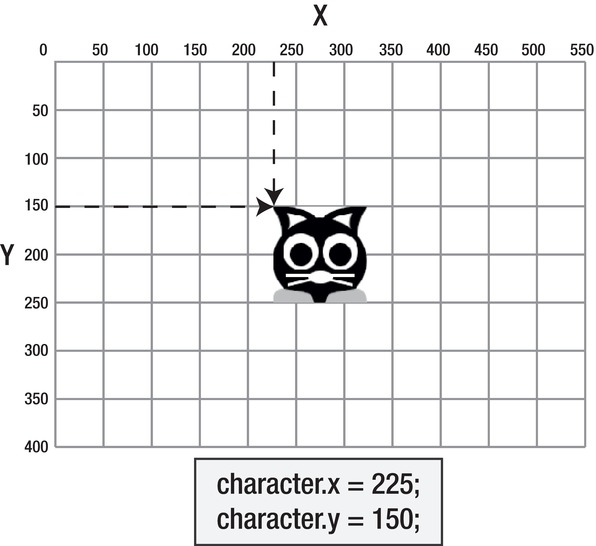
Figure 3-27
. Use the x and y properties to position a Sprite object.
Let's now use this code to actually center the character on the stage in our GameWorld program.
Enter the following code in bold text, directly after the new code you've written
characterURL.url = "../images/character.png";
characterLoader.load(characterURL);
character.addChild(characterLoader);
stage.addChild(character);
character.x = 225;
character.y = 150;
Compile the code, and you'll now see that the character is exactly centered on the stage, as shown in
Figure 3-28
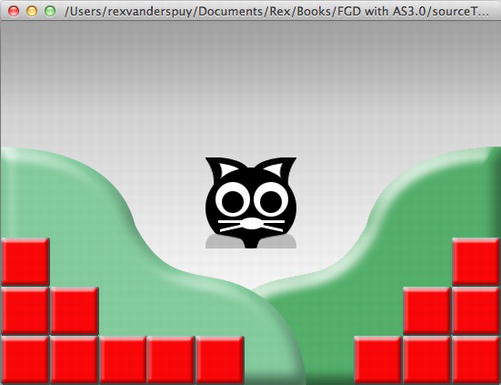
Figure 3-28
. The character is centered on the stage.
Let's now use these new techniques to load, display, and position the buttons along the left side of the stage.
We next need to load our six buttons and position them. This is simply a matter of repeating this same code model, but replacing “background” and “character” with these button names: “upButton”, “downButton”, “growButton”, “shrinkButton”, “vanishButton,” and “spinButton”.
Let's add the up button together, and I'll then leave you on your own to add the rest of them.
Add the following new code in bold text just after the existing code in the class definition.
public class GameWorld extends Sprite
{
  //Declare the variables we need
  public var backgroundURL:URLRequest;
  public var backgroundLoader:Loader;
  public var background:Sprite;
  //Character
  public var characterURL:URLRequest;
  public var characterLoader:Loader;
  public var character:Sprite;
  //upButton
  public var upButtonURL:URLRequest;
  public var upButtonLoader:Loader;
  public var upButton:Sprite;
  public function GameWorld()
  {...
Next, add the following new code in bold text to the constructor method. Add it directly after the code you wrote that set the character'sxandyproperties. I've included the entire constructor method block so that you can see all this code in its proper context.
public function GameWorld()
{
  //Add the background to the stage
  backgroundURL = new URLRequest();
  backgroundLoader = new Loader();
  background = new Sprite();
  backgroundURL.url = "../images/background.png";
  backgroundLoader.load(backgroundURL);
  background.addChild(backgroundLoader);
  stage.addChild(background);
  //Add the character to the stage
  characterURL = new URLRequest();
  characterLoader = new Loader();
  character = new Sprite();
  characterURL.url = "../images/character.png";
  characterLoader.load(characterURL);
  character.addChild(characterLoader);
  stage.addChild(character);
  character.x = 225;
  character.y = 150;
  //Add the upButton
  upButtonURL = new URLRequest();
  upButtonLoader = new Loader();
  upButton = new Sprite();
  upButtonURL.url = "../images/up.png";
  upButtonLoader.load(upButtonURL);
  upButton.addChild(upButtonLoader);
  stage.addChild(upButton);
  upButton.x = 25;
  upButton.y = 25;
}
Compile the program and you'll see that the up button is positioned near the top left corner of the stage, as shown in
Figure 3-29
.

Figure 3-29
. Add the up button to the stage.
Follow this exact same format to add the remaining 5 buttons to the stage.
Figure 3-30
shows what you your final work will look like.
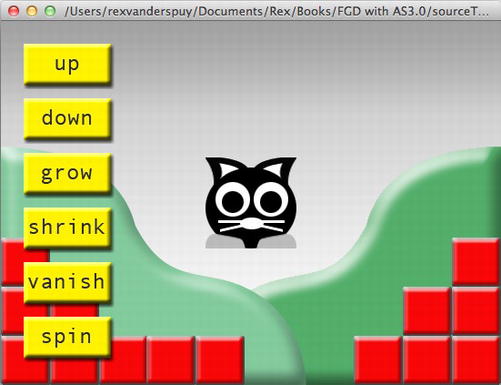
Figure 3-30
. Add all the buttons to the stage.
Here are the x and y positions that you'll need to align the buttons correctly:
downButton.x = 25;
downButton.y = 85;
growButton.x = 25;
growButton.y = 145;
shrinkButton.x = 25;
shrinkButton.y = 205;
vanishButton.x = 25;
vanishButton.y = 265;
spinButton.x = 25;
spinButton.y = 325;
You're going to be doing a lot typing, but that's an important part of the learning process. You need to develop an intuitive sense of what it feels like to type out AS3.0 code, character by character, so that you cultivate an innate familiarity with it. You also need to learn about what kinds of mistakes you're making while you're writing code. Every time you add code for a new button, compile your program to make sure that everything is working properly. It's important to catch mistakes early.
Over the next two chapters you're going to learn some shortcuts and new techniques that will drastically reduce the amount of code you need to enter to load images- by a fraction of what we've used here. But by doing it the long way, as we've done in this chapter, we're exposing the very fundamentals of how to make variables, use classes, and create objects. You need to know these things to make games.
If you have any doubts about the code you're writing, there's a complete listing of the code at end of the chapter. You can also download a project folder called GameWorldLoadedImages from the chapter's source files. You'll find all the code, up to this point, in that folder.
The next step in our project is to program the buttons so that you control the game character by clicking them. But before I go into the specifics of how to do this, let's take a few steps back and look at some of the underlying principles behind the code you're going to write. It's not difficult, but there will be a lot of new concepts to absorb quite quickly. You need to break them down into manageable chunks and look at them one at a time.
So grab a cup of masala chai and make yourself comfortable on the sofa. You'll take a short break from programming to have a detailed look at the following topics:
- Dot notation
- Methods
- Event listeners
These three elements will be working together in the new code you're going to write.
There's a lot of theory in this next section, but it's all optional. You may find you'll actually understanding it better by just rolling up your sleeves and seeing how these concepts work in the context of some practical programming. Consider jumping ahead to
the section “Making your buttons work” where all this theory is put into practice. You can always come back to this section later if you feel you need greater detail about how the code is working.
Learning to program is about writing a bit of code and watching what happens. Don't let yourself get bogged down or confused by theory or technical terms! If you feel that happening, just start working on the next practical project in this book, and carefully observe the effect your code is having. That's the best way to learn.
You may be wondering about the exact purpose of all those dots you've noticed between the bits of code we've written. The dots have three main functions.
First, they can tell you about the hierarchy of any given object. For example, take a look at thisimportstatement that you've seen many times:
import flash.display.Sprite;
The dots tell you thatSpriteis part ofdisplay, anddisplay, in turn, is part offlash. That's the hierarchy that describes how to find theSpriteclass in the Library.
The dots can also help you access
properties
of objects. A property is specific information about an object, such as its size, color, or position. We've just seen that thecharacterobject can be positioned on the stage by changing itsxandyproperties. You can refer to thexandyproperties like this: