Foundation Game Design with ActionScript 3.0, Second Edition (16 page)
Read Foundation Game Design with ActionScript 3.0, Second Edition Online
Authors: Rex van der Spuy

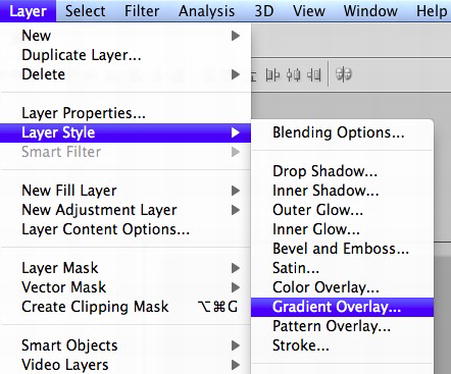
Figure 2-19.
Select the Gradient Overlay Layer style.
As soon as you select Gradient Overlay, the rectangle will be filled with a simple gradient, and the Layer Style window will open with the Gradient Overlay option selected, as you can see in
Figure 2-20
.
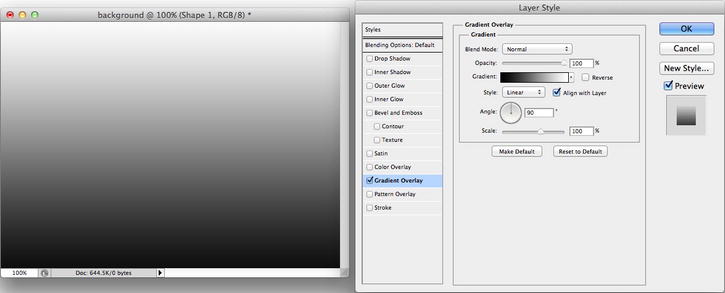
Figure 2-20.
The Layer Style window lets you create and edit a gradient on a shape.
To edit the gradient, click the Gradient box in the Layer Style window. When you do this the Gradient Editor window will open, as shown in
Figure 2-21
.
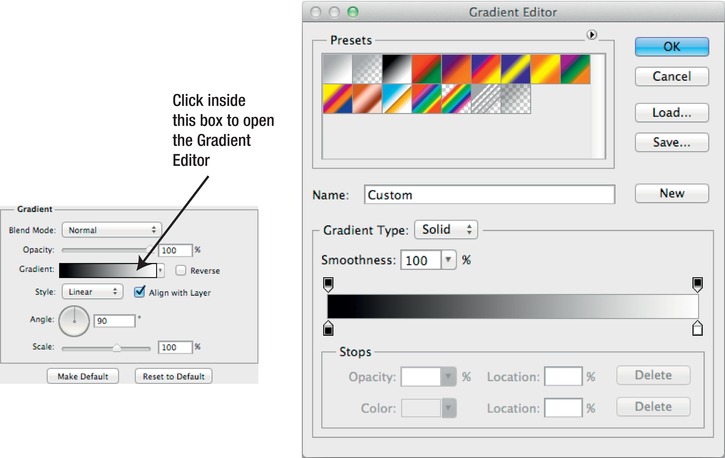
Figure 2-21.
Click inside the Gradient box.
You can change the color and transparency of a gradient by selecting and moving the
stops
. The stops are the four little squares that you can see on the corners of the gradient preview, which is the long gradient strip at the bottom half of the window. The bottom stops determine the color of the gradient. The top stops determine its transparency, which is known as
opacity
.
Figure 2-22
illustrates this.

Figure 2-22.
Use the stops in the Gradient preview to customize the gradient
The stops are quirky little things. It's going to take a bit of playing around with them until you get the hang of how to use them. You can slide them back and forth to change where the gradient starts and ends. You can add new stops by clicking anywhere along the top or bottom of the gradient preview. You can delete them by dragging them off.
The stops along the top control the gradient's opacity. When you click an opacity stop, the Opacity option in the Gradient Editor becomes active and you can control the transparency of that section of the gradient. An opacity of 0% means that it's completely transparent and 100% means that it's completely opaque (solid), so 50% will make the gradient semi-transparent at the position of the stop.
Figure 2-23
illustrates this.
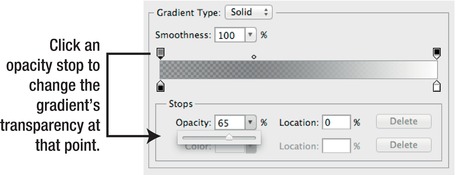
Figure 2-23.
If you select an opacity stop, you can control the transparency at that point in the gradient by changing its opacity percentage.
You'll notice that if you change the Opacity value, you'll see a checkerboard pattern appear under the gradient. This is Photoshop's way of telling you that the color is transparent.
The Location option determines at which percentage position along the gradient the stop should be placed. It's just an alternative to sliding the stop with the mouse.
The bottom stops control the colors in the gradient. If you double-click a color stop, the Color Picker window will open, which lets you choose a color for that section of the gradient. Let's do that in the next step.
Double-click the color stop on the left side of the Gradient preview. The Color Picker window will open. (Photoshop calls it the Select stop color window.) Choose a nice light blue color, either from the Color Picker window or from the Swatches panel, as shown in
Figure 2-24
.
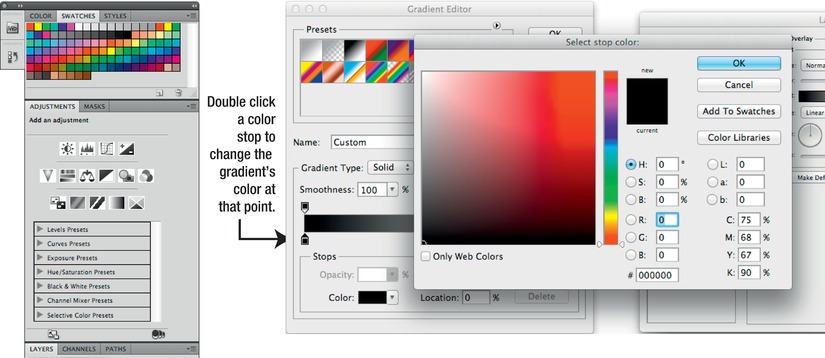
Figure 2-24.
Change the gradient's color.
Click OK in the Select stop color window. The new color you chose will be applied to gradient at the point of the stop.
The next thing you're going to do is change the
color midpoint
, which determines the center of the gradient. The color midpoint is a tiny circle along the bottom of the gradient preview. For a natural looking sky gradient, slide the color midpoint circle to the left until the Location option reads about 25%, as shown in
Figure 2-25
.
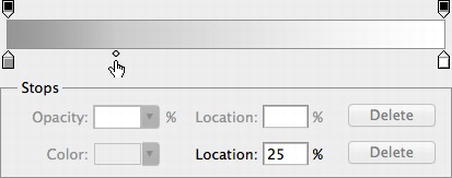
Figure 2-25.
Change the gradient's midpoint.
Click OK in the Gradient Editor window when you're happy with the way the gradient looks. You should now have a gradient that looks something like
Figure 2-26
.
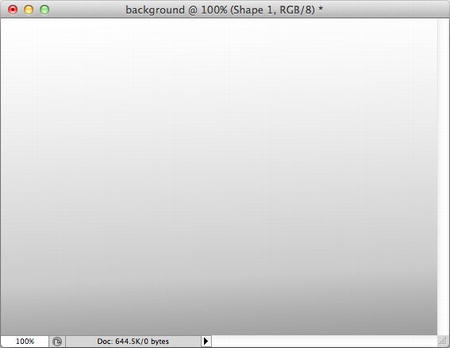
Figure 2-26.
Your gradient so far
There's something wrong with this picture! Your sky is actually upside down. So you need to flip the direction of the gradient by 90 degrees so that the dark part is at the top and the light part is at the bottom.
The Layer Style window should still be open. Find the Angle option and set the gradient's angle to -90, either by entering that into the text field or by turning the Angle wheel with the mouse, as shown in
Figure 2-27
. The rectangle's gradient will match this rotation and the sky will now appear right side up.

Figure 2-27.
Rotate the gradient's angle by 90 degrees.
Click the OK button in the Layer Style window to apply the gradient to the rectangle.
As an alternative to rotating the gradient, you could also have rotated the rectangle shape with the Move Tool.
The Layer Style window also lets you change the gradient from Linear, which is what you used in this example, to Radial, Angle, Reflected, or Diamond. Radial gradients are particularly useful for creating a pseudo 3D effect for circle shapes.
Figure 2-28
shows what these different gradient types look like.
