Foundation Game Design with ActionScript 3.0, Second Edition (17 page)
Read Foundation Game Design with ActionScript 3.0, Second Edition Online
Authors: Rex van der Spuy

Figure 2-28.
Photoshop's different gradient styles
Gradients are a complex topic in Photoshop and the best way to learn about them is to create some shapes and experiment with the settings in the Gradient Editor to see what kinds of effects you can produce. If you've created a gradient that you particularly like, the Gradient Editor lets you save it so that you can later load it into another shape.
With your sky finished, it's time to add some green background hills to the scene. You're going to draw the hills in front of the sky. But before you can do that, you must look at an important Photoshop technique: how to use
layers
to organize the depth position of objects on the canvas.
Layers allow you to organize your graphics so that they sit above or below other graphics. The Layers panel is at the bottom right of Photoshop's workspace. If you've followed the directions in this chapter so far, you should have two layers: a blank background layer and the rectangle shape that you drew in the earlier steps.
Next to each layer are icons that look like eyes. If you click on these, they can temporarily make the layer invisible on the canvas, letting you see the layer underneath. (Click the eye icon again to make the layer visible again.)
If there is a lock icon next to any layer, it means that the layer can't be edited. The background layer will always be locked. You can lock any layer by selecting the layer and clicking the Lock button near the top of the Layers panel. It's useful to lock layers if you've done a lot of work on graphics on that layer and want to prevent yourself from accidentally messing it up.
You can change the opacity (transparency) of each layer individually by selecting the layer and adjusting the opacity slider. If you give a layer an opacity of less that 100%, you'll be able to see the layers below it.
You can create and delete layers with the buttons at the bottom of the Layers panel.
Figure 2-29
illustrates these basic features and where to find them.
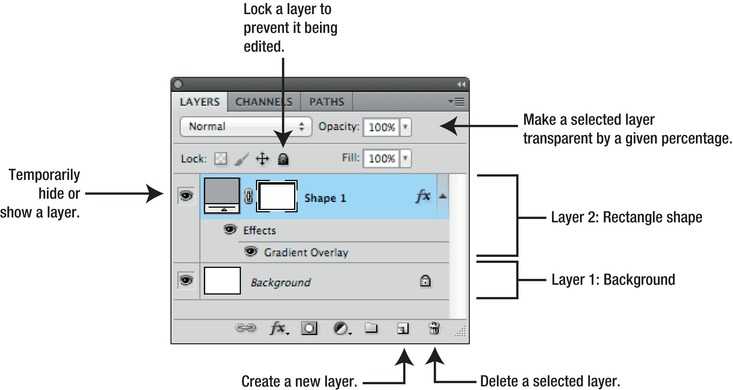
Figure 2-29.
The Layers panel lets you organize your graphics so that they're above or below other graphics.
Each layer also tells you quite a bit of information about the kinds of things that are on that layer. You can see that on the second layer there's a shape; that's your sky rectangle. You can see that it's had a special layer effect applied to it, which is what the fx icon tells you. You can also see that it's a gradient overlay effect. In fact, if you want to edit the gradient effect, just double-click on Gradient Overlay in the Layers panel and the Layer Style window will open, letting you make any changes to the gradient that you like. You can temporarily hide an effect that you've created by clicking the eye icon next to the effect name. You can hide all the effects on a layer by clicking the eye icon next to Effects.
If you want add any other special effects to your layers, you can click the little FX button at the bottom of the panel and choose an effect from the list.
Figure 2-30
illustrates these features of the Layers panel.
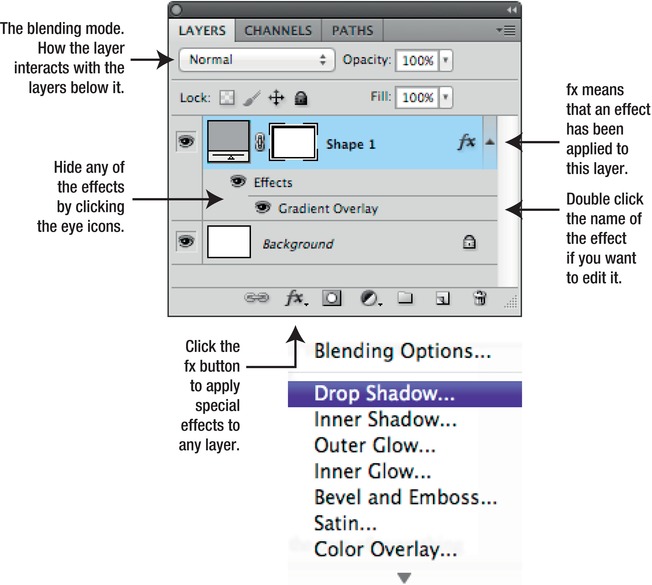
Figure 2-30.
The Layers panel lets you add, edit, or hide any effects you might have applied to your graphics.
While you're working, keep a particular eye on the blending mode that you can select from the option menu at the top left of the Layers panel. The blending mode determines how a layer interacts with the layers below it. If you work in a blending mode other than normal, you can produce some interesting and often beautiful layer effects. However, you probably won't need any of these for simple game graphics, so you'll probably always want to keep the blending mode set to normal.
There's always a chance, however, that you might accidentally change the blending mode while you're working. If you notice that your game graphics suddenly become, dim, transparent, strangely outlined, or wildly psychedelic, there's a good chance that you might have switched a layer's blending mode.
As you can see, the Layers panel gives you an awful lot of control over your work. However, although you'll possibly use all of these features when creating your own game graphics, you don't need to worry about most of them for now. The most important thing to know is this:
anything on a layer above will hide things on layers below.
Before you start work drawing on a new layer, give the sky layer a name and lock it so that you don't accidentally select or change it.
Double-click the words “Shape 1” in the Layers panel. This makes the text editable. Change it so that it reads “Sky.” (Press the Enter key to apply the name change.) It's a good habit to give your layers names
so that you can easily find them. You'll appreciate this when you're working on complex graphics with 20 or 30 layers.
Click the padlock button to lock the layer. Again, it's a good habit to lock layers after you've finished working on them so that you don't accidentally select and change them while working on new layers above. (You can easily unlock layers again to work them by again selecting the locked layer and clicking the padlock button.) Your Sky layer should now look like
Figure 2-31
.
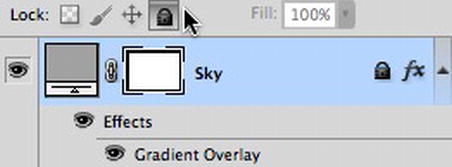
Figure 2-31.
Give the layer a name and lock it to prevent accidental changes.
There are plenty of very advanced layer features that I haven't mentioned here. You won't need to use any of them to create the game graphics in this book because many are specialized for photo editing, but for a comprehensive explanation of what they all do, refer to Adobe's most recent online documentation at
http://help.adobe.com/en_US/photoshop/cs/using/index.html
Browse to the chapter called “Layers.”
Let's create some hills for your game world scene so you can see this concept in action.
Photoshop's Pen Tool lets you make complex shapes. Even though it's called a pen, it doesn't work like any pen that exists in the known universe. It's better to think of the Pen Tool as a way of making dots, and then connecting those dots with straight lines. Connect enough dots together, and you have a shape. You can then bend the lines in the shape to make really complex shapes with curves. Learning to use the Pen Tool properly is one of the most powerful and flexible graphic design techniques you can acquire.
You're going to create two hills for your game world. Each of them will be on a different layer. For the first hill, click the “Create new layer” button at the bottom of the Layer's panel. (It looks like a new page with a corner turned over.) A new layer will appear above the Sky layer. Double-click the name of this new layer and give it the name “Hill 1.”
Figure 2-32
shows what your new layer should look like.
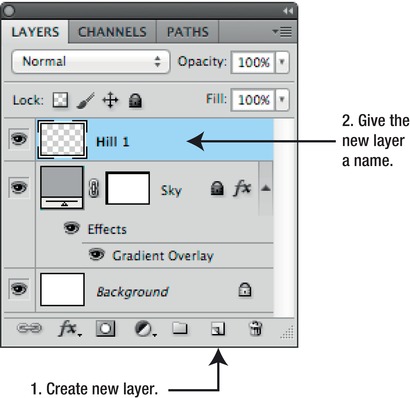
Figure 2-32.
Create a new layer to draw a hill.
You now have three layers, and it's on this new layer, “Hill 1,” where you're going to do your next drawing.
Select the Pen Tool from the Tools panel (
Figure 2-33
).
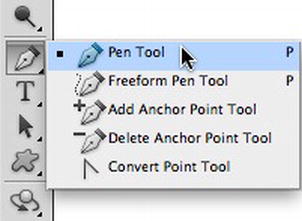
Figure 2-33.
The Pen Tool
You're going to use the Pen Tool to roughly draw the general shape of the hill by creating a series of dots and connect them with straight lines. In further steps, you'll refine it by adding curves.
With the Pen Tool selected, click once anywhere in the canvas. (You're now drawing on the Hill layer.) A black square will appear. This is called an
anchor point
; it's the starting point of your shape.

Figure 2-34.
Click with the Pen Tool to add an anchor point
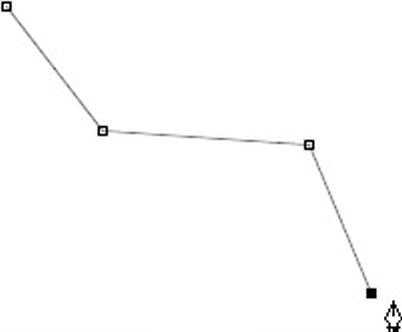
Click to add a few more anchor points in a zigzag fashion, down and to the left of the first point, as in
Figure 2-35
. You'll notice that each time you add a point it's connected by a line to the previous point. This is called a
path
.