Foundation Game Design with ActionScript 3.0, Second Edition (18 page)
Read Foundation Game Design with ActionScript 3.0, Second Edition Online
Authors: Rex van der Spuy

Figure 2-35.
Create a path by clicking to add more anchor points.
If you make a mistake in Photoshop and want to undo an action, the good old Edit Undo or CRTL+Z (Windows) or Command+Z (Mac OS X) will undo the last thing you did.
However, Photoshop is only set up to undo the very last thing you did, and no more. If you did a few actions and then realize you need to go back and undo five or six steps, open Photoshop's History panel (WindowHistory). The History panel records the previous 20 actions you did, as shown in
Figure 2-36
. It lets you revert back to a previous state by clicking any of these previous actions.
You can use the camera button at the bottom of the History panel to take a snapshot of your work. This is a good idea if you're just about to start a complex or experimental phase of your project and don't want to risk losing what you've done up till now. When you take a snapshot, Photoshop saves a version of your work in its current state, and you can get back to that state by clicking the snapshot at the top of the History panel. Snapshots aren't saved with the image file, however, so if you want to revert to snapshot, you need to do so before you close the file you're working on.
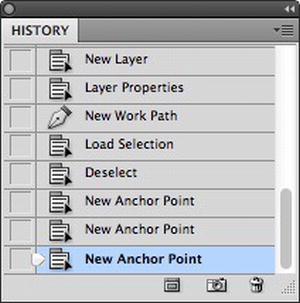
Figure 2-36.
Undo previous actions by moving back in time with the History panel.
Continue the path so that it looks like
Figure 2-37
. You can complete the shape by clicking on the very first anchor point you added. When you do this, you'll notice a small “O” icon appear next to the Pen Tool. This shows you that you're going to
close the path
. When you close a path, you make a shape.
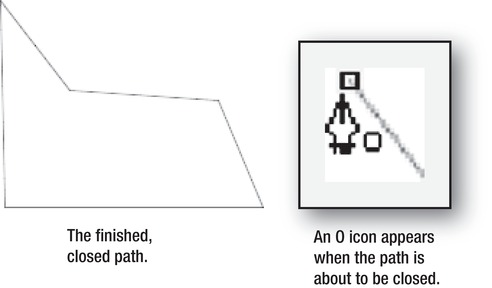
Figure 2-37.
Close the path to create the rough shape for the hill graphic.
Hold down the Shift key when you click to add anchor points and you can draw perfectly straight lines at fixed 90 and 45 degree angles between points.
Anchor points determine what your shape will look like. If you're not happy with where you've placed them, they're easy to move. Choose the Direct Selection Tool from the Tools panel. Everyone calls this the
white arrow
, which is exactly what it is. Click any of your anchor points with the white arrow and drag it to a new location, as shown in
Figure 2-38
. You can use this tool to move any of your anchor points and change the shape.
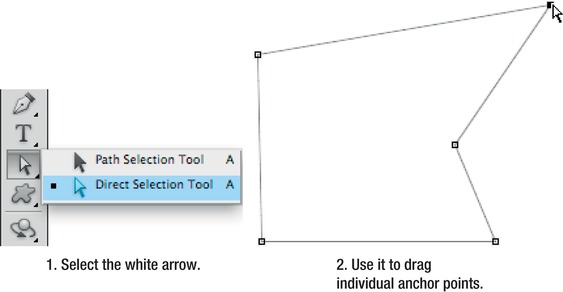
Figure 2-38.
Use the Direct Selection Tool (the white arrow) to move anchor points.
The Pen Tool and the white arrow are always used together like this. In fact, it's so common to switch between the Pen and the white arrow that's it's worth learning the keyboard shortcut to do it. With the Pen Tool selected, hold down the Ctrl key (Windows) or the Command Key (Mac OS X) and the Pen will temporarily change into the white arrow. This is a handy shortcut because if you're making lots of game graphics with the Pen Tool in Photoshop, you'll be switching back and forth between these two tools thousands of times.
You can move an entire shape path around the canvas by dragging it with the
black arrow
(the Path Selection Tool).
Figure 2-39
illustrates this.
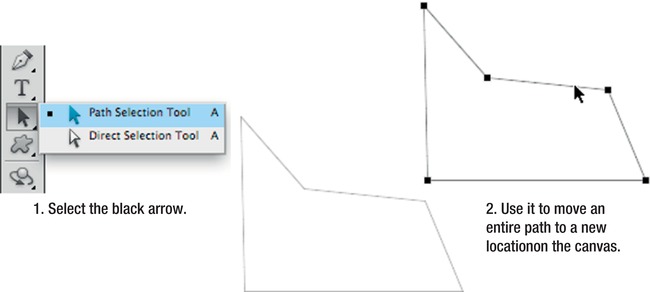
Figure 2-39.
Use the Path Selection Tool (the black arrow) to move and entire path around the canvas.
It's easy to add and delete anchor points. To add a point, select the Pen Tool and move it over any line on the path. You'll see a little plus sign icon appear next to the Pen. Click on that spot on the path, and a new anchor point will be added. (It will add this new anchor point with a new feature called
direction handles
, and you'll be looking at how those work in the next section ahead.)
You can remove anchor points in a similar way. Move the Pen Tool over an existing anchor point and you'll see a minus sign icon appear next to it. Click the anchor point and it will disappear.
Figure 2-40
shows how to add and delete anchor points.
If you're using an older version of Photoshop, you might not be able to add and remove anchor points so easily. It's likely you'll have to choose the Add Anchor Point or Delete Anchor Point Pen Tools from the Tools panel to achieve the same effect.
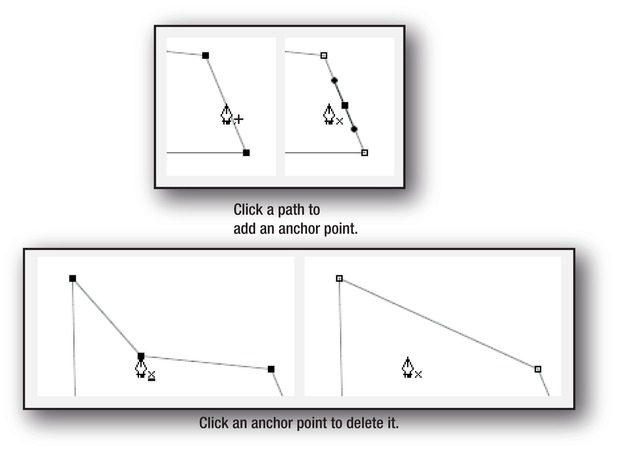
Figure 2-40.
Use the Pen Tool to add and delete anchor points.
If you know how to create paths by adding and deleting anchor points with the Pen Tool, and you know how to move them with the white arrow, you have the essential skills for creating complex shapes with Photoshop. So far, however, you've been just been working with a shape that has straight lines. In the next section I'll show you how to make shapes with curves.
To curve your shape, you need to add direction handles to the anchor points.
Choose the Convert Point Tool from the Tools panel. Click on one of the anchor points. Then, while holding down the left mouse button, drag it across the canvas. Two direction handles appear; you can use them to bend the path at that point. The longer you make the directions handles by dragging and rotating them, the bigger the curve will be.
Figure 2-41
illustrates this.

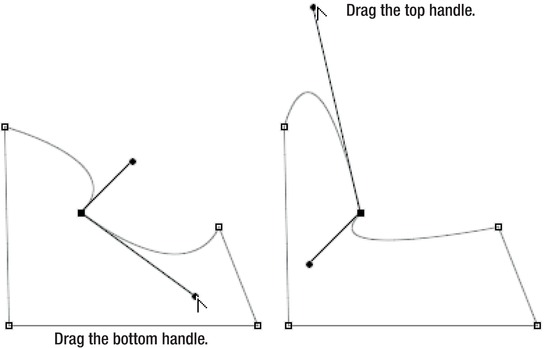
Figure 2-41.
Drag and rotate the direction handles to add curves
The first time you use the Convert Point Tool, you'll be able to move both direction handles at the same time. They stay connected together and move in the same direction. But the second time you click and drag a direction handle, you'll notice that you'll only be moving one of them. The second click with the Convert Point Tool breaks the connection between the two handles. This is actually fine because being able to move the direction handles independently is very useful in fine-tuning the curve, as you can see in
Figure 2-42
.