Windows Server 2008 R2 Unleashed (253 page)
Read Windows Server 2008 R2 Unleashed Online
Authors: Noel Morimoto

review the following sections.
Validating Share Permissions
When share permissions need to be validated, there are
several ways to accomplish this task. One way to accomplish this task is to use the Share
and Storage Management snap-in, as detailed in the following steps:
1. Log on to the Windows Server 2008 R2 system with an account with administrator
privileges.
2. Click Start, click All Programs, click Administrative Tools, and select Share and
Storage Management.
3. When the window opens, locate the desired share in the tasks pane, right-click the
share, and choose Properties.
ptg
4. Select the Permissions tab and click the Share Permissions button.
5. Review and, if necessary, reconfigure the share permissions as required.
6. Click OK to close the Share Permissions window and click OK again to close the
share properties pages.
7. Close the Share and Storage Management console.
Enabling Auditing for NTFS Folders
Enabling auditing on an NTFS folder can be a helpful
aid in troubleshooting access to server folders. Enabling auditing for NTFS folders is a two-
part configuration involving either Group Policy or local computer policy audit settings,
as well as configuring auditing on the folder itself. To enable auditing for a folder on a
Windows Server 2008 R2 system, perform the following steps:
1. Log on to the Windows Server 2008 R2 system with an account with administrator
privileges.
2. Click Start, click All Programs, click Administrative Tools, and select Local Security
Policy.
3. In the tree pane, double-click on Local Policies, and double-click on Audit Policy.
4. In the tasks pane, double-click on Audit Object Access.
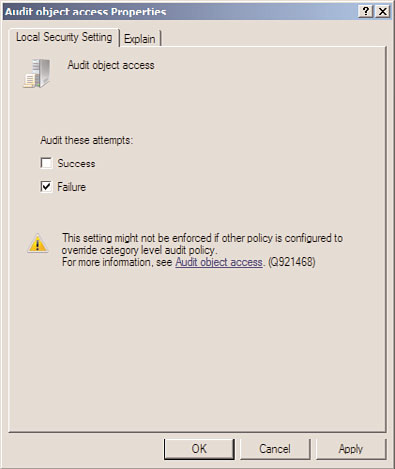
5. When the Audit Object Access Properties window opens, check the Failure check
box, and click OK, as shown in Figure 31.2.
1280
CHAPTER 31
Recovering from a Disaster
ptg
FIGURE 31.2
Enabling failure audit for object access.
6. Close the Local Security Policy window.
7. Click Start and click on Computer.
8. Browse to the drive and folder on which you will enable auditing; for this example,
use the c:\HumanResources folder.
9. Right-click the folder and select Properties.
10. Select the Security tab and click the Advanced button near the bottom of the window.
11. Select the Auditing tab and click the Edit button to enable audit changes.
12. In this particular example, we want to log failed attempts to access the folder, so we
will use the Everyone group and enable all failure audits. Click the Add button in
the Advanced Security Settings window for the HumanResources folder.
13. When the Select User, Computer, Service Account, or Group window opens, type in
Everyone and click OK.
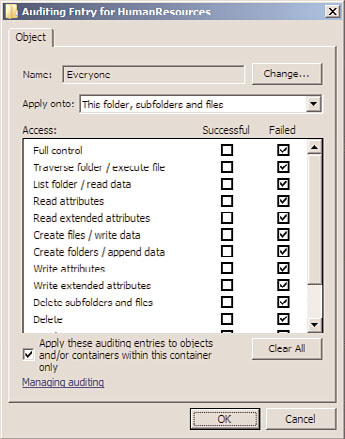
14. In the Auditing Entry window for everyone, check the Failed check box next to Full
Control, check the box at the bottom of the window to apply the Audit policy to all
objects contained within the HumanResources folder, and click OK, as shown in
Figure 31.3.
15. In the Advanced Security Settings window, check the Replace All Existing Inheritable
Auditing Entries check box, and click OK.
Recovering from a Server or System Failure
1281
31
FIGURE 31.3
Configuring an audit entry for the HumanResources NTFS folder.
ptg
16. Click OK again to close the Advanced Security Settings window, and then click OK
one more time to close the property pages of the HumanResources folder.
When a user attempts to access the HumanResources folder and fails based on permis-
sions, a failed audit entry will be logged on the server in the Security event log.
Validating Permissions on NTFS Folders
When permissions seem to be configured correctly
but an end user still cannot properly access a folder or file within a folder because of
group membership or some other factor, perform the following steps:
1. Log on to the Windows Server 2008 R2 system with an account with administrator
privileges.
2. Click Start and click on Computer.
3. Browse to the drive and folder on which you will validate the end user’s permission.
For this example, use the c:\HumanResources folder and check permissions for a
user named Khalil Droubi.
4. Right-click the folder and select Properties.
5. Select the Security tab and click the Advanced button near the bottom of the window.
6. Select the Effective Permissions tab, and click the Select button to add the end user.
7. In the Select User, Computer, or Group window, type in the end user’s name, and
click OK. For this example, use Khalil Droubi.

1282
CHAPTER 31
Recovering from a Disaster
8. On the Effective Permissions tab, the resulting permissions will be displayed, as
shown in Figure 31.4. This example displays that Khalil Droubi only has Read per-
missions and cannot create files or folders.
ptg
FIGURE 31.4
Display the effective permissions on a folder for a specific end user.
Application Access Troubleshooting
If the issue revolves around an application running on a Windows Server 2008 R2 system,
troubleshooting the application according to the application administration guide is the
recommended approach. Many applications can be configured to use authentication using
Active Directory via LDAP, Kerberos, or NTLM authentication. Also, applications might use
custom application or database user accounts and might still require NTFS permissions via
application pool identities and service accounts. Each application is different and should
be treated as such. Specific troubleshooting guides and backup and recovery documenta-
tion should be created for applications before they are deployed on a network.
Data Corruption and File and Folder Recovery
When data is reported as corrupted or deleted, administrators have the option of restor-
ing the data from backup using Windows Server Backup or Shadow Copies for Shared
Folders. An alternative to simply restoring a corrupted file from a shadow copy or backup,
the CHKDSK tool can be run on a disk if multiple users are reporting issues or if disk
errors have been reported in the System event log. CHKDSK is a utility that will scan a
disk for file corruption and bad sectors. If any errors are found, repair attempts will be
made and the details will be available in the Completed Status window. When data has
been overwritten or deleted, the only options are to recover from shadow copies or from
backup media.
Recovering from a Server or System Failure
1283
Recovering File and Folder Data Using Shadow Copies
To recover individual files and folders using previously created shadow copies of shared
31
folders, perform the following steps:
1. Log on to a Windows Server 2008 R2 system, Windows XP SP1, or later workstation
with either administrator rights or with a user account that has permissions to
restore the files from the shadow copy.
2. Click Start and select Run or type in the server and share name in the search pane.
3. At the Run prompt or search pane, type \\servername\sharename, where
servername
represents the NetBIOS or fully qualified domain name of the server hosting the
file share. The share must exist on a volume in which a shadow copy has already
been created.
4. Right-click the folder that will be restored or the folder that contains the file or
folder that will be restored, and select Restore Previous Versions.
5. When the window opens, if necessary, select the Previous Versions tab, and select
the particular folder version to be restored.
6. After the folder or file is selected, click Open.
7. An Explorer window then opens, displaying the contents of the folder when the
shadow copy was made. If you want to restore only a single file, locate the file, right-
ptg
click it, and select Copy.
8. Open the server share location in which the restored file will be placed, right-click in
an empty location, and choose Paste. Overwrite the file as required and close all the
windows as desired.
Recovering File and Folder Data Using Windows Server Backup
To recover individual files and folders using backup media created with Windows Server
Backup, perform the following steps:
1. Log on to the Windows Server 2008 R2 system with an account with administrator
privileges.
2. Click Start, click All Programs, click Administrative Tools, and select Windows
Server Backup.
3. In the Actions pane, select Recover to start the Recovery Wizard.
4. On the Getting Started page, select either to restore data previously backed up from
the local computer or a different computer. For this example, select This Server
(Servername), and click Next to continue. If no previous backup was performed
using a local disk, choose a different disk and locate the backup folder, which will be
scanned and will present all available backups for any system that stored a backup in
that folder.
5. On the next page, select the date of the backup by selecting the correct month and
click on the particular day.
1284
CHAPTER 31
Recovering from a Disaster
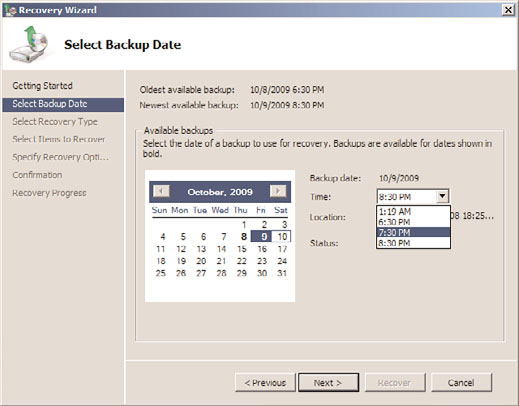
6. After the month and day are selected, if multiple backups were run in a single day,
click the Time drop-down list arrow, and select the correct backup, as shown in
Figure 31.5. Click Next to continue after the month, day, and time are selected.
ptg
FIGURE 31.5