Windows Server 2008 R2 Unleashed (237 page)
Read Windows Server 2008 R2 Unleashed Online
Authors: Noel Morimoto

10. Close the Explorer windows and log off of the server.
Cluster Quorum Configuration
If all cluster nodes and shared storage were available during the creation of the cluster, the
best-suited quorum model would have been automatically selected during the cluster
creation process. In some cases, the selected quorum model might need to be changed if
the cluster configuration changes by adding or removing nodes or by deploying geograph-
29
ically dispersed clusters. When the existing cluster quorum needs to be validated or
changed, perform the following steps:
1. Log on to one of the Windows Server 2008 R2 cluster nodes with an account with
administrator privileges over all nodes in the cluster.
2. Click Start, click All Programs, click Administrative Tools, and select Failover
Cluster Manager.
3. When the Failover Cluster Manager console opens, if necessary type in the name of
the local cluster node to connect to the cluster.
4. In the tree pane, select the cluster name; in the tasks pane, the current quorum
model is listed.
1202
CHAPTER 29
System-Level Fault Tolerance (Clustering/Network Load Balancing)
5. Review the current quorum model, and if it is correct, close the Failover Cluster
Manager console.
6. If the current quorum model is not the desired model, right-click the cluster name
in the tree pane, click More Actions, and select Configure Cluster Quorum Settings.
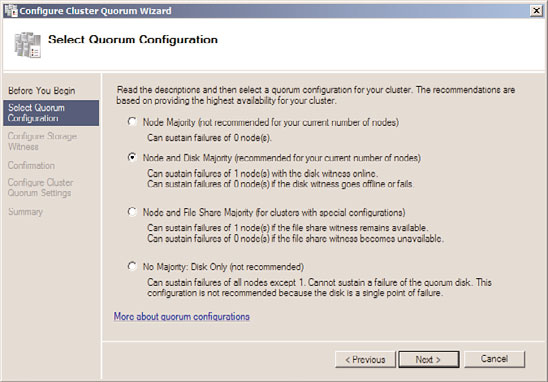
7. If the Before You Begin page opens, click Next, then on the Select Quorum
Configuration page, select the option button of the desired quorum model or select
the option button of the recommended model, and click Next to continue, as shown
in Figure 29.8.
ptg
FIGURE 29.8
Configuring the cluster quorum model for a failover cluster.
8. If a quorum model contains a witness disk or file share, select the designated disk or
specify the path to the file share, and click Next.
9. On the Confirmation page, review the settings, and click Next to update the cluster
quorum model for the failover cluster.
10. Review the results on the Summary page, and click Finish to return to the Failover
Cluster Manager console.
11. Close the Failover Cluster Manager console and log off of the server.
Enabling Cluster Shared Volumes
When Hyper-V virtual machines will be deployed on Windows Server 2008 R2 failover
cluster nodes and shared storage is used, the new Cluster Shared Volumes can be enabled
for use with Hyper-V Live Migration configurations for designated virtual machines.
Cluster Shared Volumes are currently only supported on failover clusters for Hyper-V and
unlike other cluster shared storage, these designated volumes can be read and written to
by all nodes in the cluster simultaneously. Obvious to some is the fact that when two
separate systems can write to a single disk, corruption can occur and that is why this
Deploying Failover Clusters
1203
feature is only currently supported for Hyper-V and Live Migration. One important point
to note is that for a virtual machine to use a Cluster Shared Volume, this feature must be
enabled on the cluster and the virtual machine must use storage that has been added to
the Cluster Shared Volume storage group prior to virtual machine creation. To learn how
to enable Cluster Shared Volumes and deploy virtual machines using CSV storage, refer to
Chapter 37, “Deploying and Using Windows Virtualization.”
Deploying Services or Applications on Failover Clusters
After the desired cluster configuration is achieved, the cluster is ready for the deploying of
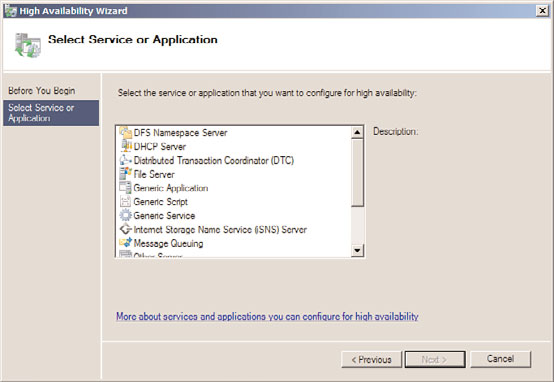
Services and Applications groups. Windows Server 2008 R2 provides several out-of-the-box
cluster resources that can be used to deploy Windows services and applications using
failover clusters, as shown in Figure 29.9.
ptg
FIGURE 29.9
Windows Server 2008 R2 built-in cluster services and applications resources.
Before a particular built-in service or application can be deployed in the cluster, the role,
29
role service, or feature associated with it needs to be installed on each node prior to running
the High Availability Wizard. For example, before a File Services server can be deployed on a
failover cluster for high availability, the File Services role will need to be installed on each
node in the cluster. After the prerequisites are installed on each cluster node, perform the
following steps to deploy the service or application on the failover cluster:
1. Log on to one of the Windows Server 2008 R2 cluster nodes with an account with
administrator privileges over all nodes in the cluster.
2. Click Start, click All Programs, click Administrative Tools, and select Failover
Cluster Manager.
3. When the Failover Cluster Manager console opens, if necessary type in the name of
the local cluster node to connect to the cluster.
1204
CHAPTER 29
System-Level Fault Tolerance (Clustering/Network Load Balancing)
4. In the tree pane, select the cluster name, expand it, and select Services and
Applications.
5. Right-click Services and Applications, and select Configure a Service or Application.
6. In the High Availability Wizard that opens, click Next on the Before You Begin page.
7. Select the desired service or application on the Select a Service or Application page,
and click Next to continue. If the necessary roles, role services, or features are not
installed on each node prior to selecting the desired entry, an error is displayed and
the process cannot continue. For this example, we have selected File Server as the
service or application that will be managed by the failover cluster.
8. On the Client Access Point page, type in the name and IP address for the new file
server, and click Next. This is the name and IP address used to publish or host the
service or application. Also, a computer account in the Active Directory domain
and DNS entries will be created for each name defined in a failover group’s Client
Access Point.
9. Select the disk that will be dedicated to this Services and Applications group on
the Select Storage page by checking the check box next to each disk, and click
Next to continue
10. Review the settings on the Confirmation page, and click Next to deploy the service
or application in the failover cluster.
ptg
11. Depending on the service or application deployed, there can be specific postcreation
wizards that open to complete the configuration. Complete the steps in the wizards
as required or close the wizard and return to the Failover Cluster Manager console.
Otherwise, click Finish to close the High Availability Wizard window and return to
the Failover Cluster Manager console.
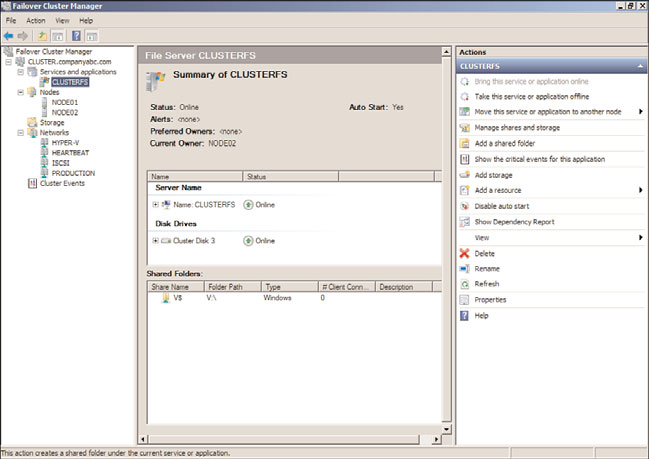
12. In the tree pane, expand Services and Applications to reveal the new group.
13. Select the new group in the tasks pane, and in the Actions pane, review the available
management commands, such as Add a Shared Folder or Manage Shares and Storage,
as shown in Figure 29.10, for a deployed file server named CLUSTERFS.
14. Complete the configuration of the newly deployed service or application, close the
Failover Cluster Management console, and log off of the cluster node.
Configuring Failover and Failback
Clusters that contain two or more nodes automatically have failover configured for each
Services and Applications group as long as each node has the necessary services or applica-
tions installed to support running the group locally. Failback is never configured by
default and needs to be manually configured for each Services and Applications group if
desired. Failback allows a designated preferred server or “preferred owner” to always run a
particular cluster group on the preferred node, when it is available. When the preferred
owner fails and the affected groups failover to alternate nodes, once the preferred node is
back online and functioning as desired, the failback configuration options are used to
determine if the group will automatically failback immediately or after a specified time
period. Also, with regard to failover and failback configuration, the Failover and Failback
properties define how many failures in a specified number of hours will be tolerated
Deploying Failover Clusters
1205
FIGURE 29.10
Reviewing the available actions for a file server failover cluster group.
ptg
before the group is taken offline and remains offline. To review and if necessary change
the failover and failback configuration options on a particular Services and Applications
group, perform the following steps:
1. Log on to one of the Windows Server 2008 R2 cluster nodes with an account with
administrator privileges over all nodes in the cluster.
2. Click Start, click All Programs, click Administrative Tools, and select Failover
Cluster Manager.
3. When the Failover Cluster Manager console opens, if necessary type in the name of
the local cluster node to connect to the cluster.
4. In the tree pane, select the cluster name, expand it, and select Services and
Applications.
29
5. Expand Services and Applications, right-click the desired group, and select
Properties. For this example, the CLUSTERFS file server group will be used.
6. In the CLUSTERFS group properties on the General tab, in the Preferred Owner
section, check the box next to the desired node if failback will be configured. Do not
close the group property window.
7. Select the Failover tab and review the number of allowed failures in a specified
number of hours. The default is one group failure allowed in six hours.
8. In the lower section of the tab, if desired, enable failback and configure whether fail-
back will be allowed and whether it will occur immediately when the preferred node
is online or if the failback can only occur during after hours, such as between the
hours of 9:00 p.m. and 6:00 a.m. or 17 and 6, as shown in Figure 29.11.
