Windows Server 2008 R2 Unleashed (235 page)
Read Windows Server 2008 R2 Unleashed Online
Authors: Noel Morimoto

each node of the cluster to help deploy a reliable failover cluster. Before deploying a
failover cluster, perform the following steps on each node that will be a member of the
failover cluster:
. Configure fault-tolerant volumes or LUNs using local disks or SAN-attached storage
for the operating system volume.
. Configure at least two network cards, one for client and cluster communication and
one for dedicated cluster communication.
. For iSCSI shared storage, configure an additional, dedicated network adapter or hard-
ware-based iSCSI HBA.
. For Hyper-V clusters, configure an additional, dedicated network adapter on each
ptg
node for virtual guest communication.
. Rename each network card property for easy identification within the Failover
Cluster Manager console after the failover cluster is created. For example, rename
Local Area Connection to PRODUCTION, Local Area Connection 2 to iSCSI NIC,
and Local Area Connection 3 to HEARTBEAT, as required and possible. Also, if
network teaming will be used with third-party software, configure the team first and
rename each physical network adapter in the team to TEAMMEMBER1 and 2. The
virtual team adapter should then get the name of PRODUCTION. Remember,
teaming is not supported or recommended for iSCSI and heartbeat connections.
. Configure all necessary IPv4 and IPv6 addresses as static configurations.
. Verify that any and all HBAs and other storage controllers are running the proper
firmware and matched driver version suitable for Windows Server 2008 R2 failover
29
clusters.
. If shared storage will be used, plan to utilize at least two separate LUNs, one to serve
as the witness disk and one to serve as the cluster disk for a high-availability Services
and Applications group.
. If applications or services not included with Windows Server 2008 R2 will be
deployed in the failover cluster, as a best practice, add an additional fault-tolerant
array or LUN to the system to store the application installation and service files.
. Ensure that proper LUN masking and zoning has been configured at the FC or
Ethernet switch level for FC or iSCSI shared storage communication, suitable for
failover clustering. Each node in the failover cluster, along with the HBAs of the
1192
CHAPTER 29
System-Level Fault Tolerance (Clustering/Network Load Balancing)
shared storage device, should have exclusive access to the LUNs presented to the
failover cluster.
. If multiple HBAs will be used in each failover node or in the shared storage device,
ensure that a suitable Multipath I/O driver has been installed. The Windows Server
2008 R2 Multipath I/O feature can be used to provide this function if approved by
the HBA, switch, and storage device vendors and Microsoft.
. Shut down all nodes except one and on that node, configure the shared storage
LUNs as Windows basic disks, format as a single partition/volume for the entire span
of the disk, and define an appropriate drive letter and volume label. Shut down the
node used to set up the disks and bring each other node up one at a time and verify
that each LUN is available, and, if necessary, configure the appropriate drive letter if
it does not match what was configured on the first node.
. As required, test Multipath I/O for load balancing and/or failover using the appropriate
diagnostic or monitoring tool to ensure proper operation on each node one at a time.
. Designate a domain user account to be used for Failover Cluster Manager, and add
this account to the local Administrators group on each cluster node. In the domain,
grant this account the Create Computer Accounts right at the domain level to
ensure that when the administrative and high-availability Services and Applications
ptg
groups are created, the account can create the necessary domain computer accounts.
. Create a spreadsheet with the network names, IP addresses, and cluster disks that
will be used for the administrative cluster and the high-availability Services and
Applications group or groups that will be deployed in the failover cluster. Each
Services and Applications group requires a separate network name and IPv4 address,
but if IPv6 is used, the address can be added separately in addition to the IPv4
address or a custom or generic Services and Applications group needs to be created.
After the tasks in the preceding list are completed, the Failover Clustering feature can be
installed. Failover clusters are deployed using a series of steps, including the following tasks:
1. Preconfigure the nodes, as listed previously and create a domain user account to be
used as the cluster service account.
2. Install any necessary Windows Server 2008 R2 roles, role services, or features that
will be deployed on the failover cluster. If any wizards are included with the role
installation, like creating a DFS namespace or a DHCP scope, skip those wizards.
Repeat this installation on all nodes that will be in the cluster.
3. Install the Failover Clustering feature on each node logged on with the cluster
service account.
4. Run the Validate a Configuration Wizard and review the results to ensure that all
tests pass successfully. If any tests fail, the configuration will not be supported by
Microsoft and can be prone to several different types of issues and instability.
Deploying Failover Clusters
1193
5. Run the Create a Cluster Wizard to actually deploy the administrative cluster.
6. Customize the failover cluster properties.
7. Install any Microsoft or third-party applications that will be added as application-
specific cluster resources, so the application can be deployed using the High
Availability Wizard.
8. Run the High Availability Wizard to create a high-availability Services and
Applications group within the failover cluster, such as a file server, print server,
DHCP server, virtual machine, or another of the included or separate services or
applications that will run on a Windows Server 2008 R2 failover cluster.
9. Test the failover cluster configuration, and back it up.
Installing the Failover Clustering Feature
Before a failover cluster can be deployed, the necessary feature must be installed. To install
the Failover Clustering feature, perform the following steps:
1. Log on to the Windows Server 2008 R2 cluster node with an account with adminis-
trator privileges.
2. Click Start, click All Programs, click Administrative Tools, and select Server Manager.
ptg
3. When Server Manager opens, in the tree pane select the Features node.
4. In the tasks pane, select the Add Features link.
5. In the Select Features window, select Failover Clustering, click Next, and click Install
on the Confirm Installation Selections page to install the feature.
6. When the installation completes, click Close to complete the installation and return
to Server Manager.
7. Close Server Manager and install the Failover Clustering feature on each of the
remaining cluster nodes.
Running the Validate a Configuration Wizard
Failover Cluster Manager is the MMC snap-in used to administer the Failover Clustering
29
feature. After the feature is installed, the next step is to run the Validate a Configuration
Wizard from the tasks pane of the Failover Cluster Manager console. All nodes should be
up and running when the wizard is run. To run the Validate a Configuration Wizard,
perform the following steps:
1. Log on to one of the Windows Server 2008 R2 cluster nodes with an account with
administrator privileges over all nodes in the cluster.
2. Click Start, click All Programs, click Administrative Tools, and select Failover
Cluster Manager.
1194
CHAPTER 29
System-Level Fault Tolerance (Clustering/Network Load Balancing)
3. When the Failover Cluster Manager console opens, click the Validate a
Configuration link in the Actions pane under the Management heading.
4. When the Validate a Configuration Wizard opens, click Next on the Before You
Begin page.
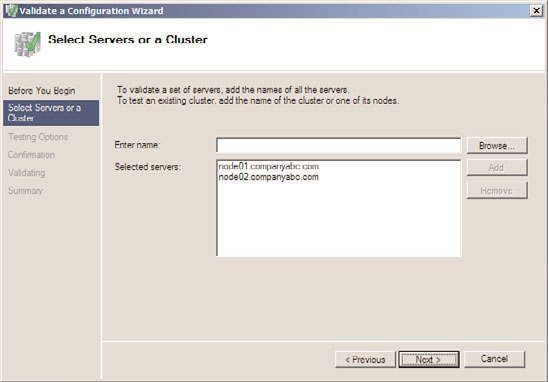
5. On the Select Servers or a Cluster page, enter the name of a cluster node, and click
the Add button. Repeat this process until all nodes are added to the list, as shown in
Figure 29.1, and click Next to continue.
ptg
FIGURE 29.1
Adding the servers to be validated by the Validate a Configuration Wizard.
6. On the Testing Options page, read the details that explain the requirements for all
tests to pass in order to be supported by Microsoft. Select the Run All Tests
(Recommended) option button, and click Next to continue.
7. On the Confirmation page, review the list of servers that will be tested and the list
of tests that will be performed, and click Next to begin testing the servers.
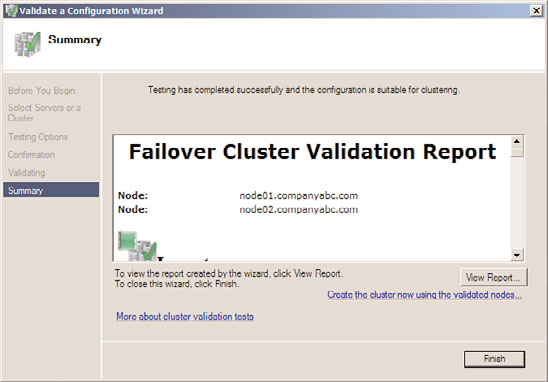
8. When the tests complete, the Summary page displays the results and if the tests
pass, as shown in Figure 29.2, click Finish to complete the Validate a Configuration
Wizard. If the test failed, click the View Report button to review the details and
determine which test failed and why the test failed.
Even if the Validate a Configuration Wizard does not pass every test, depending on the
test, creating a cluster might still be possible. After the Validation a Configuration Wizard
is completed successfully, the cluster can be created. One common mistake is that the
disks that will be used for the cluster are not defined on any of the cluster nodes, and
these should be defined and active on at least one node, and listed as offline on the
Deploying Failover Clusters
1195
FIGURE 29.2
A successful result of the Validate a Configuration Wizard is required for
Microsoft failover cluster support.
remaining nodes. Alternatively, the cluster can be deployed with only a single node, the
ptg
cluster can be created, and additional nodes can be added later.
Creating a Failover Cluster
When the failover cluster is first created, all nodes in the cluster should be up and
running. The exception to that rule is when failover clusters utilize direct attached storage
such as Serial Attached SCSI devices that require a process of creating the cluster on a
single node and adding other nodes one at a time. For clusters that will not use shared
storage or clusters that will connect to shared storage using iSCSI or Fibre Channel
connections, all nodes should be powered on during cluster creation. To create the failover
cluster, perform the following steps:
1. Log on to one of the Windows Server 2008 R2 cluster nodes with an account with
administrator privileges over all nodes in the cluster.
29
2. Click Start, click All Programs, click Administrative Tools, and select Failover
Cluster Manager.
3. When the Failover Cluster Manager console opens, click the Create a Cluster link in
the Actions pane under the Management heading.
4. When the Create Cluster Wizard opens, click Next on the Before You Begin page.
5. On the Select Servers page, enter the name of each cluster node, and click the Add
button. When all the nodes are listed, click Next to continue.
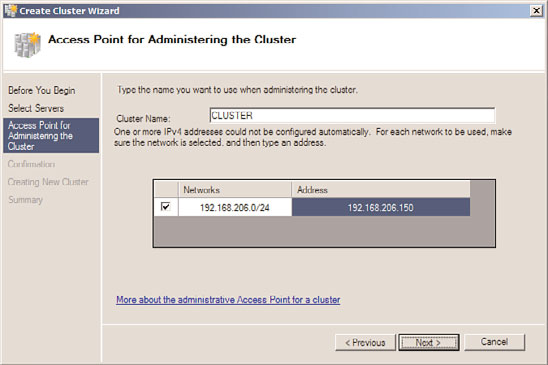
6. On the Access Point for Administering the Cluster page, type in the name of the
cluster, complete the IPv4 address, and click Next, as shown in Figure 29.3.