Windows Server 2008 R2 Unleashed (116 page)
Read Windows Server 2008 R2 Unleashed Online
Authors: Noel Morimoto

2. Expand the Roles folder.
3. Expand the Active Directory Domain Services folder.
4. Expand the Active Directory Users and Computers snap-in.
5. Expand the domain folder (in this example, the companyabc.com folder).
6. Select the Users container that was used in the previous section. In the right pane,
right-click the group that was created earlier, and select Properties.
7. Enter a description for the group on the General tab and then click the Members tab.
8. Click Add to add members to the group.
9. In the Select Users, Contacts, Computers, or Groups window, type in the name of
each group member separated by a semicolon and click OK to add these users to the
group. If you don’t know the names, clicking the Advanced button opens a window
ptg
where you can perform a search to locate the desired members.
10. When all the members are listed on the Members tab of the group’s property page,
click OK to complete the operation.
Group Management
After a group is created, it needs to be managed by an administrator, users, or a combina-
tion of both, depending on the dynamics of the group.
To delegate control of a group to a particular user, follow these steps:
18
1. Launch Server Manager on a domain controller.
2. Expand the Roles folder.
3. Expand the Active Directory Domain Services folder.
4. Select Active Directory Users and Computers and select Advanced Features from
the View menu.
5. Expand the Active Directory Users and Computers snap-in.
6. Expand the domain folder (in this example, the companyabc.com folder).
7. Select the Users container that was used in the previous section. In the right pane,
right-click the group that was created earlier, and select Properties.
8. Select the Security tab.
9. At the bottom of the page, click the Advanced button.
10. In the Advanced Security Settings for Group dialog box, select the Permissions tab.
568
CHAPTER 18
Windows Server 2008 R2 Administration
11. Click Add. In the Select User, Computer, or Group window, type in the name of the
account for which you want to grant permissions, and click OK.
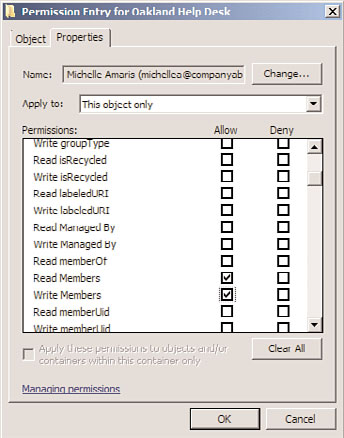
12. When the Permissions Entry for Group window appears, select the Properties tab.
13. Click the Apply To drop-down list arrow, and then select This Object Only.
14. In the Permissions section, check the Allow boxes for Read Members and Write
Members, as shown in Figure 18.5. Then click OK.
ptg
FIGURE 18.5
Granting permissions to modify group membership.
15. Click OK to close the Advanced Security Settings for Group dialog box.
16. Click OK to close the group’s property pages.
Managing Users with Local Security and Group
Windows Server 2008 R2 systems provide local security policies to manage user and group
administrative access on a per-server basis. Within Active Directory, you can use group
policies to set configurations and security on a specified collection of computers, users, or
groups of users from a single policy. These policies can be used to deliver standard desktop
configurations and security settings for server access and application functionality. Also,
policies can set user configurations to deliver software on demand, redirect desktop
folders, plus affect many more settings. Many settings within each policy explain what the
setting controls and whether computer-based settings apply to only Windows XP,
Windows Vista, or Windows 7 workstations. Chapter 15, “Security Policies, Network Policy
Managing Users with Local Security and Group Policies
569
Server, and Network Access Protection,” describes security policy in more depth, but the
best way to discover and learn about all the Group Policy settings is to open an actual
Group Policy Object and start browsing each section.
Viewing Policies with the Group Policy Management Console
You can view Active Directory-based group policies or server and workstation local security
policies with very little effort by using a single console, the Group Policy Management
Console (GPMC). This tool is added to the Server Manager console when the Active
Directory Domain Services role is added to a server. The GPMC enables administrators to
view group policies, edit group policies, and model the effects of combinations of group
policies (that is, model the resulting configuration).
To open an existing policy, follow these steps:
1. Launch Server Manager on a domain controller.
2. Expand the Features folder.
3. Expand the Group Policy Management Console.
4. Expand the Forest folder.
5. Expand the Domains folder.
6. Expand the specific domain, such as companyabc.com.
ptg
7. Select a Group Policy Object, such as the Default Domain Policy. Click OK to close
the linked policy warning window.
8. Select the Settings tab to review the settings. Or right-click the Group Policy Object,
and select Edit to change the settings.
After you access the policy, you can view each setting or settings container to determine
the default value and, in some cases, learn what the setting controls. Keep in mind that,
with the correct level of permissions, any changes you make to this policy are live
changes; there is no undo other than reversing the individual setting changes or perform-
18
ing an authoritative restore of Active Directory.
Creating New Group Policies
When changes need to be made or tested using group policies, the administrator should
leave the production environment untouched and create test policies in isolated test lab
environments. When test labs are not available or cannot replicate the production envi-
ronment, the administrator can test policies in isolated organizational units within a
domain. Also, if domain- or site-based policies need to be created for testing, security
filtering could be modified to apply the policy only to a specific set of test users or groups.
The preceding section described how to locate a group policy. Using the Group Policy
Management Console, you can also create, configure, and open site, domain, and organi-
zational unit (OU) group policies for editing.
In some cases, it will be necessary to prevent a GPO from being applied to a user or
computer. That is, there might be a GPO that applies to all members of a department, but
it is necessary to make a single exception to the rule. Rather than create a specific OU to
570
CHAPTER 18
Windows Server 2008 R2 Administration
apply the GPO, security filtering can be used to allow or deny the application of the
Group Policy Object.
The following steps outline how to create a new domain-based policy and configure its
security filtering to apply to a single user:
1. Launch Server Manager on a domain controller.
2. Expand the Features folder.
3. Expand the Group Policy Management Console.
4. Expand the Forest folder.
5. Expand the Domains folder.
6. Select the specific domain, such as companyabc.com.
7. Right-click on the domain and select Create a GPO in This Domain, and Link It Here.
8. Type in a descriptive policy name, leave the source starter GPO set to None, and
click OK to create the policy.
NOTE
Source starter GPOs are GPO templates that can be used to prepopulate settings in
GPOs. If there are common settings that will go into GPOs, they can be created in
ptg
starter GPOs and then seeded into new GPOs as they are created.
The starter GPOs are stored in a common folder named StarterGPOs. Any GPOs creat-
ed in this folder are available for seeding GPOs. There are no starter GPOs in a domain
by default.
9. The new policy will be displayed in the right pane. Right-click the new policy and
select Edit to launch the Group Policy Management Editor snap-in.
10. Right-click the GPO name in the Group Policy Management Editor, and select
Properties.
11. Select the Security tab and highlight the Authenticated Users entry.
12. In the Permissions section, scroll down and uncheck the Allow check box for Apply
Group Policy. This means that the GPO will not take effect on any user or computer.
13. Select each entry in the Group Policy access control list and verify that no existing
groups are allowed to apply Group Policy.
14. Click Add and type in the name of a user or group. To find a list of users and groups
within the current domain, click the Advanced button, and in the search window,
click Find Now to return the complete list. Scroll down and select the users or
groups you want, and click OK.
15. Click OK to add the entries to the policy.
16. Back in the security window, select the respective entry and check the Allow check
box for Apply Group Policy, as shown in Figure 18.6. This means that the GPO will
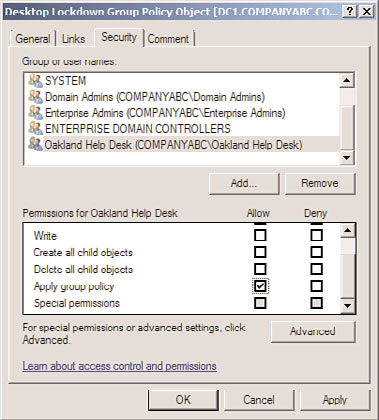
Managing Users with Local Security and Group Policies
571
take effect on the members of this group, which could include both users and
computers. Click OK when you’re finished.
ptg
FIGURE 18.6
Modifying a group policy’s application scope.
17. Close the Group Policy Management Editor snap-in.
Now the group policies set in the GPO will affect only the users or computers that were
specified—in this case, members of the Oakland Help Desk. This allows for fine-grained
application of group policies to targeted groups.
18
Configuring and Optimizing Group Policy
After a Group Policy Object is created, a few steps should be taken to configure how the
policy will be applied and to optimize the time to apply the policy. Group policies can be
limited to computer- or user-specific settings. To determine whether either type of setting
can be disabled, the administrator should determine which settings are necessary to
provide the desired policy settings. In many cases, a policy uses settings for both types. To
disable either user or computer policy settings, open the properties as described in the
section “Viewing Policies with the Group Policy Management Console” earlier in this
chapter. When the policy is listed, select the Details tab. Adjust the GPO status field to
disable computer or user settings as required.
When multiple group policies exist, they are applied in a predefined order. For a particu-
lar user or computer, the order can be derived using the Resultant Set of Policies snap-in.
The results of standard policies are that if setting X is enabled on a top-level policy and
572
CHAPTER 18
Windows Server 2008 R2 Administration
disabled on the last policy to apply to an object, the resulting setting will disable setting
X. Many policy settings have three states: enabled, disabled, and the default of not
configured.
You can limit group policies to apply to specific users or computers by modifying the secu-
rity entries. In addition to disabling portions of each GPO, policy inheritance can be
blocked at the domain or OU container level using a setting called Block Policy
Inheritance. When blocking or precedence rules need to be ignored for the settings of a
particular group policy, the group policy can be configured as Enforced.
Group Policy Objects and Logon Performance
It is important that policies be effectively placed to avoid slow logon performance. For
each level in the OU structure where a group policy is linked, the download and applica-