Make: Electronics (33 page)
Authors: Charles Platt

Tools
Desoldering
Desoldering is much, much harder than soldering. Two simple tools are available:
- Suction pump
. First, you apply the soldering iron to make the solder liquid. Then you use this simple gadget to try to suck up as much of the liquid as possible. Usually it won’t remove enough metal to allow you to pull the joint apart, and you will have to try the next tool. Refer back to Figure 3-10. - Desoldering wick or braid
. Desoldering wick, also known as braid, is designed to soak up the solder from a joint, but again, it won’t clean the joint entirely, and you will be in the awkward position of trying to use both hands to pull components apart while simultaneously applying heat to stop the solder from solidifying. Refer back to Figure 3-11.
I don’t have much advice about desoldering. It’s a frustrating experience (at least, I think so) and can damage components irrevocably.
Theory
Soldering theory
The better you understand the process of soldering, the easier it should be for you to make good solder joints.
The tip of the soldering iron is hot, and you want to transfer that heat into the joint that you are trying to make. In this situation, you can think of the heat as being like a fluid. The larger the connection is between the soldering iron and the joint, the greater the quantity of heat, per second, that can flow through it.
For this reason, you should adjust the angle of the soldering iron so that it makes the widest possible contact. If it touches the wires only at a tiny point, you’ll limit the amount of heat flow. Figures 3-45 and 3-46 illustrate this concept. Once the solder starts to melt, it broadens the area of contact, which helps to transfer more heat, so the process accelerates naturally. Initiating it is the tricky part.
The other aspect of heat flow that you should consider is that it can suck heat away from the places where you want it, and deliver it to places where you don’t want it. If you’re trying to solder a very heavy piece of copper wire, the joint may never get hot enough to melt the solder, because the heavy wire conducts heat away from the joint. You may find that even a 40-watt iron isn’t powerful enough to overcome this problem, and if you are doing heavy work, you may need a more powerful iron.
As a general rule, if you can’t complete a solder joint in 10 seconds, you aren’t applying enough heat.

Figure 3-45.
With only a small surface area of contact between the iron and the working surface, an insufficient amount of heat is transferred.
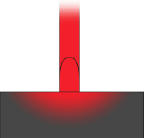
Figure 3-46.
A larger area of contact between the soldering iron and its target will greatly increase the heat transfer.
Adding Insulation
After you’ve succeeded in making a good inline solder connection between two wires, it’s time for the easy part. Choose some heat-shrink tubing that is just big enough to slide over the joint with a little bit of room to spare.
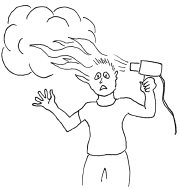
Figure 3-47.
Other members of your family should understand that although a heat gun looks like a hair dryer, appearances may be deceptive.
 Heat Guns Get Hot, Too!
Notice the chromed steel tube at the business end of your heat gun. Steel costs more than plastic, so the manufacturer must have put it there for a good reason—and the reason is that the air flowing through it becomes so hot that it would melt a plastic tube.
The metal tube stays hot enough to burn you for several minutes after you’ve used it. And, as in the case of soldering irons, other people (and pets) are vulnerable, because they won’t necessarily know that the heat gun is hot. Most of all, make sure that no one in your home ever makes the mistake of using a heat gun as a hair dryer (Figure 3-47).
This tool is just a little more hazardous than it appears.
Slide the tubing along until the joint is centered under it, hold it in front of your heat gun, and switch on the gun (keeping your fingers away from the blast of superheated air). Turn the wire so that you heat both sides. The tubing should shrink tight around the joint within half a minute. If you overheat the tubing, it may shrink so much that it splits, at which point you must remove it and start over. As soon as the tubing is tight around the wire, your job is done, and there’s no point in making it any hotter. Figures 3-48 through 3-50 show the desired result. I used white tubing because it shows up well in photographs. Different colors of heat-shrink tubing all perform the same way.
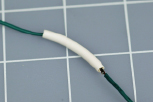
Figure 3-48.
Slip the tubing over your wire joint.
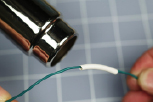
Figure 3-49.
Apply heat to the tubing.
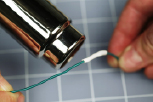
Figure 3-50.
Leave the heat on the tubing until it shrinks to firmly cover the joint.
I suggest you next practice your soldering skills on a couple of practical projects. In the first one, you can add color-coded, solid-core wires to your AC adapter, and in the second one, you can shorten the power cord for a laptop power supply. You can use your larger soldering iron for both of these tasks, because neither of them involves any heat-sensitive components.
Modifying an AC Adapter
In the previous chapter, I mentioned the irritation of being unable to push the wires from your AC adapter into the holes of your breadboard. So, let’s fix this right now:
1.
Cut two pieces of solid-conductor 22-gauge wire—one of them red, the other black or blue. Each should be about 2 inches long. Strip a quarter-inch of insulation from both ends of each piece of wire.
2.
Trim the wire from your AC adapter. You need to expose some fresh, clean copper to maximize your chance of getting the solder to stick.
I suggest that you make one conductor longer than the other to minimize the chance of the bare ends touching and creating a short circuit. Use your meter, set to DC volts, if you have any doubt about which conductor is positive.
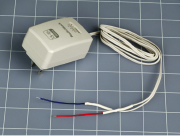
Solder the wires and add heat-shrink tubing as you did in the practice session. The result should look like Figure 3-51.
