Make: Electronics (30 page)
Authors: Charles Platt

Supplies
Solder
This is the stuff that you will melt to join components together on a permanent (we hope) basis. You need some very thin solder, size 0.022 inches, for very small components, and thicker solder, 0.05 inches, for heavier items. Avoid buying solder that is intended for plumbers, or for craft purposes such as creating jewelry. A range of solder thicknesses is shown in Figure 3-20. You want to make sure to get lead-free solder.
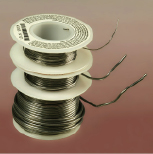
Figure 3-20.
Spools of solder in various thicknesses.
Electronics solder has a nonacidic rosin core that is appropriate for electronic components. Rolls of solder are available from all hobby-electronics sources including All Electronics, RadioShack, and Jameco, or search for “electronic solder” on Amazon.
Wire
You’ll need some stranded wire to make flexible external connections with the circuit that you’ll be building. Look for 22-gauge stranded hookup wire, in red, black, and green, 10 feet (minimum) of each.
If you want to install the intrusion alarm after completing that project in
Experiment 15
, you’ll need white-insulated two-conductor wire of the type sold for doorbells or furnace controls. This is available by the foot from Lowe’s, Home Depot, Ace Hardware, and similar stores. You’ll decide how much to buy after you measure the distances between the magnetic sensor switches that you decide to install.
Heat-shrink tube
For use in conjunction with your heat gun, described previously. You’ll need a range of sizes in any colors of your choice. See Figure 3-21. Check RadioShack part 278-1627, other electronics suppliers, or your local hardware store. Prices will vary widely. You can buy the cheapest.
Copper alligator clips
These absorb heat when you are soldering delicate components. The Mueller BU-30C is a full-size solid copper alligator clip for maximum heat absorption. RadioShack sells smaller clips (part number 270-373, shown in Figure 3-22) that are suitable for tiny components.
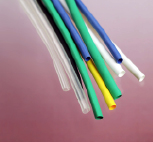
Figure 3-21.
Slide heat-shrink tubing over a bare joint and apply heat from a heat gun to make a tight insulating seal around the joint.
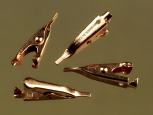
Figure 3-22.
These small clips absorb heat to protect components when you’re soldering them.
Perforated board
When you’re ready to move your circuit from a breadboard to a more permanent location, you’ll want to solder it to a piece of perforated board, often known as “prototyping board” but also called “perfboard.”
You need the type that has copper strips etched onto the back, in exactly the same “breadboard layout” as the conductors hidden inside a breadboard, so that you can retain the same layout of your components when you solder them into place. Examples are RadioShack part 276-150 (shown in Figure 3-23) for small projects and part 276-170 (in Figure 3-24) for larger projects, such as
Experiment 15
.
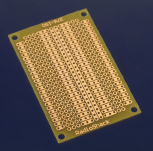
Figure 3-23.
This perforated board has a pattern of copper traces similar to the pattern inside a breadboard, so that you can lay out the components with minimal risk of wiring errors, when you’re ready to create a permanently soldered version of your project.
For very small projects in which you will connect components using their wires alone, you need perfboard that isn’t etched with copper strips connecting the holes. I like the Twin Industries 7100 range (available from Mouser.com) or Vectorboard from Newark Electronics, shown in Figure 3-25. You use a saw to cut out as small a piece as you need. Cheaper options are RadioShack part 276-147 (shown in Figure 3-26), or PC-1 from All Electronics. These have little copper circles around each hole that are not necessary for our purposes, but not a problem, either.
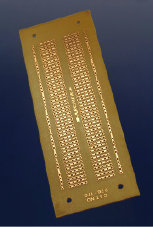
Figure 3-24.
A larger example of perforated board with breadboard geometry.
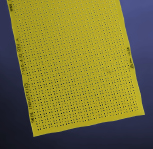
Figure 3-25.
Plain perforated board (with no copper traces) can be used for mounting components when you want to do point-to-point wiring.
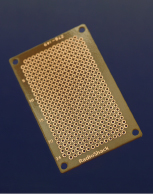
Figure 3-26.
A small piece of perforated board with individual copper solder pads to assist you in mounting components.
Plywood
When you use a soldering iron, hot drops of solder tend to fall onto your table or workbench. The solder solidifies almost instantly, can be difficult to remove, and will leave a scar. Consider using a 2-foot square of half-inch plywood to provide disposable protection. You can buy it precut at Home Depot or Lowe’s.
Machine screws
To mount components behind a panel, you need small machine screws (or “bolts”). They look nice if they have flat heads that fit flush against the panel. I suggest stainless-steel machine screws, #4 size, in 1/2-, 5/8-, 3/4-, and 1-inch lengths, 100 of each, plus 400 washers and 400 #4 locknuts of the type that have nylon inserts, so that they won’t work loose. Check McMaster-Carr for a large and reasonably priced selection.
Project boxes
A project box is just a small box (usually plastic) with a removable lid. You mount your switches, potentiometers, and LEDs in holes that you drill through the box, and you attach your circuit on a perforated board that goes inside the box. Search All Electronics for “project box” or RadioShack for “project enclosure.”
You need a box measuring approximately 6 inches long, 3 inches wide, and 2 inches high, such as RadioShack part 270-1805. Anything similar will do. I suggest you buy a couple other sizes as well, as they will be useful in the future.
Components
Power plugs, sockets, and binding posts
After you finish a project and put it in a box, you’ll need a convenient way to supply it with power. Buy yourself a pair of insulated binding posts, such as RadioShack part 274-661, shown in Figure 3-27. Also obtain a panel-mounted power jack, size N, such as RadioShack part 274-1583, and DC power plug, size N, such as RadioShack 274-1573. The plug-and-socket pair is pictured in Figure 3-28.
Finally, you will need interconnects that are sized to fit a perforated board that is drilled at intervals of 1/10 inch. Sometimes known as “single inline sockets and headers,” but also known as “boardmount sockets and pinstrip headers,” they come in strips of 36 or more, and you can snip off as many as you need. Examples are Mill-Max part numbers 800-10-064-10-001000 and 801-93-050-10-001000, or 3M part numbers 929974-01-36-RK and 929834-01-36-RK. You can buy them from the usual electronics suppliers. Figure 3-29 shows headers before and after being snapped into small sections. Make sure that the interconnects have a terminal spacing of 0.1 inch.
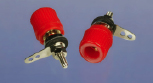
Figure 3-27.
These terminals, also known as binding posts, enable a solderless connection with wires that have stripped ends. Also available in black.
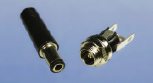
Figure 3-28.
The socket on the right can be mounted in a project box to receive power from the plug on the left.
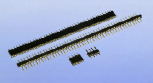
Figure 3-29.
Single inline sockets (top) and headers (middle) allow you to make very compact plug-and-socket connections to a PC board. They can be sawn, cut, or snapped into smaller sections (bottom). The terminals are 0.1 inch apart.