Foundation Game Design with ActionScript 3.0, Second Edition (34 page)
Read Foundation Game Design with ActionScript 3.0, Second Edition Online
Authors: Rex van der Spuy

That's a lot of information! Some of it might actually be very useful, although certainly not for anything we need to do right now. Later in the book you'll look at how you can access this information and use it in your games.
You can access all this information using dot notation. All you need to do is use the name of the event object, followed by a dot, and then followed by the property of the event object that you need to access. Based on the preceding example, you could use the following code to find out the x position of where the mouse clicked the stage:
function onClick(event:MouseEvent):void
{
  trace(event.stageX);
}
If there are other objects on the stage, you can find out the name of the object that was clicked by using the target property. Using event.target will give you the name of the object you clicked:
function onClick(event:MouseEvent):void
{
  trace(event.target);
}
If you use this in the example code, it will output the following:
[object Stage]
That's the stage.
Soon you'll see how we're going to use event listeners to program the buttons that will control our game character.
Figure 3-37
gives you a general overview of how this example program works.
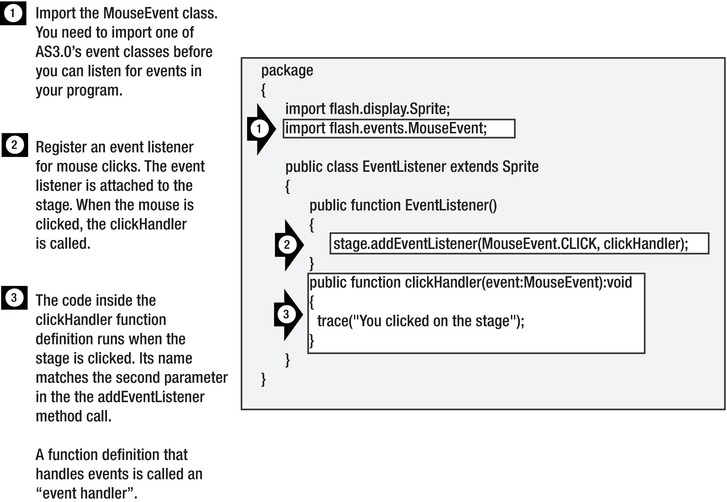
Figure 3-37
. A simple program that demonstrates event listeners
This example showed you how to use the CLICK event from theMouseEventclass. TheMouseEventclass contains many other events that you're sure to find some use for.
Table 3-1
shows the event names and what they do.
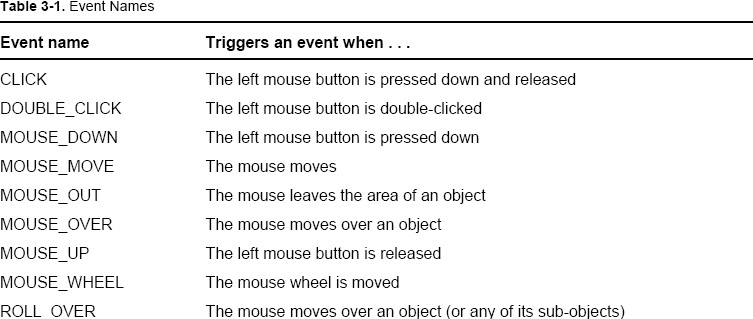

Many of these events don't work with the stage object that you used in the example, but they all work withSpriteobjects. here are some examples of how you might register these events using addEventListener:
addEventListener(MouseEvent.ROLL_OVER, onRollOver);
addEventListener(MouseEvent.ROLL_OUT, onRollOut);
addEventListener(MouseEvent.MOUSE_MOVE, onMouseMove);
Figure 3-38
illustrates the basic model for creating an event listener and what happens when the event occurs.
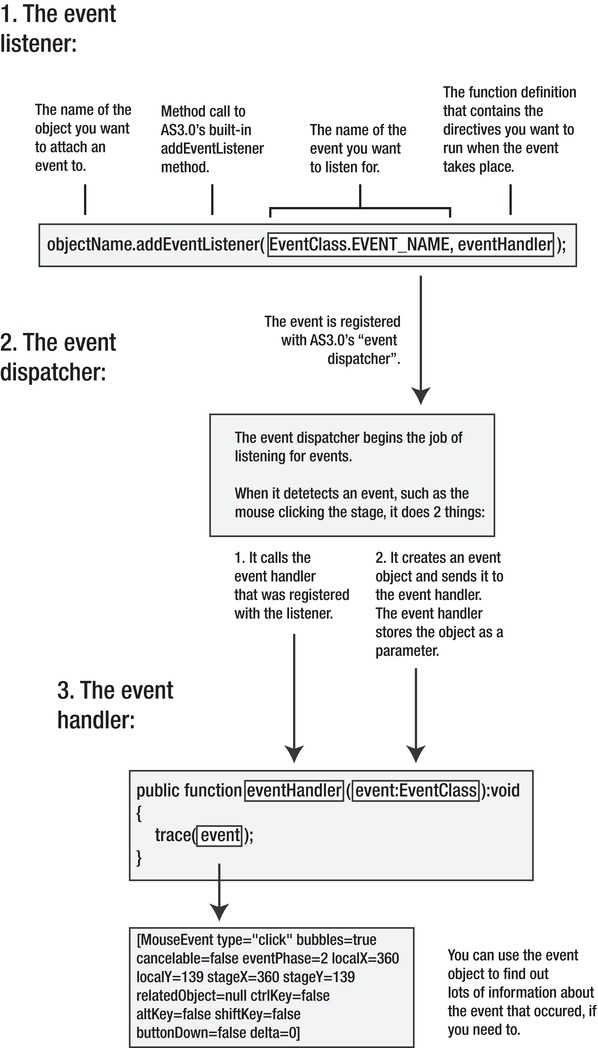
Figure 3-38.
How event listeners work
As you did with methods, you'll need a bit of practice and a few more practical examples before you fully grasp how event listeners work. You'll see lots of examples of event listeners in action over the course of this book, so you'll have plenty of opportunity to experiment with them and see their effects in different contexts. The nice thing about event listeners is that they all use exactly this same format. You don't have to absolutely understand every detail about how they work yet; you just need to know how to use them to get the results you want for your game.
Now that we know about dot notation, methods, and event listeners, we can use these techniques to help us program the buttons in our GameWorld project. Let's program the up button to display a message when we click on it.
- Make sure that the GameWorld project is open.
- Add the following code in bold directly after the previous code you wrote.
To save space in this book, I've left out all the variable declarations you wrote in the class definition, and also all the code we used to create, display and position objects in the constructor method. I've replaced all that code with comments, so you'll need to be careful to insert this new code in the correct place in your own work. If you have any doubts about where to add this new code, have a look at the file GameWorldButtonTest in the chapter's source file. It contains the completed working code of this next step. You'll also find a complete listing of the finished project at the end of this chapter.
package
{
  import flash.display.Loader;
  import flash.display.Sprite;
  import flash.events.MouseEvent;
  import flash.net.URLRequest;
  [SWF(width="550", height="400",
    backgroundColor="#FFFFFF", frameRate="60")]
  public class GameWorld extends Sprite
  {
    //All the variable declarations...
    public function GameWorld()
    {
      //All the code that creates, displays
      //and positions the objects...
      //Add the button listeners
      upButton.addEventListener(MouseEvent.CLICK, upButtonHandler);
    }
    public function upButtonHandler(event:MouseEvent):void
    {
      trace("You clicked the up button");
    }
  }
} - Compile the program. When it runs, click the up button on the stage. You'll see the trace message “You clicked the up button.”
Figure 3-39
shows what you'll see.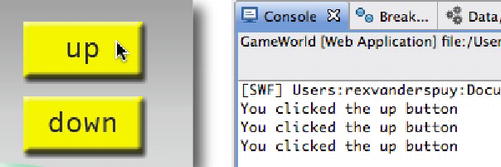
Figure 3-39.
Click the up button to test your button event.
So far, this very simple little program is a great example of how objects, dot notation, methods, and event listeners all work together. But it doesn't do anything really fun yet. To make it really interactive, and the basis of something we can use to make a game, we need to learn more aboutSpriteobjects and how to control them.
A large part of game design with AS3.0 is all about learning how to control Sprite objects. This is usually done by changing a Sprite's properties. We've already encountered two Sprite properties so far in this chapter: the x and y properties. We learnt how to change those properties to position objects on the stage. Let's take a closer look at what Sprite properties are and what you can do with them.
Properties are the features of an object that you can control with code. What are these features? they can be variables that are attached to objects that you create. Or they can be any of the built-in properties that are part of the Sprite class. These built-in properties are of particular use to game designers.
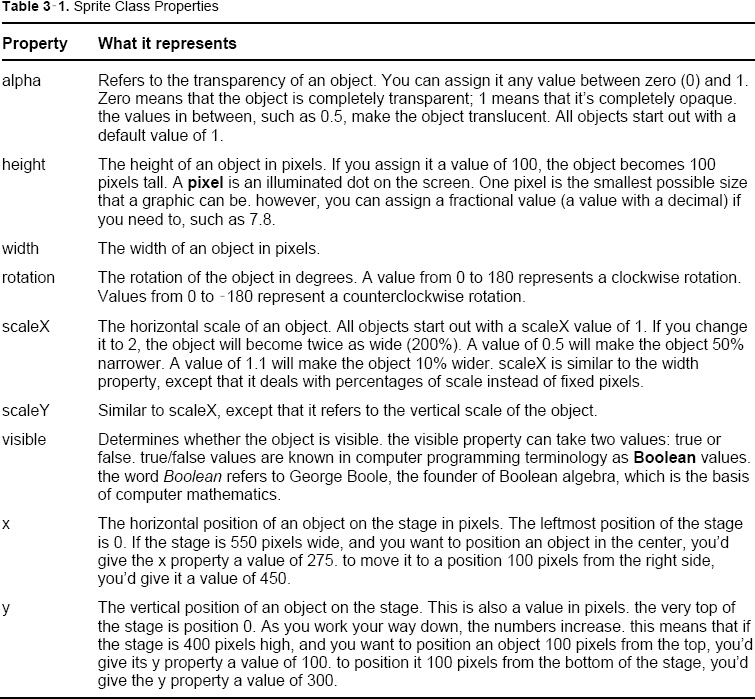
The Sprite class has a huge number of properties that you can access, use, and sometimes modify. But for the kind of interactivity that you'll need for most of the games in this book, there are a just few properties that you'll be using very frequently. As a bonus, they're the really fun-to- use properties, too!
Table 3-1
shows what these are.
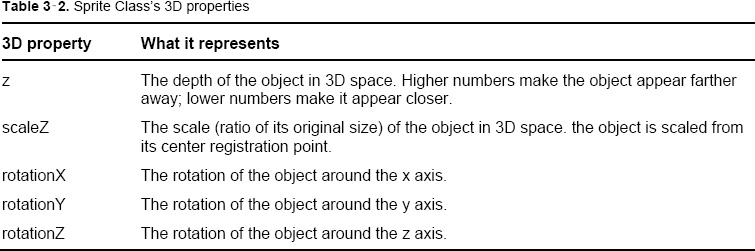
Several additional properties are used for transforming an object in 3D space. You won't be using them in this book, but you should know that they exist and experiment with them when you have the chance. Although their primary purpose is to be used as building blocks for creating 3D objects and spaces, you might find uses for these properties for special effects in some of your games.
Table 3-2
shows 3D properties you might want to get to know.
You can have a lot of fun with all these properties, and they're very easy to use. In the next few sections, we'll use them in our GameWorld project to turn the character object into an interactive toy.
The first thing we'll do is program our up and down buttons to move the character up and down the stage. there are a few ways to program these buttons. To demonstrate exactly how the x and y properties work, and how to change them, we'll start with the simplest way and then modify the program a little so that the effect is a bit more realistic.