Building Web Sites All-in-One For Dummies® (82 page)
Read Building Web Sites All-in-One For Dummies® Online
Authors: Claudia Snell

b. Click the option you'd like displayed when the list loads from the Initially Selected window.
If you don't choose an option, the drop-down list window is blank.
c. Select the Allow Multiple check box if you want viewers to be able to select multiple items from the list.
To select multiple items, viewers must hold down Ctrl (Windows) or
Ã
(Mac) while clicking.
d. In the Type area, select the List radio button to have the form object function as a drop-down list, or select Menu to have the form object function as a jump menu.
Of course, if you choose Menu, your values have to be URLs to the pages you want to open when users click the labels. If you select Menu, the option to allow multiple selections is grayed out, which is logical because even the best multitasker can't navigate to more than one page at a time.
Figure 1-14:
Choose options for the drop-down list.

 You can add other elements to a form by choosing FormâInsert and choosing an option from the submenu, including the following:
â¢
Image Field:
Insert an image in a form.
â¢
File Field:
Insert a Browse button and field in a form. (You see this type of field on a form that wants you to attach a file saved on your hard drive.)
â¢
Fieldset:
Add a border around data.
â¢
Label:
Insert label tags in your form. When you add this option, the Split workspace appears. In the Code section of the workspace, enter the name for the label between the tags.
â¢
Spry Validation Text Field:
Create a text field that's validated to make sure the correct format is entered. For example, if you choose E-Mail as the validation method, the user is prompted if she forgets to enter an @ character followed by a domain address with a period.
â¢
Spry Validation Text Area:
Create a text field that's validated. For example, you can specify the maximum number of characters, and the response will not be valid if the user exceeds the maximum allowable number of characters.
â¢
Spry Validation Check Box:
Create a check box or check box group that's validated. For example, if a response to the check box query is required, the response is invalid if the user leaves the check box or check box group blank.
â¢
Spry Validation Select:
Create a drop-down menu that's validated. For example, if you create a drop-down menu with several groups of objects that are separated by divider lines, an invalid response would be selecting the divider line.
â¢
Spry Validation Password:
Create a password field that's validated. For example, you can create a password field that's validated for the number and type of characters that can be entered. An invalid response would be too many or too few characters, or the incorrect type of character.
â¢
Spry Validation Confirm:
Create a text field or password field that's validated. For example, if you have two password fields that require the user to submit the same response, the result is invalid if the user enters two different passwords.
â¢
Spry Validation Radio Group:
Create a radio button group that's validated. For example, if you create a radio group that is a required response, an error message appears if the user tries to submit the form without choosing an option from the radio group.
Event Handlers and JavaScript
When you add JavaScript to the body of a document, you need to specify when the code is executed. For example, you've probably visited more than one Web site where one of those annoying pop-ups appeared before all the page content loaded. The designer was responsible for that piece of magic by using the
onload
event handler. An
event handler
tells the Web browser when to execute
(handle)
the code.
But there's more than just knowing which event handler to use when creating a script. You have to know which browser your client's intended audience is using. That's right â the browser wars come into play because different browsers have different event handlers. When you work in Dreamweaver and use Behaviors, you can choose the browser used by the intended audience from the Show Events For drop-down menu.
Listing 1-8 shows code used to open a Web page in another browser window. The code refers to the JavaScript function
“MM_openBrWindow”
that's in the head of the document. The
onLoad
event handler instructs the browser to execute the function when the page loads.
Listing 1-8: You Will Open a New Window onLoad
The
onLoad
event handler has other purposes. For example, the event handler is used to load all images used in the page as soon as the page loads. This makes it possible for images that appear when a user pauses his cursor over an image to appear immediately because they've already been loaded into the host computer's memory. Here's a list, with descriptions, of a few more event handlers:
â¢
onBlur
â Code executes when a text field loses focus. A text field
gains focus
when a user clicks inside the text box, and it
loses focus
when the user clicks outside the text box. A common use for this event handler is to display a message if a user clicks inside a text box and then outside the text box without entering data.
â¢
onClick
â Code executes when a user clicks the left mouse button on an object. For example, you can write code to redirect a user to a Thank You page when the user clicks a form's Submit button.
â¢
onDblClick
â Code executes when a user double-clicks the left mouse button on an object.
â¢
onError
â Code executes when a JavaScript error occurs. Developers often use this event handler with code that displays an error dialog box or suppresses all JavaScript errors in the document.
â¢
onFocus
â Code executes when a text field
gains focus
(when a user clicks inside the text box). Code with this event handler can be used to display a dialog box with instructions on what information to enter into a form when the first text field in the form gains focus.
â¢
onKeyDown
â Code executes when a user presses a key.
â¢
onKeyPress
â Code executes when a user presses and holds a key.
â¢
onKeyUp
â Code executes when a user presses and then releases a key.
â¢
onMouseDown
â Code executes on the down stroke of a left mouse button click.
â¢
onMouseMove
â Code executes whenever the user moves his mouse.
â¢
onMouseOut
â Code executes when a user moves his mouse over and then out of a specified object on the page. In other words, the object gained and then lost focus.
â¢
onMouseOver
â Code executes when a user pauses his cursor over active text or an object.
â¢
OnMouseUp
â Code executes when the user releases the left mouse button.
â¢
onUnload
â Code executes when a user leaves a page. If you've ever seen a window pop up when you navigate to another Web page, you've been a victim of a script with an
onUnload
event handler. These are almost as annoying as pop-up windows that occur when a page loads.
Making Dynamic Pages with Server Side Technology
Every single section in this chapter â with the exception of this one â concerns code that's interpreted by the client, who is the visitor to the wonderful page you created for your wonderful client, which may sound redundant, but the client in this case is your customer. However, some Web technology requires server side technology to decipher your code. We describe two prime examples of pages that require server side technology to decipher code in the list that follows.
â¢
ASP (Active Server Pages):
ASP
is the Microsoft server side technology for generating Web page content on the fly. When you create a Web page with ASP code, you can simplify the process by using built-in objects. ASP has six built-in objects:
⢠Application
⢠ASPError
⢠Request
⢠Response
⢠Server
⢠Session
ASP pages are generated on the fly, using software on the server. The page delivers information based on how the user interacts with the page. ASP code is often used to deliver information from a database. For example, you can design a Web page to display contact information from a database of members. The page visitor can then search for members in a certain ZIP code, and the ASP code causes the page to display members in that ZIP code.
The default script language for ASP is VBScript. ASP is designed to run on a Windows server. However, other servers might have software that will interpret ASP pages. When in doubt, check with your Web hosting service.
To create ASP pages, you should read a book devoted to the subject. Chapter 2 of this minibook, however, introduces you to the kiddie side of the ASP pool.
â¢
PHP (PHP HyperText PreProcessor):
PHP is an alternative for ASP pages. Most Web hosting services have the software to interpret PHP code. Blog applications rely heavily on PHP code. PHP runs on different platforms and is compatible with most Web servers. PHP supports many databases. In fact, most blog applications use a combination of PHP with a MySQL database. PHP syntax is similar to the Perl and C programming languages.
Dipping your toe into the shallow end of the PHP pool requires only that you read Chapter 3 of this minibook.
Chapter 2: An Introduction to ASP
In This Chapter
Defining ASP
Running ASP on your computer
Installing IIS
Introducing ASP scripting
Rotating images and ad banners
Writing code is not a Web designer's favorite task. However, at times, you have to buck up and actually dive into the deep end of the pool to satisfy a client.
ASP
(Active Server Pages) is code that is parsed by the server; therefore, it's known as
server side technology.
ASP pages can change on the fly to suit the need of the site visitor.
One prime example of ASP pages is plucking information from a database and then serving it up to the client (the Web site visitor). The client submits the request to the server, which can be in the form of a query. The server responds to the query, writes the page, and sends it back to the client. With a fast server, the transaction is seamless. Although this chapter is by no means a substitute for the heady subject of creating ASP pages, it shows you enough to know whether you want to venture further or put a clove of garlic on a piece of string and wave it in front of any client who says, “Oh, by the way, do you do ASP?”
Understanding ASP
ASP is the brainchild of Microsoft, the same people who brought you Windows Me. Okay, Windows Me was a bust, but ASP isn't. ASP can do many things that HTML could never even dream of. For example, you can create code in an ASP page that will retrieve the date and the server's local time. If you're going to create ASP pages for a client, you must run them on a Windows server. You can create ASP pages in Dreamweaver or any good HTML editing application.
An ASP page shares many attributes with an HTML page. The page consists of tags, text, and images. Where ASP pages differ is when interactivity is needed. To obtain the interactivity, you add
scripts
to the page. You can write scripts using the VBScript or JavaScript language. ASP pages have the
.asp
extension.
When a visitor accesses an ASP page, the server hands off the page to
IIS
(Internet Information Services), an application that reads each line of the ASP page and returns the results as an HTML page to the visitor's browser. Using ASP pages has several advantages, including the following:
⢠You can modify or dynamically create additional content for a Web page.
⢠You can answer visitor queries or respond to data submitted from HTML forms.
⢠You can get information from server data or database information and return the results to the visitor's browser.
⢠You can personalize a Web page to make it more useful for individual visitors.
⢠ASP code is easier to learn and it executes faster than CGI and Perl.
⢠Your code is more secure because it can't be viewed as source in the visitor's browser.
⢠Your ASP pages can be viewed in any browser because they're returned as garden variety HTML.
Creating ASP pages is made easier thanks to seven built-in IIS objects. The objects are grouped based on the functions they perform. The IIS objects used within ASP pages are
â¢
ASPError
:
ASP objects that return detailed information when an error in your ASP script occurs
â¢
ObjectContext
: ASP objects that manage ASP transactions that are controlled by Microsoft Transaction Server (MTS)
â¢
Request
: ASP objects that obtain data from the user
â¢
Response
: ASP objects that send information from the server to the visitor
â¢
Server
: ASP objects that control IIS
â¢
Session
: ASP objects that store data about, and change settings based on, information obtained during the user's current Web-server session
â¢
Application
: ASP objects that share application-level information and control settings for the lifetime of the application
You might be familiar with objects if you've ever delved into an object-oriented programming (OOP) language such as ActionScript or JavaScript. Each object can perform a set of functions, and each object has methods and properties. For example, the
Response
object has a method known as
Write
that displays information for the user.
Creating ASP Pages and Testing Them on Your Local System
It might seem like a case of the blatantly obvious, but ASP pages have the
.asp
extension. You can write ASP pages in a word-processing application, such as Windows Notepad. However, most designers prefer the safety net of an HTML editing application, such as Dreamweaver. In Dreamweaver, you don't have to write all the code, and the application can help you in some instances. You can write the pages with Dreamweaver, but you need another application such as IIS (Internet Information Server) installed on your system to test the pages.
Working with IIS
ASP pages need IIS to process them and return them as HTML pages. To test ASP documents on your local machine, you need to install IIS, which functions as a Web server. Installation instructions for Windows XP and Vista follow.
IIS is included with Windows XP Professional, and you can install it as follows:
1.
Insert the Windows XP Professional CD into your CD-ROM drive.
2.
Choose Start
â
Settings
â
Control Panel.
3.
In the Control Panel window, click Add/Remove Programs.
4.
In the Add/Remove window, click Add/Remove Windows Components.
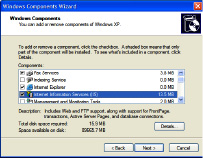
The Windows Components Wizard appears. (See Figure 2-1.)
Figure 2-1:
Installing IIS.

5.
Select the Internet Information Services (IIS) check box and then click Next.
Windows installs IIS on your system. This process takes a few minutes, but Windows entertains you with a progress bar while the application is installed. When the installation is complete, Windows displays a message telling you that the component has successfully installed.
6.
Click Finish.
IIS is installed on your system.
To install Windows IIS 7.0 with the Windows Vista operating system:
1.
Choose Start
â
Control Panel.
The Windows Control Panel dialog box appears.
2.
Double-click Programs and Features.
The Programs and Features section of the Control Panel appears.
3.
Choose Turn Windows Features On and Off from the Tasks menu.
The User Account Control dialog box appears.
4.
Click Continue.
The Windows Features dialog box appears.
5.
Select the Internet Information Services check box and then click OK.
IIS 7.0 is activated on your system.
Setting up the Web site
After successfully installing IIS on your computer, you're ready to start creating ASP pages. You can't create the pages in just any folder on your computer, though. You have to set them up in a special folder, which is the equivalent of a Web server. To set up your Web site, follow these steps:
1.
Navigate to
C:\Inetpub\wwwroot
.
2.
Right-click and choose New
â
Folder from the shortcut menu.
Windows creates a new folder.
3.
Name the folder.
Defining the site in Dreamweaver
After you create the folder, you're almost ready to start creating pages in Dreamweaver. But, as we mention previously, ASP pages don't work without a local server. Before you can create a little ASP magic in Dreamweaver, tell the application where the local server is. You do that when you define the site as follows:
1.
Choose Site
â
New Site.
The Site Definition dialog box appears.
2.
Enter the name of your site.
3.
Enter the URL of the site.
So you might be thinking, “The site is on my local machine; how do I enter a URL?” The answer is that when a site is on a local machine, the machine is the host server: hence, the name
localhost
.
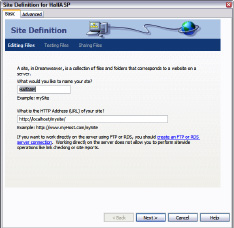
The URL for a site named
mysite
in the wwwroot folder is
http://localhost/mysite/
. (See Figure 2-2.)
Figure 2-2:
But my sites are always well defined.

4.
Click Next.
The Site Definition dialog box refreshes, and you have the option to specify a testing server.
5.
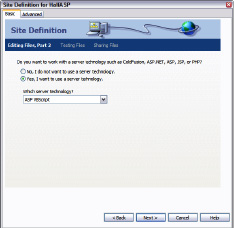
Select the Yes, I Want to Use a Server Technology radio button.
The Site Definition dialog box does its chameleon thing and adopts a new guise.
6.
Choose an option from the server technology drop-down menu.
Choose the applicable ASP server technology. (See Figure 2-3.) The upcoming examples will be VBScript. If your code will be VBScript, your choice would be ASP VBScript.
Figure 2-3:
Choose a testing server.

7.
Click Next.
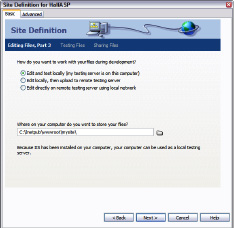
The Site Definition dialog box dons another disguise; this time, you get the option of choosing how you will test your files. (See Figure 2-4.)
Figure 2-4:
Tell Dream-weaver where you're going to put your files to the test.

8.
Accept the default option to test on your local machine. Verify that the folder where you store your files is correct.
9.
Click Next.
The dialog box reconfigures, giving you the option to specify the root URL of your site. This should already be filled in. (See Figure 2-5.)
