Build Your Own ASP.NET 3.5 Website Using C# & VB (81 page)
Read Build Your Own ASP.NET 3.5 Website Using C# & VB Online
Authors: Cristian Darie,Zak Ruvalcaba,Wyatt Barnett
Tags: #C♯ (Computer program language), #Active server pages, #Programming Languages, #C#, #Web Page Design, #Computers, #Web site development, #internet programming, #General, #C? (Computer program language), #Internet, #Visual BASIC, #Microsoft Visual BASIC, #Application Development, #Microsoft .NET Framework

DetailsView is a straightforward process. Within the GridView’s SelectedIndexChanged event handler, we just need to make another database query to read the details we want to display for the selected employee, then simply feed the results
into the DetailsView object, like this:
Visual Basic
Dorknozzle\VB\11_AddressBook.aspx.vb
(excerpt)
Protected Sub grid_SelectedIndexChanged(ByVal sender As Object,
➥ ByVal e As System.EventArgs) Handles grid.SelectedIndexChanged
BindDetails()
End Sub
Private Sub BindDetails()
Dim selectedRowIndex As Integer = grid.SelectedIndex
Dim employeeId As Integer = _
grid.DataKeys(selectedRowIndex).Value
Dim conn As SqlConnection
Dim comm As SqlCommand
Dim reader As SqlDataReader
Dim connectionString As String = _
ConfigurationManager.ConnectionStrings( _
"Dorknozzle").ConnectionString
conn = New SqlConnection(connectionString)
comm = New SqlCommand( _
"SELECT EmployeeID, Name, Address, City, State, Zip, " & _
"HomePhone, Extension FROM Employees " & _
"WHERE EmployeeID=@EmployeeID", conn)
comm.Parameters.Add("EmployeeID", Data.SqlDbType.Int)
comm.Parameters("EmployeeID").Value = employeeId
Try
conn.Open()
reader = comm.ExecuteReader()
Licensed to [email protected]
466
Build Your Own ASP.NET 3.5 Web Site Using C# & VB
employeeDetails.DataSource = reader
employeeDetails.DataKeyNames = New String() {"EmployeeID"}
employeeDetails.DataBind()
reader.Close()
Finally
conn.Close()
End Try
End Sub
C#
Dorknozzle\CS\11_AddressBook.aspx.cs
(excerpt)
protected void grid_SelectedIndexChanged(object sender, EventArgs e)
{
BindDetails();
}
private void BindDetails()
{
int selectedRowIndex = grid.SelectedIndex;
int employeeId = (int)grid.DataKeys[selectedRowIndex].Value;
SqlConnection conn;
SqlCommand comm;
SqlDataReader reader;
string connectionString =
ConfigurationManager.ConnectionStrings[
"Dorknozzle"].ConnectionString;
conn = new SqlConnection(connectionString);
comm = new SqlCommand(
"SELECT EmployeeID, Name, Address, City, State, Zip, " +
"HomePhone, Extension FROM Employees " +
"WHERE EmployeeID=@EmployeeID", conn);
comm.Parameters.Add("EmployeeID", SqlDbType.Int);
comm.Parameters["EmployeeID"].Value = employeeId;
try
{
conn.Open();
reader = comm.ExecuteReader();
employeeDetails.DataSource = reader;
employeeDetails.DataKeyNames = new string[] { "EmployeeID" };
employeeDetails.DataBind();
reader.Close();
}
finally
{
Licensed to [email protected]
Managing Content Using Grid View and Details View
467
conn.Close();
}
}
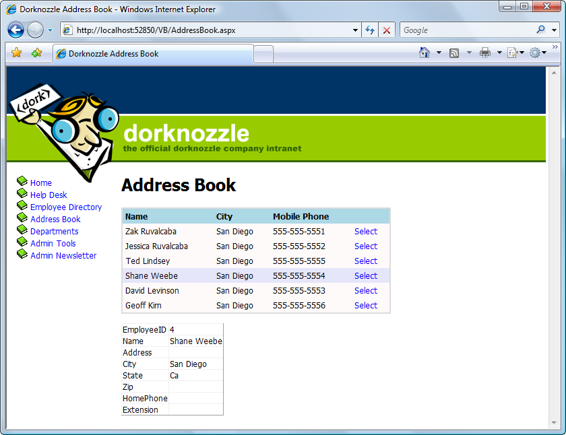
Now, if you execute the project and select one of the employees, you should see a
page like the one shown in
Figure 11.10
.
Styling the DetailsView
Displaying the data in the DetailsView control is easy enough, but you’ll probably
want to make it look a bit prettier. We’ll start by changing the row headings in the
left-hand column. Open
AddressBook.aspx
and modify the DetailsView control like
this:
Dorknozzle\VB\12_AddressBook.aspx
(excerpt)
AutoGenerateRows="False"
>
HeaderText="Home Phone" />
HeaderText="Extension" />
<%#Eval("Name")%>
As you can see, we customize the DetailsView control in a similar way to the
GridView, except that this time we’re dealing with fields instead of rows. We set
the AutoGenerateRows property to False. Then, we define the fields we want to
show, and create a HeaderTemplate to display the name of the employee in the
header—we’ll see what this looks like in a minute.
To further improve the appearance of the DetailsView, add this skin to
SkinFile.skin
:
Licensed to [email protected]

468
Build Your Own ASP.NET 3.5 Web Site Using C# & VB
Figure 11.10. The DetailsView control in action
Dorknozzle\VB\13_SkinFile.skin
(excerpt)
CellPadding="4" GridLines="None">
Here, we’ve defined a style that’s similar to the GridView control, which will ensure
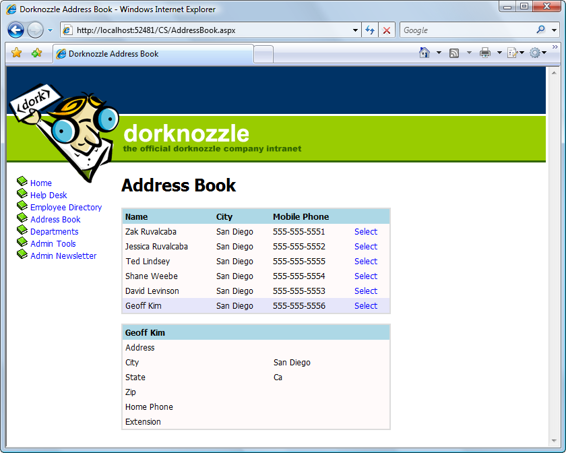
that our page has a consistent appearance. Save your work, open
AddressBook.aspx
in the browser, and select an employee. Y
ou should see something similar to Fig-
We’re really making progress now. There’s only one problem—our employee records
don’t include any addresses, and at this moment there’s no way to add any! Let’s
take care of this next.
Licensed to [email protected]

Managing Content Using Grid View and Details View
469
Figure 11.11. Viewing employee details
GridView and DetailsView Events
In order to use the GridView and DetailsView controls effectively, we need to know
how to handle their events. In this section, we’ll learn about the events raised by
these controls. We’ll focus on the events that relate to editing and updating data,
as our next goal will be to allow users to edit employee details in the DetailsView.
Earlier, you learned how to respond to the user’s clicking of the
Select
button by
handling the GridView’s SelectedIndexChanged event. Soon you’ll implement
editing functionality, which you’ll achieve by adding an
Edit
button to the
DetailsView control. The editing features of the GridView and the DetailsView
are very similar, so you can apply the same principles—and almost the same code—to
both of them.
Both the GridView and DetailsView controls support
Edit
command buttons, which
will place
Edit
buttons in the control when the page loads. Once one of the
Edit
Licensed to [email protected]

470
Build Your Own ASP.NET 3.5 Web Site Using C# & VB
buttons has been clicked, the row (in case of GridView) or the entire form (in case
of DetailsView) will become editable, and instead of an
Edit
button, users will see
Update
and
Cancel
buttons.
These features are fairly amazing, because you can achieve this “edit mode” without
writing any HTML at all: the columns know how to render their editable modes by
themselves. If you don’t like their default edit mode appearances, you can customize
them using templates.
Before we write any code, let’
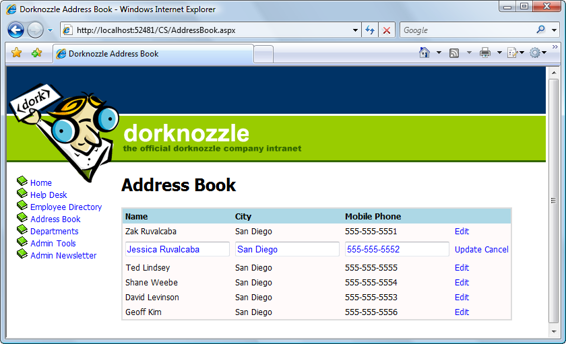
s see what this edit mode looks like. Figure 11.12
shows a GridView control in which one row appears in edit mode.
Figure 11.12. GridView in edit mode
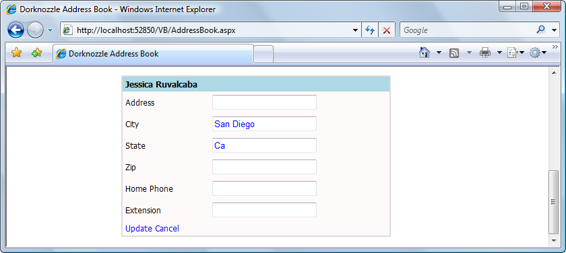
Figure 11.13 shows a
DetailsView control in edit mode.
Licensed to [email protected]

Managing Content Using Grid View and Details View
471
Figure 11.13. DetailsView in edit mode
When command buttons such as
Edit
are clicked, they raise events that we can
handle on the server side. The GridView supports more kinds of command buttons,
each of which triggers a certain event that we can handle. The action types and the
events they trigger are listed in Table 11.1
.
Table 11.1. GridView Action Types and the Events They Trigger
Action
Events Triggered When Clicked
Select
SelectedIndexChanging, SelectIndexChanged
Edit
RowEditing
Update
RowUpdating, RowUpdated
Cancel
RowCancelingEdit
Delete
RowDeleting, RowDeleted
(sorting buttons)
RowSorting, RowSorted
(custom action)
RowCommand
The DetailsView control, on the other hand, has buttons and events that refer to
items
, rather than
rows
, which makes sense when you realize that DetailsView is used to display the items in one record, while GridView displays a few items from
many records. The DetailsView action types, and the events they generate, are listed
Licensed to [email protected]
472
Build Your Own ASP.NET 3.5 Web Site Using C# & VB
Table 11.2. DetailsView Action Types and the Events They Trigger
Action
Events triggered when clicked
