Build Your Own ASP.NET 3.5 Website Using C# & VB (85 page)
Read Build Your Own ASP.NET 3.5 Website Using C# & VB Online
Authors: Cristian Darie,Zak Ruvalcaba,Wyatt Barnett
Tags: #C♯ (Computer program language), #Active server pages, #Programming Languages, #C#, #Web Page Design, #Computers, #Web site development, #internet programming, #General, #C? (Computer program language), #Internet, #Visual BASIC, #Microsoft Visual BASIC, #Application Development, #Microsoft .NET Framework

Let’s start by deleting all the code in the code-behind file (
AddressBooks.aspx.vb
or
AddressBook.aspx.cs
). Yes, you’ve read this correctly: we’re starting from scratch! As you’ll see, we can implement a large number of features without any code at all
when we use the SqlDataSource class. Leave your code-behind files like this:
Visual Basic
Dorknozzle\VB\01_AddressBook.aspx.vb
(excerpt)
Imports System.Data.SqlClient
Partial Class AddressBook
Inherits System.Web.UI.Page
End Class
C#
Dorknozzle\CS\01_AddressBook.aspx.cs
(excerpt)
using System;
using System.Collections;
using System.Configuration;
using System.Data;
using System.Linq;
using System.Web;
using System.Web.Security;
using System.Web.UI;
using System.Web.UI.HtmlControls;
using System.Web.UI.WebControls;
using System.Web.UI.WebControls.WebParts;
using System.Xml.Linq;
using System.Data.SqlClient;
Licensed to [email protected]
Advanced Data Access
491
public partial class AddressBook : System.Web.UI.Page
{
}
If you’re using C#, you’ll also need to delete the event handler declarations from
AddressBook.aspx
. Remove the OnSelectedIndexChanged property from the GridView
control, and the OnModeChanging and OnItemUpdating properties from the
DetailsView control.
Open
AddressBook.aspx
in
Design
view, and drag the SqlDataSource control from
the Toolbox (it’s located under the
Data
tab) onto the form. You can place it anywhere you like—the location isn’t relevant because the control doesn’t display in the
browser. Of course, it will appear in the
Design
view
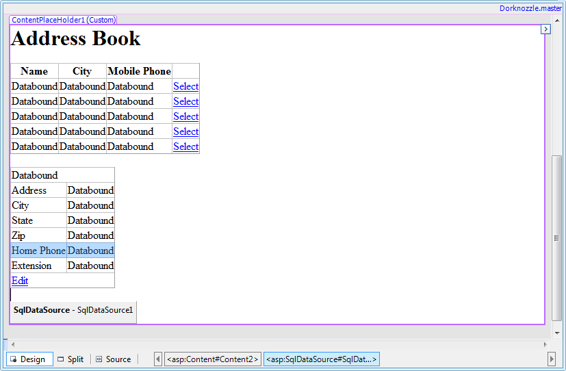
, as Figure 12.2 shows.
Figure 12.2.
AddressBook.aspx
with an SqlDataSource control
Rename the object employeesDataSource. In
Source
view, the code for the new
control should look like this:
Licensed to [email protected]
492
Build Your Own ASP.NET 3.5 Web Site Using C# & VB
Dorknozzle\VB\02_AddressBook.aspx
(excerpt)
Switch back to
Design
view, click the SqlDataSource control’s smart tag, and select
Configure Data Source
. A dialog will appear, giving us the opportunity to provide
the details of the data source. In the first page of the dialog, we specify the data
connection we want to use. If we hadn’t already added the Dorknozzle connection
string to the
Web.config
file, we could have clicked the
New Connection…
button, and used the wizard to add a connection string to
Web.config
. However, as we’ve
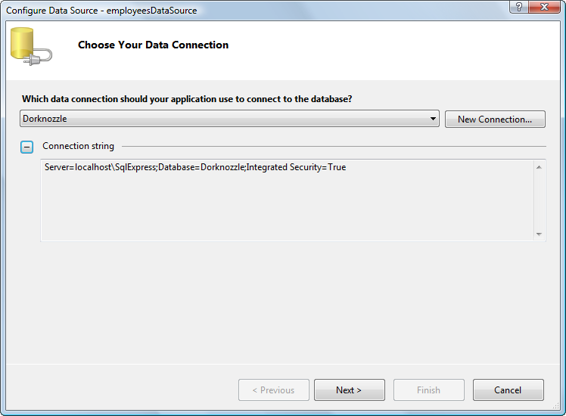
already set up the connection string, we simply choose it from the drop-down list,
as shown in
Figure 12.3
.
Figure 12.3. Specifying the connection string
After we’ve selected the
Dorknozzle
connection, we click
Next
. This is where the fun begins!
Licensed to [email protected]
Advanced Data Access
493
In the next screen, we can specify the database table and the columns that we want
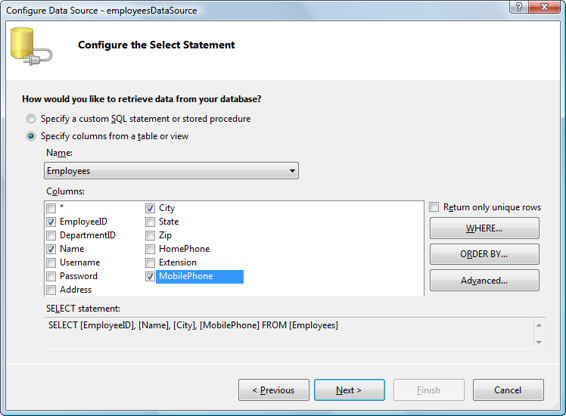
our data source object to handle. Select the Employees table and check the EmployeeID, Name, City, and MobilePhone
columns, as depicted in Figure 12.4.
Figure 12.4. Choosing columns
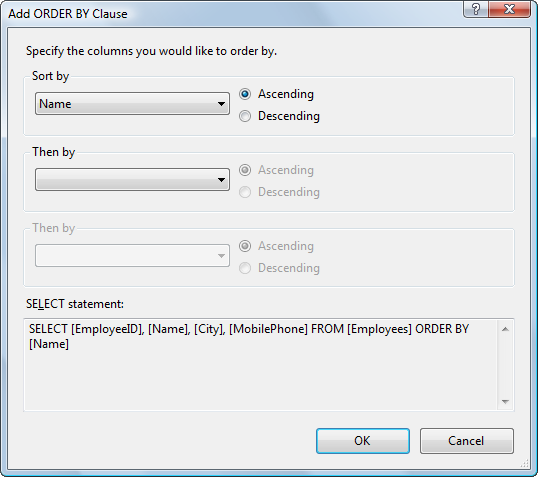
Figure 12.5. Specifying an ORDER BY clause
Licensed to [email protected]
494
Build Your Own ASP.NET 3.5 Web Site Using C# & VB
Click the
ORDER BY…
button and select the Name column (or any other column by
which you want to sort your employees), as illustrated in
Figure 12.5
. Click
OK
, then
Next
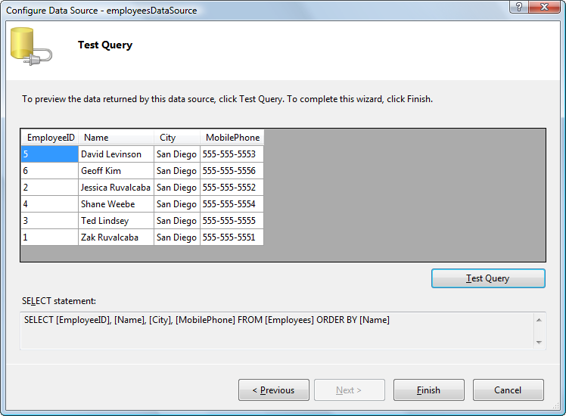
. In the dialog that appears, press the
Test Query
button to test that the query will work with this data source. If everything worked well, you should
be shown a list of employees similar to the one depicted in Figure 12.6. Finally
, click
Finish
.
Figure 12.6. Testing the data source
Before we move on, let’s take a look at the new code we’ve added to
AddressBook.aspx
.
If you switch to
Source
view, you’ll see that quite a bit of code has been created for you. Let’s look at the SqlDataSource object first:
Dorknozzle\VB\03_AddressBook.aspx
(excerpt)
ConnectionString="<%$ ConnectionStrings:Dorknozzle %>"
SelectCommand="SELECT [EmployeeID], [Name], [City],
[MobilePhone] FROM [Employees] ORDER BY [Name]">
Licensed to [email protected]


Advanced Data Access
495
This object is amazing in its simplicity, yet the GridView can connect to it and display the required data with very little additional effort. Let’s use this SqlDataSource object to populate the GridView.
In
AddressBook.aspx
, use either
Source
view or the
Properties
window in
Design
view to set the properties of the GridView
control to those outlined in Table 12.1.
Table 12.1. Properties to Set for the GridView Control
Property
Value
DataSourceID
employeesDataSource
DataKeyNames
EmployeeID
AllowPaging
True
PageSize
3
AllowSorting
True
Don’t Overwrite the Columns!
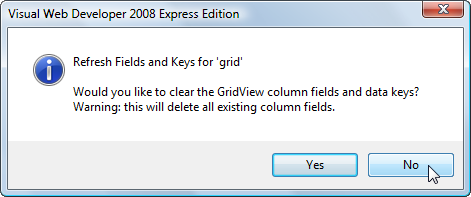
If you set the DataSourceID property in
Design
view, Visual Web Developer will
ask if you’d like to clear the column data and replace it with that from the data
source, as Figure 12.7 illustrates. Make sure you choose
No
, because we’re happy with the columns we decided to display when creating the grid in
Chapter 11.
