Windows Server 2008 R2 Unleashed (96 page)
Read Windows Server 2008 R2 Unleashed Online
Authors: Noel Morimoto

.
Host Credential Authorization Protocol (HCAP)—
An industry-standard protocol
that is used when integrating Microsoft NAP with the Cisco Network Access Control
Server. This allows the Windows NPS role to examine Cisco 802.1X access client
health.
.
Health Registration Authority (HRA)—
A server that distributes health certificates
ptg
to clients that pass health policy checks. The HRA is only used in Microsoft’s NAP
implementation for IPSec enforcement.
.
Network Policy Server—
The Windows Server 2008 R2 role that acts as a NAP
Health Policy Server and a Remote Authentication Dial-In User Service (RADIUS)
server for authentication and authorization.
Exploring NPS Concepts
The Network Policy Server role in Windows Server 2008 R2 allows for the creation of
enforcement policies that apply to the following types of network access:
.
Internet Protocol Security (IPSec)—
IPSec encryption allows for all communica-
tions, even those that would normally be unencrypted, to be highly secured through
PKI-based encryption. IPSec can be configured to be required between servers, and a
system configured with the NPS role can regulate which clients are allowed as IPSec
clients based on their local health.
.
802.1X authentication—
802.1X is a network-based authentication method that
uses PKI-based certificates to authenticate that the user who attaches to the network
is who he claims to be. 802.1X authentication is often used on wireless fidelity (Wi-
Fi) networks. A system with the NPS role in Windows Server 2008 R2 can add clients
to the 802.1X network based on their health status.
.
Virtual private network (VPN) connections—
A VPN connection allows for traffic
to be sent in an encrypted tunnel across an untrusted network such as the Internet.
VPNs are often used by roaming users to connect to the internal local area network
Deploying a Windows Server 2008 R2 Network Policy Server
463
(LAN) of an organization. The NPS role includes support for restricting client VPN
access based on system health.
.
Dynamic Host Configuration Protocol (DHCP) addresses—
One very useful NPS
enforcement method is the ability to restrict which clients get DHCP addresses based
on their system health. Although this is the easiest NAP policy to set up, this is also
the easiest to circumvent as clients could set their own IP addresses.
Understanding RADIUS Support on a Network Policy Server
As previously mentioned, installing the Network Policy and Access Services role adds
support for the RADIUS protocol, an industry-standard authentication mechanism
supported by a wide range of clients.
NOTE
The NPS role in Windows Server 2008 R2 is the replacement for the legacy Internet
Authentication Service (IAS) role. The old IAS role provided simple RADIUS authentica-
15
tion support to Active Directory sources.
ptg
RADIUS authentication allows for Active Directory users to be authenticated using RADIUS
authentication, rather than AD DS authentication. This is commonly used in scenarios
where VPN access requires RADIUS authentication, or when other devices cannot use AD-
based authentication.
RADIUS client support is limited to a maximum of 50 clients and two remote RADIUS
server groups with the Standard Edition of Windows Server 2008 R2. Enterprise and
Datacenter Editions offer unlimited support. Windows Web Server 2008 R2 does not
support NPS.
Installing a Network Policy Server
Installation of the Network Policy and Access Services role installs the Network Policy
Server component and the RADIUS role. To install, perform the following steps:
1. Open Server Manager (Start, All Programs, Administrative Tools, Server Manager).
2. Click the Add Roles link in the Actions pane.
3. On the Welcome page, click Next to continue.
4. From the list of roles to install, select Network Policy and Access Services from the
list, and click Next to continue.
5. Review the information provided on the Welcome page, and click Next to continue.
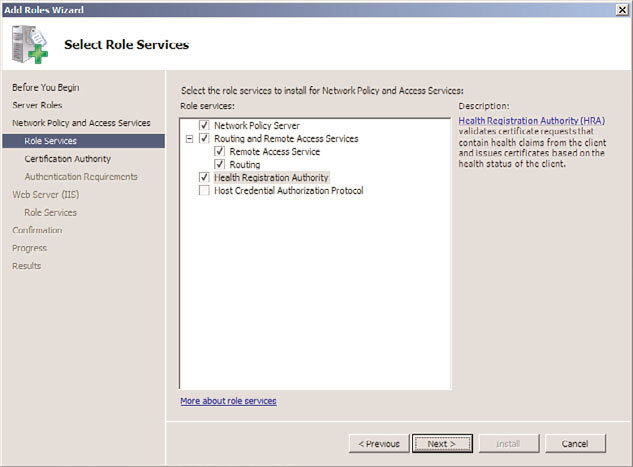
6. On the Select Role Services page, shown in Figure 15.1, select which role services to
install on the server, using the information provided in the previous section of this
chapter. Click Next to continue.
464
CHAPTER 15
Security Policies, Network Policy Server, and Network Access
Protection
FIGURE 15.1
Installing the Network Policy and Access Services roles.
ptg
NOTE
Adding the Health Registration Authority role service requires the IIS Web Server Role
to be installed on the server. Selecting the role service might prompt you to install
these services as well.
7. On the Certificate Authority page, choose whether to install a local CA for issuing
health certificates or to use an existing remote CA. If using a remote CA, make sure it
is dedicated to issuing only health certificates. In this example, we install a local CA;
this will install AD Certificate Services (AD CS) on the system. Click Next to continue.
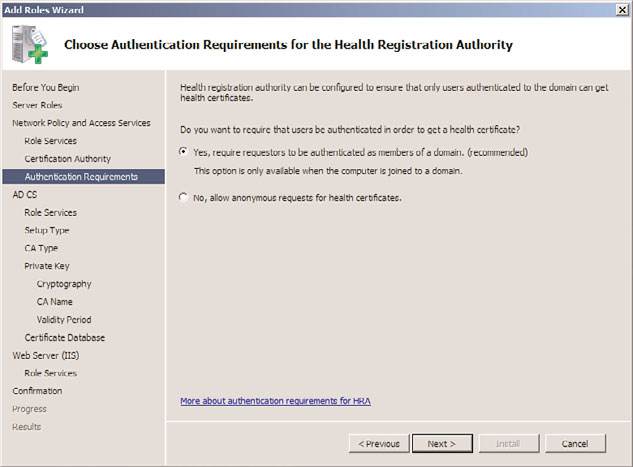
8. Select whether to configure the HRA to allow only domain-authenticated users to get
health certificates, as shown in Figure 15.2. This can improve security, but might not
be wanted in environments with untrusted domains or with workgroup members.
Click Next to continue.
9. If installing AD CS on the server, the wizard will lead you through the AD CS instal-
lation process. For information on this process, reference Chapter 14, “Transport-
Level Security.”
10. If installing the IIS role on the server, the wizard will lead you through the IIS instal-
lation process. For more information on this installation routine, reference Chapter
12, “Internet Information Services.”
11. On the Confirmation page, click Install.
12. Click Close when the wizard completes.
Enforcing Policy Settings with a Network Policy Server
465
15
FIGURE 15.2
Choosing HRA client authentication requirements.
ptg
Enforcing Policy Settings with a Network Policy Server
The goal of a Network Policy Server is to enforce policy settings defined by the administra-
tor, for example, to configure the NPS role to block clients from connecting if they don’t
have an antivirus application installed. There are multiple variations on this theme, but
the same principles apply to each of the variations.
This section of the chapter focuses on describing a scenario where NPS is configured to
block DHCP clients from receiving IP addresses if they do not have an antivirus applica-
tion installed and if their antivirus definitions are out of date. The same overall process
can be used for 802.1X validation, VPN validation, or IPSec validation.
The process to set up this type of validation on an NPS system consists of the following
five high-level steps:
1. Create a System Health Validator.
2. Create a health policy for compliant clients.
3. Create a health policy for noncompliant clients.
4. Create a network policy for compliant clients.
5. Create a network policy for noncompliant clients.
Each of these five steps is explained in more detail in the following sections of this chapter.
466
CHAPTER 15
Security Policies, Network Policy Server, and Network Access
Protection
Creating a System Health Validator
The first step to enabling NPS validation is to create and configure a System Health
Validator (SHV). The validator is where the settings are stored and what will be enforced
on the client, such as if a firewall is needed, if spyware software must be installed, and so
on. To create the SHV for the example we are outlining, do the following:
1. From the Network Policy MMC tool (Start, All Programs, Administrative Tools,
Network Policy Server), navigate to Network Access Protection, System Health
Validators, Windows Security Health Validator.
2. Click on the Settings link in the details pane.
3. Right-click the Default Configuration SHV in the details pane and choose Properties.
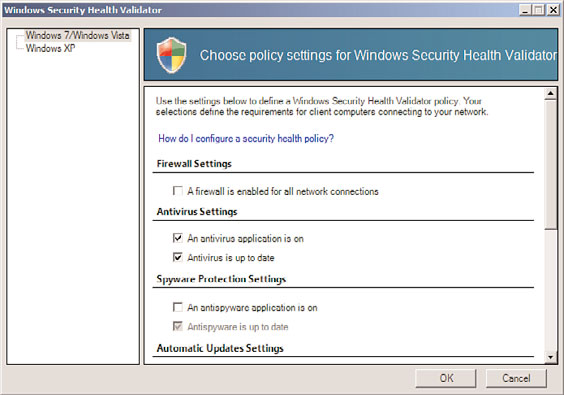
4. From both the Windows 7/Windows Vista and Windows XP sections in the
Windows Security Health Validator dialog box, shown in Figure 15.3, select the type
of policies that will be enforced. In our example, we are just enforcing that an
antivirus application is installed and up to date. Click OK and then click OK again
when you are finished.
ptg
FIGURE 15.3
Configuring a Security Health Validator.
Creating a Health Policy for Compliant Clients
After the System Health Validator has been configured, a health policy for clients that are
compliant must be created. Any client that complies with the SHV will have this policy
applied. To create this policy, do the following:
1. Open the Network Policy Server MMC tool (Start, All Programs, Administrative
Tools, Network Policy Server).
2. In the node pane, navigate to Policies, Health Policies.
Enforcing Policy Settings with a Network Policy Server
467
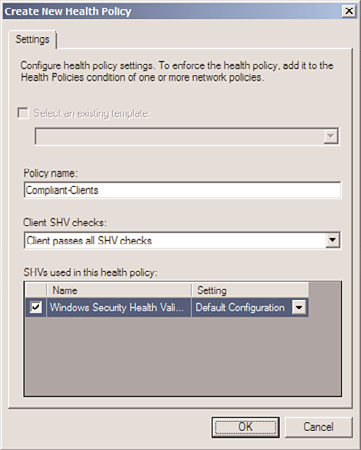
3. Right-click Health Policies, and choose New.
4. Enter a name for the policy, such as Compliant-Clients, and then select which SHV
checks the client must pass, as shown in Figure 15.4. In this case, we create a health
policy where clients must pass all checks. Check the box next to the Windows
Security Health Validator, choose the setting (typically the default configuration,
though R2 allows for multiple configurations), and click OK to save the policy.