Windows Server 2008 R2 Unleashed (222 page)
Read Windows Server 2008 R2 Unleashed Online
Authors: Noel Morimoto

volume quotas in this section is merely to describe the process and use of NTFS vol-
ume quotas; however, most organizations should consider using FSRM quotas and
should avoid using NTFS volume quotas or both types because they are not comple-
mentary to each other.
To enable quotas for an NTFS volume, perform the following steps:
1. Log on to the Windows Server 2008 R2 system with an account with administrator
privileges.
2. Click Start, click All Programs, click Administrative Tools, and select Server Manager.
3. In the tree pane, double-click the Storage node, and select Disk Management.
4. In the tasks pane, scroll down to locate the desired volume, right-click the volume,
and select Properties.
5. Select the Quota tab and check the Enable Quota Management check box.
ptg
6. Enter the appropriate quota limit and warning thresholds and decide whether users
will be denied write access when the limit is reached, as shown in Figure 28.9.
28
FIGURE 28.9
Enabling NTFS volume quotas.
1130
CHAPTER 28
File System Management and Fault Tolerance
7. Click OK to complete the quota configuration for the NTFS volume.
8. A window opens, prompting you to confirm the enabling of quotas; click OK to
enable the quota and scan the volume to update quota statistics.
9. After you configure quotas, open the properties of the volume, select the Quota tab,
and click the Quota Entries button to review the existing quotas based on data
already stored on the volume.
File Server Resource Manager (FSRM)
Windows Server 2008 R2 includes a file system management and reporting configuration
tool named the File Server Resource Manager (FSRM). This service and tool was first intro-
duced in Windows Server 2003 R2 and provides administrators with the ability to config-
ure quota management at the volume and folder level, create and apply file screening
policies, generate alert notifications and reports on a schedule and in real time, and clas-
sify files and folders based on administratively defined criteria.
With the volume-level quota management, previously included with Windows Server
versions, administrators were very limited on how quotas could be applied and several
issues were encountered. Many organizations that required tighter control of their storage
were forced to utilize third-party quota management software to get the functionality they
ptg
required. With the quota management functionality included with the FSRM service in
Windows Server 2008 R2, administrators can now create quotas at a volume or folder level
and create exceptions or tighter restrictions as required in subfolders. With this sort of
functionality, a standard quota size can be established and specific managers, executives,
or administrators or specific departments or collaborative groups could have different
quota policies applied on the folders that require different storage settings.
With the file screening functionality of FSRM, organizations can restrict all users from
storing certain types of files on server storage; for example, music, video, or executables
are common files that are screened for end users. Of course, this can be overridden using
file screen exceptions to allow these file types in a specific folder or set of folders beneath
the parent folder or volume to which the file screen policy is applied.
The new feature included with Windows Server 2008 R2 FSRM is the File Classification
Infrastructure. This new functionality can be used to run scheduled tasks that identify and
tag or classify files based on their storage location and/or the content stored within the
file. Of course, FCI can only search through the content of certain file types, which does
not include encrypted files. As this is the first implementation or release of the FCI on the
Windows platform, expect that future releases will detail the types of files that can be clas-
sified by content and the built-in actions that can be performed after classification is
performed on a set of files.
Uses of File Server Resource Manager
FRSM allows administrators to set quotas on volumes and folders as well as implementing
file screening functionality or file classification by location or content. Even though in
today’s market disk storage is much more affordable than in previous years, the amount of
File Server Resource Manager (FSRM)
1131
time required to back up and restore the data still needs to be managed. Furthermore,
many more organizations need to ensure that their file systems meet certain security and
regulatory compliance policies and FSRM can assist with these tasks. Some of the most
common uses of FSRM are as follows:
.
Setting limits on storage—
An administrator can set the limit on how much disk
space a user or group of users can store within a system volume or folder. This is the
traditional quota limit item that can limit users to store, for example, 100MB of files
on the network.
.
Providing storage limit flexibility of group data—
When a user or group of
users need to have different storage limits, rather than allowing these users unlim-
ited access, FSRM can be configured to allow the extension of storage usage beyond
the default within specific, designated folders. This can be achieved by applying a
strict quota policy on a parent folder and either disabling the quota on a subfolder
or applying a less-restrictive quota policy on the necessary folder or folders.
.
Enforcing storage policies—
FSRM does more than just define storage policies, but
can also help administrators enforce the policies by creating reports and generating
notifications of policy violations and predefined storage threshold limits, on a real-
time or scheduled basis, that can be sent via email, stored in event logs, or stored in
designated report folders.
ptg
.
File screen policies—
Administrators can block the storing of a particular type of
file or sets of files. In previous years, many organizations were surprised to discover
that a significant source of increased data storage requirements had to do with end
users downloading and storing music files on the server. File screen exceptions can
be created and applied to subfolders as necessary.
.
File classification—
Administrators can define file classification properties and rules
that can be manually run or scheduled to check files and define file classification
property values based on the administratively defined rules. This can be useful in
identifying data based on usage characteristics or identifying data based on content
28
to ensure higher security and management of sensitive data.
Installing the File Server Resource Manager Tools
The File Server Resource Manager tools can be installed separately or it can be installed
during the installation of the File Services role. If the FSRM tools needs to be installed on a
system that is not a file server or just installed separately, perform the following steps:
1. Log on to the Windows Server 2008 R2 system with an account with administrator
privileges.
2. Click Start, click All Programs, click Administrative Tools, and select Server Manager.
3. Click on the Features node in the tree pane, and then click on Add Features in the
tasks pane.
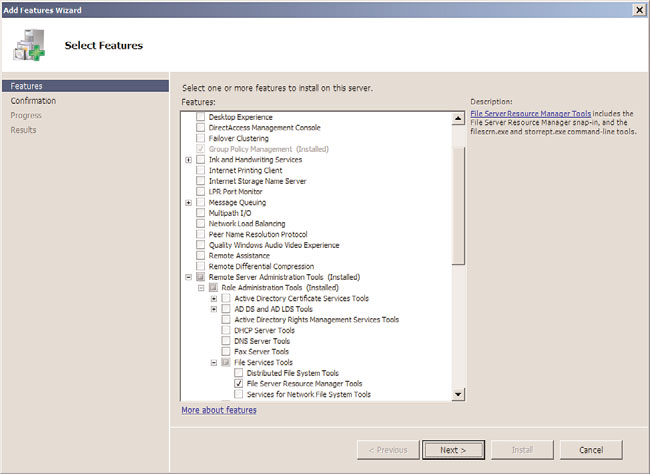
4. The Add Features Wizard opens. On the Select Feature page, click the plus symbol
next to Remote Server Administration Tools.
5. Click the plus symbol next to Role Administration Tools.
1132
CHAPTER 28
File System Management and Fault Tolerance
6. Click the plus symbol next to File Services tools, check the File Server Resource
Manager Tools check box, as shown in Figure 28.10, and click Next to continue.
ptg
FIGURE 28.10
Selecting the File Server Resource Manager tools.
7. On the Confirm Installation Selections page, review the selections made and click
Install to continue.
8. On the Installation Results page, review the result summary, and click Close to com-
plete the installation.
On a system with the FSRM tools installed but not the File Server role and File Server
Resource Manager services, FSRM will only be available from the Administrative Tools
menu to manage remote servers. On systems with the File Server role and File Server
Resource Manager services installed, FSRM will be available in the Server Manager console
in the File Services group under Roles.
NOTE
If the File Services role is installed but the File Server Resource Manager tool cannot
connect to the system, chances are that during the File Services role installation, File
Server Resource Manager was not selected. To add this functionality, the File Service
Resource Manager service will need to be added using the Add Role Services from the
tasks pane in the Server Manager Role node.
File Server Resource Manager (FSRM)
1133
FSRM Global Options
To enable the full functionality of the FSRM service, FSRM notifications, and FSRM audit-
ing and reporting, FSRM global options need to be configured. FSRM settings such as the
SMTP server to use for email notifications, notification limits, the location of reports, and
enabling file screen auditing can be configured by right-clicking the File Server Resource
Manager node in Server Manager, and selecting Configure Options. FSRM settings apply to
only the single server they are configured on. These settings can be configured on remote
servers using the FSRM console, but settings cannot be created and applied to multiple
servers using the FSRM interface.
Configuring Quotas with File Server Resource Manager
After the File Server Resource Manager service and tool has been installed, an administra-
tor can launch the tool and begin creating FSRM quota and file screening policies. To
open the FSRM console, perform the following steps:
1. Log on to the Windows Server 2008 R2 system with an account with administrator
privileges.
2. Click Start, click All Programs, click Administrative Tools, and select Server Manager.
ptg
3. Double-click on Roles.
4. Double-click on File Services.
5. Double-click on Share and Storage Management.
6. Double-click on the File Server Resource Manager console.
To create a new quota using the File Server Resource Manager console, continuing from
the preceding set of steps, perform the following steps:
1. Double-click the Quota Management node under the FSRM console.
28
2. Select the Quotas node in the tree pane.
3. In the Actions pane, click the Create Quota link to begin the process.
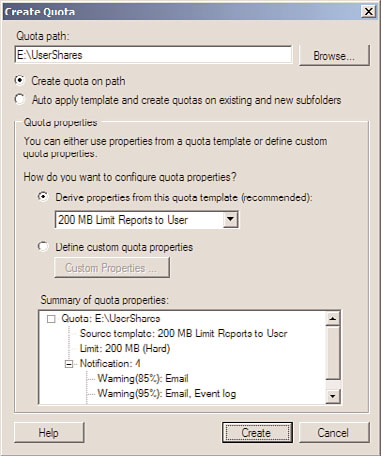
4. When the Create Quota window opens, specify the path for the quota, such as
E:\UserShares.
5. Select the Auto Apply Template and Create Quotas on Existing and New Subfolders
option button.
6. In the Quota Properties section of the window, select the Derive Properties from This
Quota Template option button and from the drop-down menu, select the 200 MB
Limit Reports to User template, and click Create, as shown in Figure 28.11.
7. After the quota is created, click the Refresh link in the Actions pane.
8. In the tasks pane, the new quota will be listed, along with the quotas applied to all
existing subfolders and the current status of each quota.
9. Review the quotas as desired and close the Server Manager console.