Windows Server 2008 R2 Unleashed (68 page)
Read Windows Server 2008 R2 Unleashed Online
Authors: Noel Morimoto

select the DNS server name.
2. Expand the server, expand Forward Lookup Zones, and select the zone.
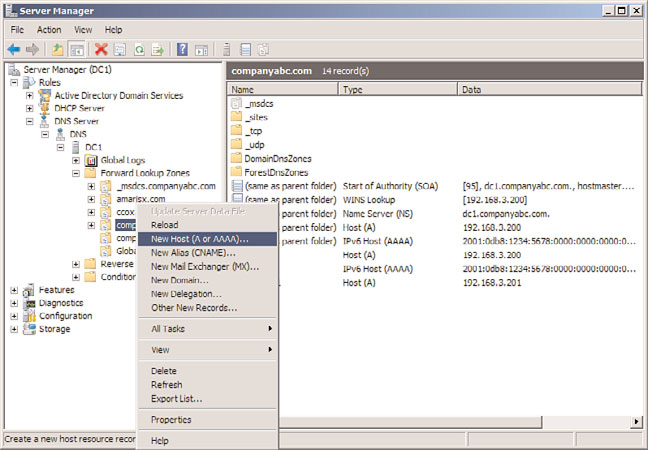
3. Right-click on the zone, and select New Host (A or AAAA). See Figure 10.30 for
more detail.
4. Type the short name of the host (hostname without the FQDN) and populate the
IPv6 address. Ensure that the Create Associated Pointer (PTR) Record check box is
10
checked, and then click Add Host.
5. Click OK on the The Host Record Was Successfully Created message box. Add addi-
tional host records, and click Done when you are finished.
As noted earlier in the chapter, IPv6 host records are displayed as AAAA (quad A) records
in DNS. Other records associated to an IPv6 address will reflect the full IPv6 address in the
Data column.

316
CHAPTER 10
Domain Name System and IPv6
FIGURE 10.30
Adding IPv6 AAAA DNS records.
ptg
The new record can be tested by pinging the FQDN, as follows:
1. Launch a command prompt.
2. Enter the command ping -6
3. The command should return a series of four pings to the IPv6 address.
NOTE
The ping command defaults to IPv4, so a ping to a hostname by default will not let you
test the IPv6 address. You can force IPv6 by using the syntax ping -6
You can also force IPv4 by using the syntax ping -4
Because DNS does not offer any form of security natively, it is vulnerable to spoofing,
man-in-the-middle, and cache poisoning attacks. For this reason, it has become critical to
develop a means for securing DNS. DNSSEC was developed to do just that.
There are a series of IETF RFCs that specify the DNSSEC extensions to DNS. These include
the following:
.
RFC 4033—
DNS Security Introduction and Requirements
.
RFC 4034—
Resource Records for the DNS Security Extensions
.
RFC 4035—
Protocol Modifications for the DNS Security Extensions
Secure DNS with DNSSEC
317
There are also several other supporting IETF RFCs. Together, these RFCs modify and
extend the DNS protocol. The DNSSEC extensions provide the following:
. Origin authority
. Data integrity
. Authenticated denial of existence
In a nutshell, DNSSEC allows clients to know that the DNS information is coming from a
valid server, wasn’t changed, and that a given host exists or doesn’t exist.
Windows Server 2008 R2 and Windows 7 fully support the latest DNSSEC RFCs 4033
through 4035.
NOTE
Interestingly, Windows Server 2003 and Windows Server 2008 do not support the lat-
est RFCs, as their implementation of DNSSEC was based on the now obsolete RFC
2535. That RFC required secondary zones and, thus, they cannot interoperate with the
Windows Server 2008 R2 DNSSEC.
DNSSEC Components
ptg
The DNSSEC relies on signed zones, which is a zone whose records are signed as defined
by RFC 4035. A signed zone contains one or more of the new DNSEC record types, which
are DNSKEY, NSEC, RRSIG, and DS records. These records allow DNS data to be validated
by resolvers.
Zone Signing Key (ZSK) is the encryption key used to sign the zone, essentially a public
and private key combination stored in a certificate. The Key Signing Key (KSK) is the key
used to sign the ZSK to validate it, essentially a public and private key combination as well.
The DNSKEY record is a DNSSEC record type used to store a public key. The KSK and the ZSK
public keys are stored in the DNSKEY records to allow the zone signatures to be validated.
Next Secure (NSEC) record is a DNSSEC record type used to prove non-existence of a DNS
name. This allows DNS clients to be sure that if a record is not retrieved in a DNS lookup,
the record does not exist in the DNSSEC zone.
The Resource Record Signature (RRSIG) record is used to hold the signature for a DNS
record. For each A record, there will be a corresponding RRSIG record. For each NSEC
record, there will also be a corresponding RRSIG record.
10
The Delegation Signer (DS) record is used to secure delegations to other DNS servers and
confirm their validity. This prevents man-in-the-middle DNS servers from breaking the
security chain during recursive lookups.
A nonvalidating security-aware stub resolver is a security-aware stub resolver that trusts
one or more security-aware DNS servers to perform DNSSEC validation on its behalf. All
Windows DNS clients are nonvalidating security-aware stub resolvers, meaning they do
not actually do the DNSSEC validation.
318
CHAPTER 10
Domain Name System and IPv6
The Windows DNS client is nonvalidating, meaning that the Windows DNS client does
not check to see if the DNS records are secured but instead implicitly trusts the DNS
server. The Windows DNS client flags the DNS request based on the NRPT table and
expects the DNS server to perform the check for it. The DNS server returns the results
regardless and indicates if the check for DNSSEC was successful or not. If the check was
successful, the Windows DNS client passes the results to the application requesting the
DNS lookup.
NOTE
To really ensure the security of the DNS requests, the DNS client must be able to vali-
date the DNS server. The method of doing this for Windows systems is to use IPSec.
To really, really secure DNS, IPSec must be deployed as well.
Requirements
In the Windows Server 2008 R2 implementation of DNSSEC, the zones are signed offline—
that is, the zone file for the DNS zone is signed and then loaded into the DNS server.
Thus, you cannot have dynamic zones with Windows Server 2008. They must be static.
ptg
The signed zones can be Active Directory-integrated zones but must be file backed up. The
records are all text based, so Active Directory integrated zones do not pose a problem.
To request DNSSEC security for a lookup, the DNS client must have a Name Resolution
Policy Table (NRPT) entry. This then forces the DNS client to flag the request as a secure
request, which causes the DNS server to check the security of the lookup and return the
records with the secure flag set. If the client does not request security, the DNS server
simply returns the records.
Finally, to fully secure the DNS lookups, IPSec should be deployed.
Configuring a DNSSEC Zone
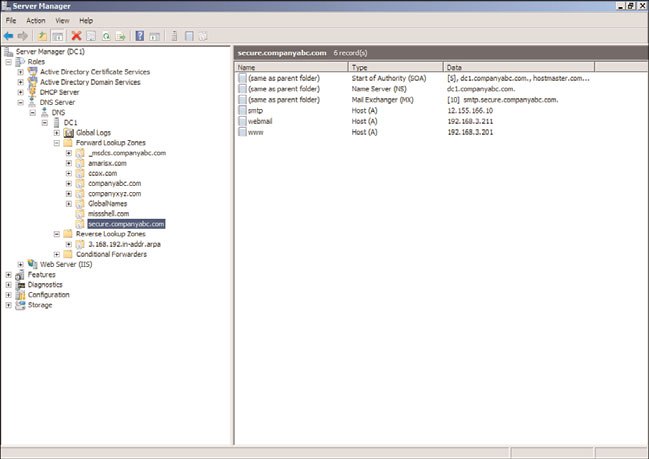
In this scenario, the zone secure.companyabc.com will be encrypted. The zone is unse-
cured to start and contains several records, shown in Figure 10.31. The zone is a file-based
zone, with the DNS zone stored in the default directory c:\windows\system32\dns\ in a
file named secure.companyabc.com.dns.
The DNSSEC configuration and management is done using the dnscmd.exe utility.
The first step is to generate the signing certificates for the secured zone; that is, generate the
ZSK and KSK certificates. The steps to generate the KSK and ZSK certificates are the following:
1. On the DNS server, select Start, Command Prompt, and Run As Administrator.
2. Type the command cd \windows\system32\dns.
3. To generate the KSK, run the command dnscmd /OfflineSign /GenKey /Alg
rsasha1 /Flags KSK /Length 1024 /Zone secure.companyabc.com /SSCert
/FriendlyName KSK-secure.companyabc.com.

Secure DNS with DNSSEC
319
FIGURE 10.31
Unsecured DNS zone.
ptg
4. To generate the ZSK, run the command dnscmd /OfflineSign /GenKey /Alg
rsasha1 /Length 1024 /Zone secure.companyabc.com /SSCert /FriendlyName
ZSK-secure.companyabc.com.
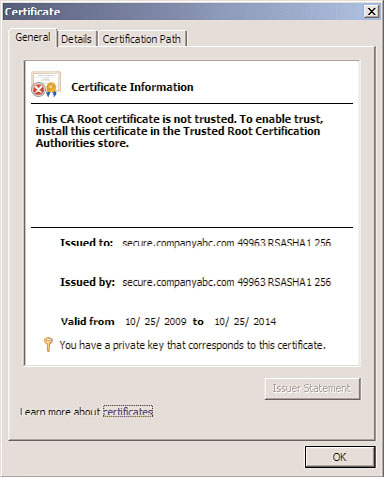
The keys are stored in the Local Computer certificate store of the DNS server in the MS-
DNSSEC folder. The certificates are shown in Figure 10.32 from the MMC certificates
snap-in for the Local Computer. The validity period of the signing certificates is five years
by default.
The next step is to sign the zone file and the records. This takes the existing zone file
(secure.companyabc.com.dns), signs the zone and records, and saves it to another zone
file (signed.secure.companyabc.com.dns). The certificates generated in the previous steps
will be used for the signing. The steps to sign the zone are the following:
1. On the DNS server, launch Server Manager.
2. Expand Roles, DNS Server, DNS, DC1, Forward Lookup Zones, and select
secure.companyabc.com.
3. Right-click on secure.companyabc.com and select Update Server Data File. This
10
ensures that the latest updates are saved in the file.
4. Select Start, Command Prompt, and Run As Administrator.
5. Type the command cd \windows\system32\dns.
6. To sign the zone file, run the command DnsCmd /OfflineSign /SignZone /input
secure.companyabc.com.dns /output signed.secure.companyabc.com.dns /zone
secure.companyabc.com /signkey /cert /friendlyname KSK-secure.compa-
nyabc.com /signkey /cert /friendlyname ZSK-secure.companyabc.com.

320
CHAPTER 10
Domain Name System and IPv6
ptg
FIGURE 10.32
KSK and ZSK certificates.
The signed zone file is now ready to be loaded into the DNS server.
The last step in signing the zone is to reload the zone file into the DNS server. The
unsigned zone must be deleted first; then the signed zone file (signed.secure.compa-
nyabc.com.dns) is loaded. The steps to reload the zone are the following:
1. On the DNS server, select Start, Command Prompt, and Run As Administrator.
2. Type the command cd \windows\system32\dns.
3. Type dnscmd /ZoneDelete secure.companyabc.com /f. This deletes the zone from
the DNS server.
4. Type dnscmd /ZoneAdd secure.companyabc.com /primary /file
signed.secure.companyabc.com /load. This loads the signed zone file.
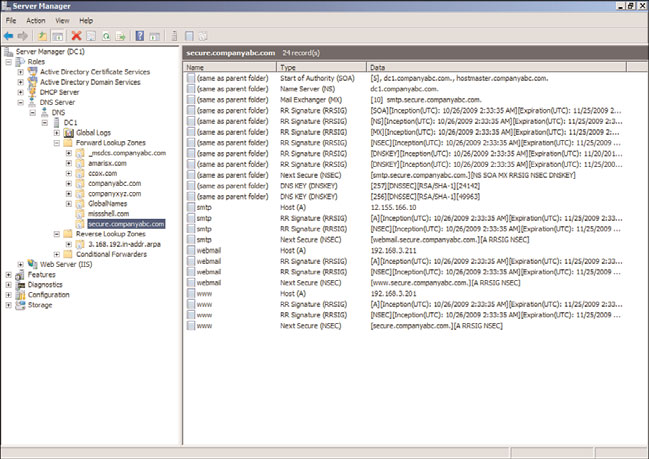
The zone secure.companyabc.com is now encrypted. Also, if saved, the zone file will save
to the new signed.secure.companyabc.com.dns if updates are made. Figure 10.33 shows
the zone records after encryption.
NOTE
The records show an inception date of 10/26/2009 and an expiration date of
11/25/2009. The default validity date is 30 days from the date of the signing of the
zone. This means that the zone file will need to be resigned within 30 days. If a longer
validity period is needed, the optional /ValidFrom and /ValidTo parameters can be spec-
ified on the dnscmd.exe command when signing the zone file.

