Windows Server 2008 R2 Unleashed (67 page)
Read Windows Server 2008 R2 Unleashed Online
Authors: Noel Morimoto

networks. The Teredo relay routes between Teredo clients and IPv6 hosts in the IPv6
network.
10
.
Teredo host-specific relay—
This is an IPv6/IPv4 device that is connected to IPv6
and IPv4 networks. It can communicate with the IPv6 network, the IPv4 network,
and Teredo clients without a Teredo relay.
Figure 10.26 shows the components of Teredo.
310
CHAPTER 10
Domain Name System and IPv6
Teredo Relay
IPv6 Internet
IPv4 Internet
Windows Server 2008 R2
Teredo Host
Windows 7
Windows Server 2008 R2
IPv6 Host
IPv6 Host
Windows Server 2008 R2
Teredo Host-Specific Relay
NAT
ptg
Windows 7
Teredo Client
FIGURE 10.26
Teredo network.
Windows Server 2008 R2, Windows Server 2008, Windows 7, and Windows Vista can all
operate as Teredo clients and Teredo host-specific relays.
The Windows Teredo clients send Router Solicitation messages to Teredo servers. These
responses to the router solicitation messages are used to build the Teredo address and what
type of NAT is in place.
NOTE
The command netsh interface ipv6 show teredo can be used to see how the
Teredo client configured itself.
Once the Teredo address has been determined, the Teredo client can then communicate
with Teredo clients. This is facilitated by the Teredo server, which brokers communications
How to Configure IPv6 on Windows Server 2008 R2
311
between the two Teredo clients during the initial start of communications. Following the
initial setup of communications, the two Teredo clients communicate directly.
NAT-PT Devices
Internally, IPv6 devices can use Network Address Translation-Protocol Translation (NAT-PT)
devices, which can be used to provide access to IPv4 resources. Resources that don’t support
IPv6 natively can be accessed through the use of a Network Address Translation-Protocol
Translation (NAT-PT) device. Microsoft Windows Server 2008 R2 does not currently include
that capability, so a third-party device would be needed for this functionality.
NOTE
NAT-PT is covered in IETF RFC-2766 (http://tools.ietf.org/html/rfc2766), but was
reclassified from a Proposed Standard to Historic due to issues with the standard.
RFC4966 (http://tools.ietf.org/html/rfc4966) contains the details of these issues.
These include difficulty with integrity mechanisms, inability to redirect protocols that
lack demultiplexing capabilities, premature state timeouts, loss of information due to
IPv4 and IPv6 header incompatibilities, packet fragmentation issues, and an inability to
handle multicast traffic. NAT-PT devices are only recommended as a stop-gap measure
due to these issues.
ptg
As long as all Intranet resources that IPv6 clients need to reach support IPv6, then there
should be no need for NAT-PT devices.
How to Configure IPv6 on Windows Server 2008 R2
Many of the tasks for configuring IPv6 are exactly the same as those for IPv4 addresses,
albeit with longer addresses to type. This includes manually setting IP addressing, creating
DHCP scopes, and creating DNS host records. The steps in this section walk through some
of the administrator tasks for configuring IPv6 on Windows Server 2008 R2.
Manually Setting the IPv6 Address
On many occasions, it is necessary to set the IP addresses manually. This is normally the
case for servers, routers, and other devices that have static IP addresses.
10
To set the IPv6 addressing of a Windows Server 2008 R2 server, execute the following steps:
1. Launch Server Manager.
2. Click on View Network Connections from the options in the left pane of the window.
3. Right-click on the desired Local Area Connection, and select Properties.
4. Click Internet Protocol Version 6 (TCP/IPv6), and select Properties. If the item is not
enabled, check the box first.
312
CHAPTER 10
Domain Name System and IPv6
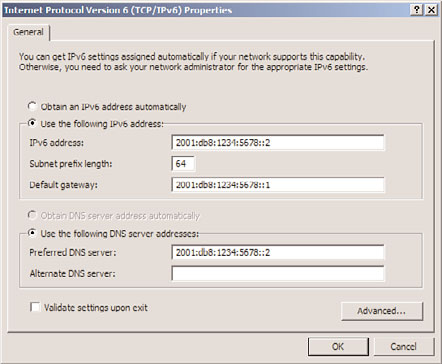
5. Click the Use the Following IPv6 Address option button.
6. In the IPv6 Address field, type in Fc00:1234:5678:9abc::2, and then press Tab. Notice
that the Subnet Prefix Length field auto-populates with “64.” Leave that in place and
press Tab to move to the Default Gateway input field.
7. Enter Fc00:1234:5678:9abc::1 for the default gateway.
8. Press Tab again to move to the Use the Following DNS Server Address field. Then
press Tab to move to the Preferred DNS Server input field. For this example, use the
IPv6 address for this server. In the Preferred DNS Server field, type in the sample
IPv6 address Fc00:1234:5678:9abc::2 and leave the Alternate DNS Server field blank.
The settings should match those shown in Figure 10.27.
ptg
FIGURE 10.27
IPv6 settings.
9. Click OK to close the IPv6 Properties window. Click Close to close the Local Area
Connection Properties window.
NOTE
The IPv6 prefix Fc00:1234:5678:9abc::/64 for the address Fc00:1234:5678:9abc::2
is a ULA—that is, a private non-globally routable address.
The DNS server also needs to have a reverse lookup zone created to allow computers to
register their IPv6 addresses. This is separate from the IPv4 reverse lookup zone created
earlier in the chapter, although it serves the same purpose. To create the IPv6 reverse
lookup zone, perform the following steps:
1. Launch Server Manager on the DNS server.
2. Expand the Roles node, DNS Server node, DNS node, and the server node, and select
the Reverse Lookup Zones node.
3. Right-click the Reverse Lookup Zones node and select New Zone.
How to Configure IPv6 on Windows Server 2008 R2
313
4. Click Next at the Welcome screen.
5. Ensure that Primary Zone and Store the Zone in Active Directory are selected, and
then click Next.
6. Select to replicate to all domain controllers in the forest, and then click Next.
7. Select the IPv6 Reverse Lookup Zone option and click Next.
8. Enter FC00:1234:5678:9abc::/64 for the IPv6 address prefix. The reverse lookup
zone name will be created automatically. Click Next.
9. Allow only secure updates and click Next.
10. Click Finish to complete the task.
Setting Up a DHCPv6 Server on Windows Server 2008 R2
IPv6 is installed and enabled by default in Windows Server 2008 R2, and native IPv6 func-
tionality is already included into Windows Server 2008 R2 DHCP by way of DHCPv6.
In this example, we assume that the Windows Server 2008 R2 server is assigned with the
IPv6 address from the previous example: Fc00:1234:5678:9abc::2. To set up the DHCP role,
execute the following steps:
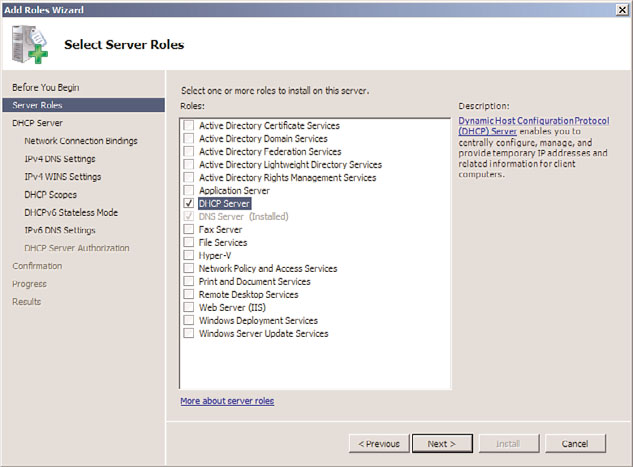
1. Launch Server Manager and click the Add Roles link.
ptg
2. Read the Before You Begin page and ensure that you have followed the bulleted
items. Click Next if you are ready to continue.
3. On the Server Roles page, click the check box to enter a check mark next to DHCP
Server (as shown in Figure 10.28), and click Next.
10
FIGURE 10.28
Selecting the DHCP server role.
314
CHAPTER 10
Domain Name System and IPv6
4. A warning message might appear, asking for confirmation to “Install DHCP Server
Without a Static IP Address.” For this example, we have not assigned a static IPv4
address. The wizard is detecting this, and this can be ignored during this example. If
this message appears, click Install DHCP Server Anyway (Not Recommended).
5. Be sure to take the time to read the “Introduction to DHCP Server,” and click Next
when you are ready to continue.
6. The next three sections for IPv4—IPv4 DNS Settings, IPv4 WINS Settings, and DHCP
Scopes—can be bypassed by clicking Next.
7. On the DHCPv6 Stateless Mode page, two options are available. For the Windows
Server 2008 R2 server to issue IPv6 addresses, select Disable DHCPv6 Stateless Mode
for This Server, and click Next.
8. On the DHCP Server Authorization page, specify the account that will be used to
authorize this DHCP server on the network, and click Next.
9. On the Confirmation page, review the settings, and click Install when you are ready
to continue.
10. It is important to not disrupt the installation progress, and allow the installation
to complete.
11. Confirm the installation on the Results page, and click Close.
ptg
The DHCPv6 server is set up, but an IPv6 scope still needs to be configured for the server
to begin assigning addresses.
Setting Up a DHCPv6 Scope on Windows Server 2008 R2
A separate scope is needed to assign IPv6 addresses in DHCP. The following steps show the
administrator how to configure a DHCPv6 scope in Windows Server 2008 R2:
1. Launch Server Manager, expand Roles, and then select DHCP Server.
2. In the DHCP window, expand the server name, and then click IPv6.
3. Right-click on IPv6, and click on New Scope. This opens a New Scope Wizard
window. Click Next to continue.
4. For this example, name the scope “Test IPv6 Scope,” leave the Description field
blank, and click Next to continue.
5. Assuming that the server’s IPv6 address is still Fc00:1234:5678:9abc::2 from the
previous example, enter in a prefix of Fc00:1234:5678:9abc::, leave the Preference
setting at the default setting of 0, and click Next.
6. On the Add Exclusions page, enter :0000 for the start and :ffff for the end.
Exclusions are added to avoid a potential IP address conflict (for example, the server
issuing its own address).
7. Click the Add button, and click Next to continue. See Figure 10.29 for more detail.
8. Review the default settings, and click Next on the Scope Lease page.

How to Configure IPv6 on Windows Server 2008 R2
315
FIGURE 10.29
Adding exclusions.
9. Confirm the settings, ensure that the Yes option button under Activate Scope Now is
ptg
selected, and then click Finish.
Now the DHCP server will begin to assign IPv6 addresses from the scope.
Adding an IPv6 Host Record in Windows Server 2008 R2 DNS
Configuring IPv6 host records in DNS is very similar to configuring IPv4 records. When
configuring IPv6 records in Windows Server 2008 R2 DNS, it is possible to provide the
abbreviated IPv6 addressing, meaning that you are able to use double “::”. The following
steps walk through configuring an AAAA host record for IPv6:
1. Launch the Server Manager, expand the Roles, expand DNS Server, expand DNS, and