Windows Server 2008 R2 Unleashed (219 page)
Read Windows Server 2008 R2 Unleashed Online
Authors: Noel Morimoto

Managing Windows Server 2008 R2 Disks
1115
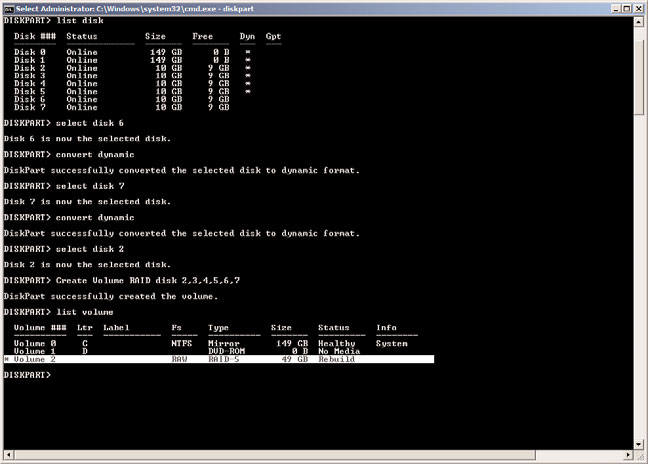
and disks 6 and 7 are online and basic. The online or offline status is listed in the
Status column and a dynamic disk is shown in the Dyn column with a * symbol.
ptg
FIGURE 28.4
Listing disk status using diskpart.exe.
11. Based on the disk configuration detailed in Figure 28.4, disk 6 and disk 7 need to be
converted to dynamic disks.
12. In the Command Prompt window, type select disk 6 and press Enter.
13. In the Command Prompt window, type convert dynamic and press Enter.
28
14. In the Command Prompt window, type select disk 7 and press Enter.
15. In the Command Prompt window, type convert dynamic and press Enter. Leave
diskpart.exe running in the Command Prompt window.
16. Now that all of the disks are initialized, online, and dynamic, we can create the
RAID-5 volume.
17. In the Command Prompt window, type Select disk 2 and press Enter.
18. In the Command Prompt window, type Create volume RAID disk 2,3,4,5,6,7 and
press Enter.
19. Now that the RAID-5 volume is created, we will format it, but the volume will need
to be identified. In the Command Prompt window, type List volume and press Enter.
20. The new volume should be listed as a RAID-5 volume. In Figure 28.5, the new
volume is listed as volume 2.
1116
CHAPTER 28
File System Management and Fault Tolerance
FIGURE 28.5
Identifying the new RAID-5 volume using diskpart.exe.
ptg
21. In the Command Prompt window, type Select volume 2 and press Enter.
22. In the Command Prompt window, type Format FS=NTFS label=New_RAID5_Volume,
and press Enter to format the volume. This will perform a full format of the volume.
23. When the format completes, the window details if the format completed success-
fully. If the format completed successfully, once the volume is formatted, type
Assign Letter=F and press Enter to assign the new volume the letter F.
24. When the drive letter is assigned, in the Command Prompt window, type Exit, and
press Enter to close diskpart.exe.
25. In the Command Prompt window, type Exit, and press Enter to close the Command
Prompt window.
The new RAID-5 volume should now be accessible from the operating system.
Working with Virtual Hard Disks
Virtual hard disks have been around since virtual machines appeared on the scene in the
late 1990s. Windows Server 2008 R2 can create and directly attach Microsoft virtual hard
disks or VHD files. VHD files are used in Windows Server 2008 and Windows Server 2008
R2 Hyper-V guest machines, as well as Microsoft Virtual Server 2005 and Microsoft Virtual
PC, although not all VHD versions are 100% interchangeable. Starting with Windows
Server 2008 R2, VHD files can be easily created and attached to the host operating system
using Disk Manager. To create and attach a new VHD file, perform the following steps:
1. Log on to the Windows Server 2008 R2 system with an account with administrator
privileges.
Managing Windows Server 2008 R2 Disks
1117
2. Click Start, click All Programs, click Administrative Tools, and select Server Manager.
3. In the tree pane, double-click the Storage node, and select Disk Management.
4. Right-click Disk Management and select Create VHD.
5. In the Create and Attach Virtual Hard Disk window, click Browse to select the
volume and folder to place the new VHD file.
6. In the Browse Virtual Disk Files window, locate the correct volume and folder, type
in the name of the new VHD file, and click Save.
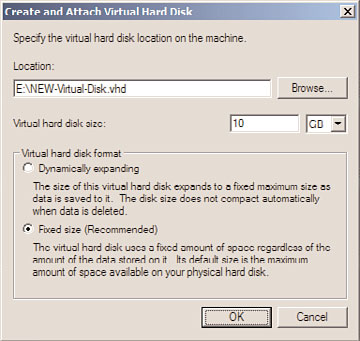
7. Back in the Create and Attach Virtual Hard Disk window, enter the size of the new
virtual hard disk and pull down the menu to select MB, GB, or TB. For our example,
we will create a 10GB file on the E: drive called NEW-Virtual-Disk.vhd.
8. In the Create and Attach Virtual Hard Disk window, after the location, name, and
size of the new virtual disk are defined, select the Fixed Size option button to create
the file and allocate all the space to file, as shown in Figure 28.6, and click OK to
create the new virtual hard disk.
ptg
28
FIGURE 28.6
Creating and attaching a new virtual hard disk.
9. Once the process completes, scroll down in the Disk Management tasks pane to
locate the new virtual hard disk, which should be listed as the last disk and should
be listed as Unknown and Not Initialized. Right-click the disk in the left section of
the tasks pane and select Initialize Disk.
10. In the Initialize Disk window, choose to create an MBR partition style for the disk,
ensure that the correct disk is checked in the window, and click OK to initialize the
disk.
11. Once initialized, the disk will be listed as basic and online. Right-click the unallo-
cated space in the tasks pane and select New Simple Volume.
12. Follow the steps to format the disk as NTFS and assign a drive letter.
1118
CHAPTER 28
File System Management and Fault Tolerance
13. Once the process has completed, the virtual hard disk will be available in My
Computer and Windows Explorer just as any other local drive.
14. Once the usage of the disk is complete, from within Disk Manager, right-click the
attached virtual hard disk and select Detach VHD.
15. In the Detach Virtual Hard Disk window, the disk that was selected will be listed; if
the virtual hard disk file will be used again, do not check the box to delete the virtu-
al disk as part of detaching it. Click OK to detach the disk.
Once the virtual hard disk is detached, if the disk was not deleted, it can be copied to any
other Windows Server 2008 R2 system and mounted or attached to the host operating
system or a Hyper-V guest virtual machine. One use of this new feature is to easily preload
software and files on virtual disks that will be used for Hyper-V guest machines or to mount
up virtual disk for disk repair, data copies, backup, or a number of different functions.
To attach an existing virtual disk to a Windows Server 2008 R2 system, the server adminis-
trator can open Server Manager, right-click the Disk Management node, and select Attach
VHD, and then the administrator can choose to attach the VHD in read-only mode to
avoid changing or modifying any data stored within the disk.
ptg
In each release of Microsoft Windows for the workstation or server, Microsoft has made
great attempts to increase the reliability of the system by extending the number of
included hardware drivers. This holds true today for Windows Server 2008 R2 and
Windows 7, which to date have the most complete set of hardware and device drivers. Of
course, Windows Server 2008 R2 is only available in 64 bit, which does limit hardware
compatibility to a certain degree. Microsoft works hand in hand with software and hard-
ware manufacturers to provide the means for these manufacturers to create the best
drivers for Windows that will provide the highest level of reliability for the client and
server operating systems.
System File Stability
Windows Server 2008 R2 and Windows 7 allow an administrator to control the level of
security associated with hardware drivers. Because Microsoft works closely with indepen-
dent hardware vendors (IHVs), Windows Server 2008 R2 and Windows 7 support extensive
brands of hardware and client/server peripherals. When an IHV tests its hardware and
passes certain Microsoft requirements, its hardware driver is certified, digitally signed by
Microsoft, and, in most cases, added to the Hardware Compatibility List (HCL) for the
particular platform or operating system. If the driver is certified early enough in the oper-
ating system development process, the driver is included with the operating system.
Most new hardware will be detected by Windows and will prompt to search the local file
system or Windows Update to find the driver. If the hardware was tested and verified by
Microsoft before the production release of Windows, it should be found and added auto-
matically. If the hardware was certified after the release of Windows, it might be included
System File Reliability
1119
in Windows Update or the administrator might be required to locate, download, and
install the driver right from the manufacturer’s website.
In most cases, administrators should only install drivers provided by Microsoft and digi-
tally signed by Microsoft Windows Hardware Compatibility Publisher. In other cases,
however, especially when it comes to connecting to external disk storage, it might be pref-
erential and required to use the driver provided by the manufacturer. Unsigned drivers are
not accepted by default on Windows Vista, Windows 7, Windows Server 2008, and
Windows Server 2008 R2. These drivers are not fully tested and can cause issues. Make
sure to check with the hardware manufacturer for compatibility before purchasing any
new or used hardware that will be attached to a new Windows Server 2008 R2 system. In
particular, disk controllers and disk access are critical to server stability and administrators
should always try to configure their disk controller firmware version and driver version to
match the recommended manufacturer and Microsoft specification; otherwise, data
corruption or loss might result.
File Signature Verification (
Sigverif.exe
)
File Signature Verification is a graphic-based utility that can be used when it is suspected
that original, protected, and digitally signed system files or drivers have been replaced or
overwritten after an application or device installation. This tool checks the system files
ptg
and drivers to verify that all the files have a Microsoft digital signature. When unsigned or
incorrect version files are found, the information, including filename, location, file date,
and version number, is saved in a log file and displayed on the screen.
To run this tool, click Start, Run, and in the search pane, type Sigverif.exe, and press
Enter. When the window is open, click Start to run a check for signed drivers and system
files in the operating system. This starts a scan of the devices drivers and if they all pass, a
window will open stating that the files have been scanned and verified and digitally
signed. Click OK to close the pop-up and click Close to close the File Signature
Verification window.
28
System File Checker (
Sfc.exe
)
The System File Checker is a command-line tool that is similar in function to the File
Signature Verification tool, but any detected incorrect files are automatically replaced with
the Microsoft version of the detected file. This tool can be dangerous and cause serious
problems if the administrator is not sure if certain Windows files or unsigned drivers are
required for the operating system to function properly. This tool should be used if operat-
ing systems become unstable and drivers or system files are suspected or logged as possible
causes of problems.
NOTE
Sfc.exe scans and replaces any system files that it detects are incorrect. If any
unsigned drivers are necessary for operation, do not run this utility; otherwise, the files
might be replaced and cause your hardware to operate incorrectly, producing data cor-
ruption, loss of functionality, or actually producing different problems.