Windows Server 2008 R2 Unleashed (221 page)
Read Windows Server 2008 R2 Unleashed Online
Authors: Noel Morimoto

that file will be sent on the local network, and in this particular example, the file will be
referenced from the original workstation that copied the file over during the initial
request, thus improving access performance to the file and reducing network traffic. More
detailed information on BranchCache is included in Chapter 32, “Optimizing Windows
Server 2008 R2 for Branch Office Communications.” To enable BranchCache on a
Windows Server 2008 R2 system, perform the steps in the following sections.
Install the BranchCache Service
Before BranchCache can be utilized, the service must be installed on a Windows Server
2008 R2 system. To install the BranchCache service, perform the following steps:
1. Log on to the Windows Server 2008 R2 system with the File Services Role installed
with an account with administrator privileges.
2. Click Start, click All Programs, click Administrative Tools, and select Server Manager.
Managing Data Access Using Windows Server 2008 R2 Shares
1125
3. Double-click on Roles in the tree pane to expand the role services. In the tasks pane
on the right, scroll down to Role Services until you reach the File Services Role
section. Under the File Service Role section, check to see whether the BranchCache
for network files is installed.
4. If the service is not installed, click on Add Role Services and follow the steps to
check and install the BranchCache for network files service.
Enable BranchCache on a File Share
Once the BranchCache for network files service is installed on the Windows Server 2008
R2 system, the service can be enabled on a share-by-share basis. To enable BranchCache
functionality on a particular server share, perform the following steps:
1. Log on to the Windows Server 2008 R2 system with an account with administrator
privileges.
2. Click Start, click All Programs, click Administrative Tools, and select Server Manager.
3. Double-click on Roles, and then double-click on File Services.
4. Select Share and Storage Management.
5. In the tasks pane, right-click the share that needs to have BranchCache functionality
enabled and select Properties.
ptg
6. On the Sharing tab, click the Advanced button.
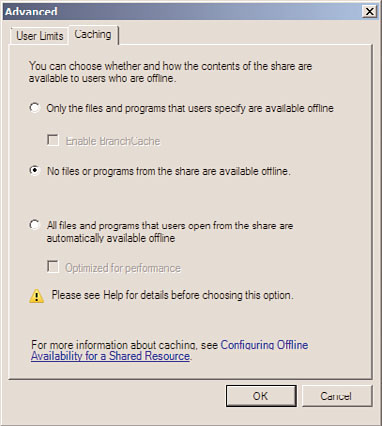
7. Select the Caching tab, and verify that the Only the Files and Programs That Users
Specify Are Available Offline option button is selected. Check the Enable
BranchCache check box, and click OK to close the Advanced window.
8. Click OK again to save the settings to the share and close the Server Manager window.
Before BranchCache functionality is enabled, network administrators need to understand
the service in greater detail, especially because it is currently only supported on Windows
7 workstations and Windows Server 2008 R2, and any lower-level client will not be able to
28
make use of this feature. In cases where Windows Vista or older clients still exist on
remote or branch office networks, administrators should continue to deploy remote file
servers with replicated DFS file shares when access to large or numerous files is required.
Managing Folder Shares
Folders can be shared on FAT, FAT32, and NTFS volumes. When a folder is shared, as
stated earlier, share options can be configured, including the share name, description,
share permissions, access-based enumeration, limiting the number of simultaneous
connections, the default offline file settings, and BranchCache if the service is already
installed on the Windows Server 2008 R2 system. There are many ways to create a share,
but to provide the most functionality during the share creation task, administrators
should use the Share and Storage Management console located in Server Manager.
1126
CHAPTER 28
File System Management and Fault Tolerance
The Share and Storage Management console can be used to create shares and provision
storage, including tasks such as creating volumes on existing Windows disks. To create a
new share using the Share and Storage Management console, perform the following steps:
1. Log on to the Windows Server 2008 R2 system with an account with administrator
privileges.
2. Click Start, click All Programs, click Administrative Tools, and select Server Manager.
3. Double-click on Roles, and then double-click on File Services.
4. Select Share and Storage Management.
5. In the Actions pane, click Provision Share to invoke the Provision a Shared Folder
Wizard.
6. For this example, a new folder called HumanResources will be created and shared on
the C: drive. Type c:\HumanResources in the location area, and click Next.
7. A pop-up window opens, stating that the folder does not exist; click Yes to create
the folder.
8. On the NTFS Permissions page, select the No, Do Not Change NTFS Permissions
option button, and click Next to continue. If desired, click to change the permis-
sions and add the Human Resources department members or security groups to limit
access to the share.
ptg
9. On the Share Protocols page, select the SMB protocol to share the folder to Windows
and other compatible SMB clients, type in the name of the share if the default is not
desired, and click Next to continue. If the Services for NFS is installed, the adminis-
trator can also enable the NFS protocol for this share by checking the NFS check box
and entering a share name.
10. On the SMB Settings page, click the Advanced button to configure the advanced
share settings.
11. In the Advanced Settings window, select the User Limits tab to configure the
maximum number of connections to the share and check the Enable Access-based
Enumeration check box.
12. On the Caching tab, select the No Files or Programs from the Share Are Available
Offline option button, as shown in Figure 28.8, and click OK. Because we are sharing
a folder that will contain Human Resources data, users should only be able to access
the folders and files when connected to the company network and that is why we
are disabling caching. Also, due to the secure nature of some Human Resources data,
we have also enabled access-based enumeration to ensure that the users who do not
have access to the data do not even see the folders or files hosted within the share.
13. Back on the SMB Settings page, click Next to continue.
14. On the SMB Permissions page, select the Administrators Have Full Control; All Other
Users and Groups Have Only Read Access option button, and click Next. This
permission setting is preferred on some networks to allow administrators to upload
new data to the share from the network to simplify administration. If tighter secu-
rity is required, as would be typical with a Human Resources folder, the administra-
tor can select the users and groups that have custom share permissions and
Managing Data Access Using Windows Server 2008 R2 Shares
1127
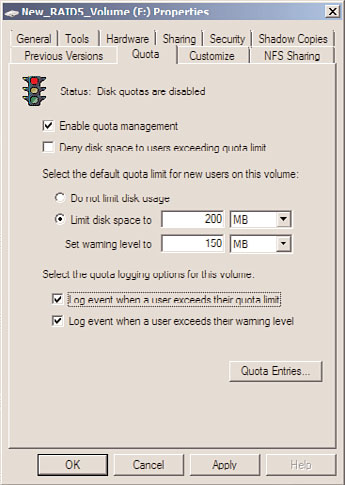
FIGURE 28.8
Disabling caching on a file share.
ptg
configure the permissions to allow only the network administrators and Human
Resources department members access to the share.
15. If the File Server Resource Manager is installed, the Quota Policy page is displayed.
On the Quota Policy page, configure the Apply Quota check box as necessary, and
click Next to continue.
16. If the File Server Resource Manager is installed, the File Screen Policy page is
displayed on the next page. On the File Screen Policy page, configure the Apply File
Screen check box as necessary, and click Next to continue.
17. On the DFS Namespace Publishing page, clear the check box, and click Next to
28
continue.
18. On the Review Settings and Create Share page, review the chosen settings and if
everything appears correct, click Create to continue.
19. The Confirmation page is displayed to show the results of the share creation. Click
Close to complete the share creation.
Using the Share and Storage Management console on Windows Server 2008 R2 systems
with the File Server Resource Manager (FSRM) installed enables administrators to fully
configure a share’s properties and security settings. That is why no file server should be
deployed without the FSRM and why shares should only be created using the Share and
Storage Management console.
As a best practice, always define share permissions for every share regardless of the volume
format type. When a share is first created using the Share and Storage Management
console, the administrator is provided three standard permissions configuration options as
1128
CHAPTER 28
File System Management and Fault Tolerance
well as the ability to customize the permissions. The three preconfigured permissions
options use the local Administrators group and the Everyone group for share permissions.
Using any of the three preconfigured settings and not customizing permissions might not
be acceptable for companies that must adhere to strict security requirements as the
Everyone group can enable guest and anonymous share access and viewing. Even though
the guest account is disabled by default, and anonymous access is disabled by default,
using a best-practice recommendation is to always replace the Everyone group with at
least the Authenticated Users, local server Users, or Domain Users group to require authen-
tication before accessing a share.
Volume-Based NTFS Quota Management
Quotas can be enabled and configured at the volume level and applied to user and group
objects. This is the same quota management included with Windows 2000 Server,
Windows Server 2003, Windows Server 2003 R2, Windows Server 2008, and Window
Server 2008 R2. Quotas enabled at the volume will be calculated based on all files saved to
the volume by a particular user who is not part of the server administrators group. Volume
quotas can only be enabled on NTFS volumes and cannot be applied to any lower level,
such as a subfolder. The key to a successful implementation of quotas on a volume is
ptg
setting the correct file permissions for the entire volume and folders and to limit the data
transferred to a volume for an end user by a third party, such as a desktop or server
administrator.
The steps required to enable and implement quotas based on folders and not an entire
volume are detailed later in the chapter in the “Configuring Quotas with File Server
Resource Manager” section. The quota management features available in the File Server
Resource Manager are different from the features included with NTFS volume quotas;
Table 28.1 details the differences.
TABLE 28.1
Quota Differences Between FSRM and NTFS
Quota Capabilities
FSRM Quotas
NTFS Quotas
Quota tracking
By folder or by volume
Per user on a specific volume
only
Calculation of storage
By actual disk space used
By the logical file size on the
usage
volume
Notification method
By email, custom reports, and event
By event log only
log entries
Volume-Based NTFS Quota Management
1129
NOTE
Prior to the release of FSRM, organizations used to depend on NTFS volume quotas or
third-party products to provide their quota storage management capabilities; however,
FSRM has effectively replaced the use of NTFS volume quotas. The coverage of NTFS