Windows Server 2008 R2 Unleashed (193 page)
Read Windows Server 2008 R2 Unleashed Online
Authors: Noel Morimoto

. The ability to use boot and installation images included with the Windows Server
2008, Windows Vista SP1, Windows 7, and Windows Server 2008 R2 media using the
.wim extension. These can be copied directly from the respective installation media
right into the WDS server to provide base images for these operating systems within
minutes, without any customization.
. Support for both 32- and 64-bit operating system deployment.
Before an organization can consider deploying Windows 2008 R2 WDS, Active Directory
Domain Services (AD DS) must be deployed. Also, due to the nature of the Preboot
ptg
Execution Environment (PXE), Dynamic Host Configuration Protocol (DHCP) and domain
name system (DNS) services are also required. Of course, for WDS to function properly,
the desktop or server hardware must also be compatible and must support PXE boot and
have at least 512MB of RAM, as this is the minimum RAM requirement to install Windows
Server 2008 R2, Windows 7, and Windows Vista or Windows Server 2008 using the
Windows PE environment. Although the WDS server can be configured to use IPv6, all
client and WDS server communication will use IPv4.
WDS Image Types
Windows Server 2008 R2 WDS includes several different image types. WDS administrators
need to understand each of these image types to understand the documentation and how
WDS works and also to be able to communicate the inner workings of WDS to manage-
ment and other administrators or clients as required. WDS image types include boot
images, installation images, discover images, and capture images.
Boot Images
A boot image contains the Windows Deployment Services client and the Windows
Preinstallation Environment (Windows PE), which is basically a mini operating system
used to connect the system to the WDS server and provide the means to select and install
a WDS installation image. The boot image included in the Windows Server 2008 R2 instal-
lation media, as an example, is appropriately named boot.wim and can be used to boot
systems that will install Windows Server 2008 R2, Windows Vista SP1 x64, Windows 7 x64,
or Windows Server 2008 x64 images. The Windows Server 2008 R2 boot image can also be
Windows Server 2008 R2 Windows Deployment Services
993
used to install images using multicast transmissions. If x86 images will be deployed, it is a
best practice to boot those systems using the compatible x86 Windows 7 or Windows Vista
SP1 boot image. This will help simplify issues with driver provisioning and manual driver
injection as necessary. Also, even if a Windows XP or Windows Server 2003 custom install
image will be deployed, the boot image from Windows Automated Installation Kit, or
Windows Vista SP1 or greater will be required as well as the appropriate storage, system
bus, and networking drivers for that boot image. To be very specific, if a hardware plat-
form that will be used for a Windows XP or Windows Server 2003 system does not contain
storage, network, and system bus hardware that has a compatible driver that matches the
boot image, that hardware might not be a candidate for WDS deployment.
Installation Images
The installation images are the actual Windows installation media, packaged into a
single WIM file. Depending on the actual media used to provide the WIM files, many
different installation images might be included. For example, organizations that receive
volume license media from Microsoft might have received a Microsoft Windows Server
2008 R2 DVD that contains the full installation and the Server Core images for Standard
Edition, Enterprise Edition, and Datacenter Edition. On a WDS server, normally only a
single boot image is required per platform, x86 or x64, but it can contain many different
ptg
installation images.
26
Discover Images
A discover image is created from a boot image and is used to boot a system and load the
Windows Preinstallation Environment (Windows PE) and locate and connect to a WDS
server. A discover image is commonly used when the network does not support PXE boot
or the system does not support it. Discover images can be exported to ISO files and then
burned or stored on removable media, such as CDs, DVDs, or USB memory sticks, for
portability. In some cases when hardware is not booting and connecting properly to a
WDS server using a boot image, a Discover image can be tested as an alternative for both
deploying installation images and capturing a system to an image.
Capture Images
A capture image is also created from a boot image, but instead of running setup like an
installation image, the capture image runs the WDS capture utility. The WDS capture
utility is used to connect to a system that has been prepared for imaging or cloning, using
the appropriate system preparation tools, to the WDS system to create a new installation
image that can be deployed later to WDS clients. Before a capture image is used, a system
with an operating system is customized by adding applications, custom configurations,
and other system changes that are required by the particular organization. When the
994
CHAPTER 26
Windows Server 2008 R2 Administration Tools for Desktops
system is ready for imaging, it is prepared using Sysprep, a Microsoft deployment tool
used to clear the machine’s SID and operating system configurations that are specific to
the system that will be imaged.
Installing Windows Deployment Services (WDS)
You can install WDS on Windows Server 2008 R2 using the Initial Configuration Wizard,
the Server Manager console, or the command-line utility Servermanagercmd.exe. Windows
Deployment Services can be installed on the Standard, Enterprise, or Datacenter Edition of
Windows Server 2008 R2, but it is not included on any Server Core editions. Before
installing the WDS role, ensure that all volumes on the WDS server are formatted as NTFS
volumes. Also, it is not recommended to install the WDS images into the same volume as
the operating system to allow for customized security and to remove any risk of filling up
the system drive when adding images to the WDS server. To add the WDS role using
Server Manager, perform the following steps:
1. Log on to the Windows Server 2008 R2 system that will have the WDS role installed
with an account with local administrator and domain administrator rights.
2. Click Start, click All Programs, click Administrative Tools, and select Server Manager.
ptg
3. When Server Manager opens, in the tree pane, select the Roles node.
4. In the tasks pane, click the Add Roles link.
5. Click Next on the Before You Begin page.
6. On the Select Server Roles page, check the box next to the Windows Deployment
Services role, and click Next to continue.
7. On the Overview of Windows Deployment Services page, read the introduction and
notes, and click Next to continue.
8. On the Select Role Services page, verify that both the Deployment Server and the
Transport Server are checked, and click Next to continue.
9. On the Confirm Installation Selections page, review the selections and click Install
to continue.
10. Review the results on the Installation Results page, and click Close to complete the
installation. Close Server Manager and log off of the server.
Configuring the WDS Server
After the WDS role is installed, the initial boot and installation image can be added.
Locate the Windows 7 Enterprise x64 installation media as the boot image from this
media can and will be used to deploy Windows Vista SP1, Windows 7 Ultimate, and
Windows 7 Enterprise 64-bit edition images. Add x86-based boot images if both x86 and
Installing Windows Deployment Services (WDS)
995
x64 install images will be deployed using WDS. To install the initial boot image, perform
the following steps:
1. Log on to the Windows Server 2008 R2 system that has the WDS role installed with
an account with local administrator and domain administrator rights.
2. Click Start, click All Programs, click Administrative Tools, and select Windows
Deployment Services.
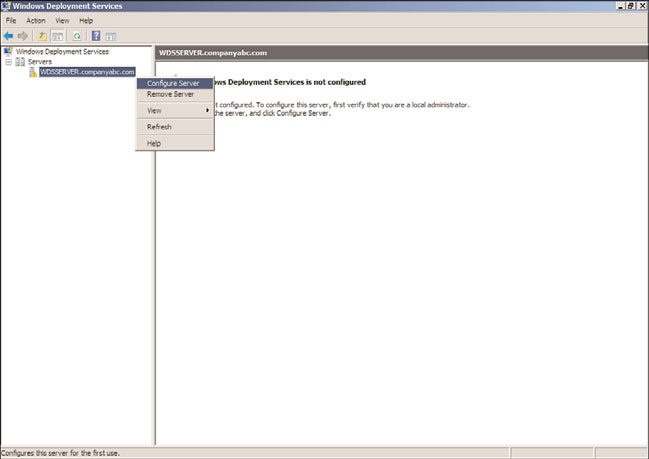
3. When the Windows Deployment Services console opens, in the tree pane, expand
Servers.
4. The WDS server will be listed in the tree pane with a warning symbol on it indicat-
ing that the WDS server needs to be configured. Right-click the server and select
Configure Server, as shown in Figure 26.1.
ptg
26
FIGURE 26.1
Initiating the WDS server configuration.
5. Review the requirements that are detailed on the Before You Begin page, and click
Next to continue.
6. On the Remote Installation Folder Location page, specify the default installation
path for the WDS images. For our example, we will use a separate drive and specify
the path of E:\RemoteInstall and then click Next.
996
CHAPTER 26
Windows Server 2008 R2 Administration Tools for Desktops
NOTE
If the WDS server only has a single disk and is selected for the installation folder, a
pop-up notification opens stating that it is recommended that you create the remote
installation disk on a different volume and, if possible, a different disk.
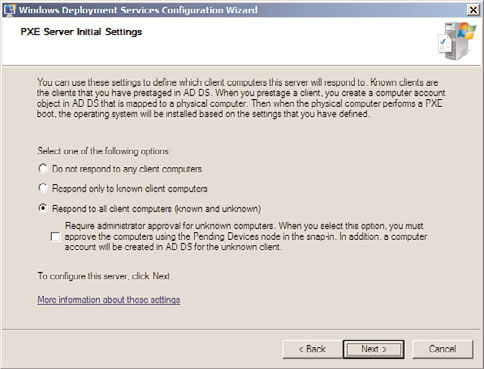
7. On the PXE Server Initial Settings page, review the options for PXE boot settings:
.
Do Not Respond to Any Client Computer—
This option essentially disables
the WDS server from responding to any PXE boot attempts.
.
Respond Only to Known Client Computers—
This option requires that
each system that will have an image deployed or captured will need to have an
existing Active Directory computer account with a predefined globally unique
identifier (GUID). This is the desired configuration after the WDS infrastructure
is tested and working properly and after the WDS administrator understands
how to locate the GUID of a system and pre-create a computer account in
Active Directory.
.
Respond to All Client Computers (Known and Unknown)—
This option
ptg
allows any machine that is PXE boot capable to connect to the WDS server and
load a boot image. Of course, to install an image, the user needs to specify
domain credentials.
When Respond to All Client Computers (Known and Unknown) is selected,
the WDS administrator can also select an additional check box that would
require WDS administrators to approve connected WDS clients in the console
before an image can be deployed to that system. This added security removes
the requirement for the collection of system GUIDs before a system can
connect to WDS but also adds the necessary security to allow the WDS admin-
istrator to control the deployment of WDS images.
8. For the initial WDS installation, select the Respond to All Client Computers (Known
and Unknown) option button, and click Next, as shown in Figure 26.2.
9. The Operation Complete page appears and an Add Images to the Server Now check
box is displayed. Uncheck the check box and click Finish to close the wizard.
After the wizard closes, the Windows Deployment Services console is displayed. Review
each of the nodes that are now displayed beneath the WDS server, such as the Install
Images, Boot Images, Pending Devices, Multicast Transmissions, and the new Drivers
node. As we move forward in our WDS server configuration, each of these nodes will be
reviewed, but at this time, additional configuration of the WDS server might be required.
To review the WDS server settings, perform the following steps:
1. Log on to the Windows Server 2008 R2 system that has the WDS role installed with
an account with local administrator and domain administrator rights.