Windows Server 2008 R2 Unleashed (197 page)
Read Windows Server 2008 R2 Unleashed Online
Authors: Noel Morimoto

and CAT file that make up the driver set.
6. On the system, open a command prompt. Change directories to the C:\Program
Files\Windows AIK\Tools\x86 folder. If the boot image that will be modified is an
x64-based image, the amd64 folder would be substituted for the x86 folder in our
example.
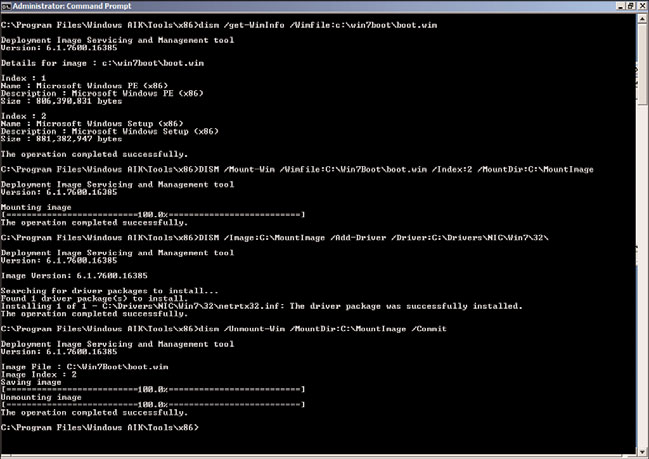
7. Based on the location of our drivers and boot image, type in the command DISM
/Get-Wiminfo /Wimfile:C:\Win7Boot\Boot.wim and press Enter.
8. The previous command lists the information about the boot.wim file and specifically
shows that this Windows 7 x86 boot.wim file contains two images, Microsoft
Windows PE (Image Index 1) and Microsoft Windows Setup (Image Index 2). We will
be mounting and adding drivers to the Image Index 2. This info step should be run
on each boot image file that will have drivers added to ensure that the correct image
index number is referenced when the file is mounted.
9. In the Command Prompt window, type the command DISM /Mount-Wim
/WimFile:C:\Win7Boot\boot.wim /Index:2 /MountDir:C:\MountImage and press
Enter to mount the boot image file.
10. If the process is successful, the command prompt will state that the operation
completed successfully.
ptg
11. In the Command Prompt window, type the command DISM /Image:C:\MountImage
26
/Add-Driver:C:\Drivers\NIC\Win7\32 and press Enter.
12. If the driver addition completes successfully, enter the command DISM /Unmount-Wim
/MountDir:C:\MountImage /Commit and press Enter to save the changes back to the
boot.wim file. The results will show in the Command Prompt window, as shown in
Figure 26.7.
13. Copy the updated boot.wim file to the WDS server, add it as a boot image, and test
the image to verify the driver addition was successful.
Manual Driver Injection for Windows Vista, WinPE, and Windows Server 2008 Boot Images
There might be situations when WDS administrators need to use a boot image other than
a Windows 7 or Windows Server 2008 R2 boot image, and drivers need to be added to
these images. In these cases, it is necessary to add or inject those drivers manually to the
WIM files. This can be accomplished using the tools included in the Windows Automated
Installation Kit (WAIK) for Windows Vista and Windows Server 2008. The WAIK for
Windows 7 and Windows Server 2008 R2 does not support injecting drivers to boot
images from Windows Vista. To manually inject drivers into a Vista boot image, as an
example, perform the following steps:
1. Download the necessary drivers and the Windows Vista WAIK from the Internet to a
local server.
2. Log on to a system with an account with administrator group membership and
follow the steps noted in the previous section to copy the drivers and boot.wim file,
and create a folder to mount the image into.
3. Install the Windows Vista WAIK on the system.
1012
CHAPTER 26
Windows Server 2008 R2 Administration Tools for Desktops
FIGURE 26.7
Manually injecting drivers to Windows 7 boot images.
ptg
For our example, the Windows Vista SP2 x86 boot.wim will be located in the
C:\VistaBoot\boot.wim and the network card driver we will add is located in the
E:\Drivers\NIC\WinVista\32\ folder. When viewed, this folder contains an INF, SYS,
and CAT file that make up the driver set. The image will be mounted in a newly
created folder named C:\MountImage.
4. On the system, open a command prompt. Change directories to the C:\Program
Files\Windows AIK\Tools\x86 folder. If the boot image that will be modified is an
x64-based image, the amd64 Tools subfolder would be substituted for the x86 folder
in our example.
5. Based on the location of our drivers and boot image, type in the command IMAGEX
/info C:\VistaBoot\boot.wim and press Enter. Make sure this boot.wim file is not
set to read only.
6. The previous command lists the information about the boot.wim file and specifically
shows that this Vista x86 SP2 boot.wim file contains two images, Windows Longhorn
WinPE (Image Index 1) and Windows Longhorn Setup (Image Index 2). We will be
mounting and adding drivers to the Image Index 2. This info step should be run on
each boot image file that will have drivers added to ensure that the correct image
index number is referenced when the file is mounted.
7. In the Command Prompt window, type the command IMAGEX /Mountrw
C:\Vistaboot\boot.wim 2 C:\MountImage and press Enter to mount the boot
image file.
8. If the process is successful, the command prompt will state that the operation
completed successfully.
Creating Discover Images
1013
9. In the Command Prompt window, type the command PEIMG
/Inf=C:\Drivers\NIC\WinVista\32\netrtx32.inf C:\MountImage\Windows and
press Enter. Also, make sure to substitute the correct INF file that is located in the
driver folder.
10. If the process completes successfully, type the command IMAGEX /Unmount /Commit
C:\MountImage and press Enter.
11. Save the updated boot.wim to the necessary WDS server and install as a boot image
if desired.
Pre-creating Active Directory Computer Accounts for WDS
Without doing any extensive customization to the imaging process, you can include
customizations to boot images, install images, or the WDS server configuration settings.
WDS automatically generates the name of the computer and uses the credentials specified
during the image deployment to add the imaged system to the Active Directory domain of
which the WDS server is a member. WDS uses the configuration settings in the WDS
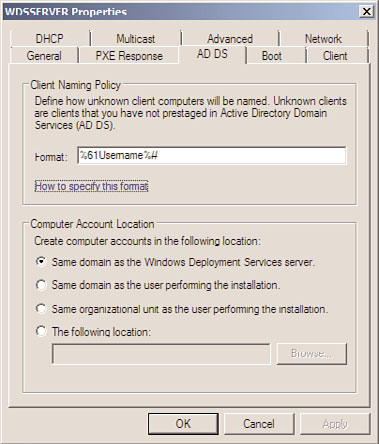
Properties, AD DS tab, as shown in Figure 26.8, to define the Client Naming Policy format
for computers and to define which domain and container the new computer accounts will
be created in.
ptg
26
FIGURE 26.8
WDS Properties page for new computer account, AD DS tab.
The configuration options in the WDS Property page, AD DS tab work well for new
computer account placement, but are not very flexible for naming computer accounts.
When many computers will be deployed and will require predefined computer names in
Active Directory, the computer accounts can be pre-created. For the pre-created computer
1014
CHAPTER 26
Windows Server 2008 R2 Administration Tools for Desktops
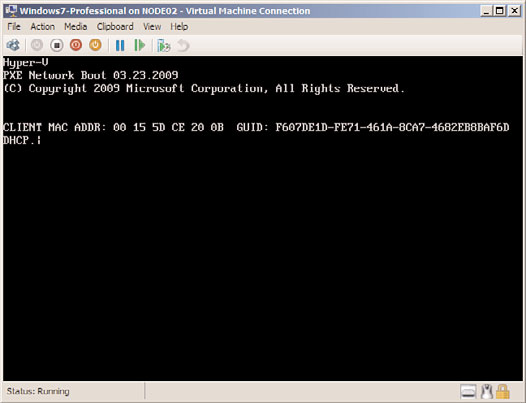
accounts to be linked to the actual systems, the GUID associated with the system’s
network adapter is required. On most systems, the GUID will be displayed during the PXE
boot sequence, as shown in Figure 26.9. After the GUID has been identified and recorded,
the Active Directory computer account can be created. The account will need to be created
before the system is imaged using WDS. To create an Active Directory computer account
for use with WDS, perform the following steps:
1. Log on to the Windows Server 2008 R2 system running WDS with an account with
administrative rights.
2. If the Remote Server Administration tools for the Active Directory Domain Services
AD DS role are not installed on the WDS server, they must be installed now.
3. After the domain services tools are installed, click Start, click All Programs, click
Administrative Tools, and select Active Directory Users and Computers.
4. Expand the domain and select the container that the WDS server will place new
computer accounts in, as specified in the WDS Properties page, AD DS tab. By default,
all new computer accounts will be placed in the domain’s Computers container.
5. Right-click on the domain’s Computers container, click New, and select Computer.
6. When the New Object – Computer window opens, type in the desired name of the
new computer account in the Computer Name field, and click Next.
ptg
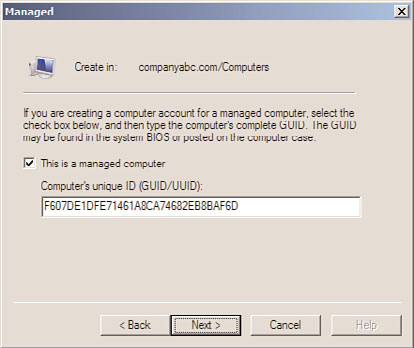
7. On the Managed page, check the This Is a Managed Computer check box.
8. After the check box is checked, enter the previously recorded GUID associated with
the network card on the system that will be imaged, as shown in Figure 26.10, and
click Next to continue. The dashes will need to be removed and should not be typed
into the GUID field.
FIGURE 26.9
Gathering a system’s network adapter GUID to pre-create Active Directory
computer accounts.
Creating Discover Images
1015
FIGURE 26.10
Populating the GUID into the Active Directory computer account properties.
9. The next page is the Host Server page where a specific WDS server can be specified
to provide images to this host. Either specify a WDS server or leave the default of
ptg
allowing any WDS server to provide images to this client, and click Next.
10. Review the settings and click Finish to complete the process.
26
11. After the computer account is created, the system can be imaged and will join the
domain using the preconfigured computer account name.
Migration Path from Win2k3 RIS to W2k3-Sp2 WDS to Win2k8-WDS
Windows Server 2003 Remote Installation Services (RIS) is included with the release of the
product and with Service Pack 1. With the release of Windows Server 2003 Service Pack 2,
RIS services were upgraded to Windows 2003 Windows Deployment Services. The first
time the new WDS console is opened on a Windows Server 2003 SP2 system, a prompt
appears asking if the WDS server should be configured to run in Legacy or Mixed mode. If
you plan to use previously created RIS images only, Legacy mode can be used. If you want
to use your RIS images as well as the Windows Vista, Windows Server 2008, Windows 7,
and Windows Server 2008 R2 Windows Imaging Format files (WIM), Mixed mode should