Windows Server 2008 R2 Unleashed (189 page)
Read Windows Server 2008 R2 Unleashed Online
Authors: Noel Morimoto

list. The settings are grouped into the following categories:
.
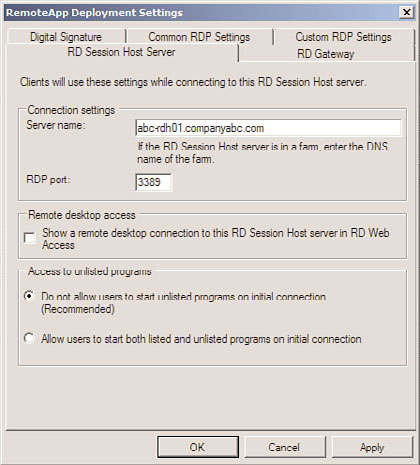
RD Session Host Server Settings—
These settings are used to define how users will
connect to an RD Session Host server or RD Session Host server farm to access
RemoteApp programs, as shown in Figure 25.14.
Deploying Remote Desktop Services
971
25
FIGURE 25.14
Modifying global deployment settings.
ptg
.
RD Gateway Settings—
These settings are used to define RD Gateway deployment
settings.
.
Digital Signature Settings—
This setting is used to define the digital certificate that
is used to digitally sign .rdp files.
.
RDP Settings—
These settings are used to define common RDP settings for
RemoteApp connections, such as device and resource redirection.
Accessing RemoteApp and Desktop Connection
When using Windows 7 or Windows Server 2008 R2, users can also access RemoteApp and
Desktop Connection using two methods. The first method is to use a RemoteApp and
Desktop Connection URL, which is provided by administrators. For example, such a URL
might be formatted as: https://remotedesk.companyabc.com/RDWeb/Feed/webfeed.aspx.
Using this URL, a user can then create a new connection to RemoteApp and Desktop
Connection using the Control Panel, RemoteApp and Desktop Connection.
The second method to access RemoteApp and Desktop Connection is to use a configura-
tion file that is generated by an administrator. These configuration files are generated
using the Remote Desktop Configuration Manager tool. Once the configuration file is
given to a user, the user just has to double-click the configuration file and the connection
to RemoteApp and Desktop Connection is created.
RemoteApp and Desktop Connection connections are also created when a user logs on to
RD Web Access and accesses RemoteApp programs, session-based remote desktops, or
972
CHAPTER 25
Remote Desktop Services
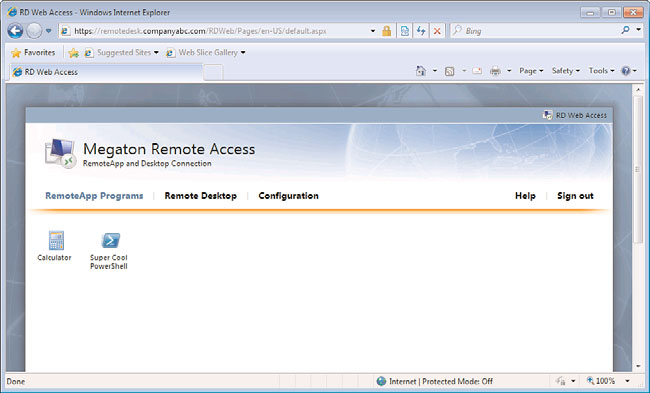
virtual desktops. To access RemoteApp and Desktop Connection, users would log on to RD
Web Access using the following URL:
https://
The
that refers to that server or group of servers, as shown in Figure 25.15. Additionally, for
centralized portal deployments, an RD Web Access web part can be added to a Windows
SharePoint Services site.
ptg
FIGURE 25.15
Using the default RD Web Access web page.
Deploying RD Gateway
As described previously in this chapter, a number of requirements must be met before the
RD Gateway role service can be installed. Additionally, it is highly recommended that the
following task be completed:
. A trusted SSL certificate must be obtained for and installed on the RD Gateway
server(s). For more information about this process, review Chapter 13, “Server-
Level Security.”
Next, use the following steps to install and configure the RD Gateway role service on a
machine that already has the RD Web Access and RD Connection Broker role services
installed:
1. Log on to the desired server with local administrator privileges.
2. Click Start, and then click Run.
3. In the Run dialog box, type in ServerManager.msc and click OK.
4. Under Roles Summary, select the Remote Desktop Services option.
Deploying Remote Desktop Services
973
5. Under Role Services, select the Add Role Services task.
6. On the Select Role Services page, select the Remote Desktop Gateway role service.
7. When prompted with the Add Roles Wizard dialog box, click the Add Required Role
Services button (any missing required role services or features for the RD Gateway
role service will now be added).
8. On the Select Role Services page, click Next.
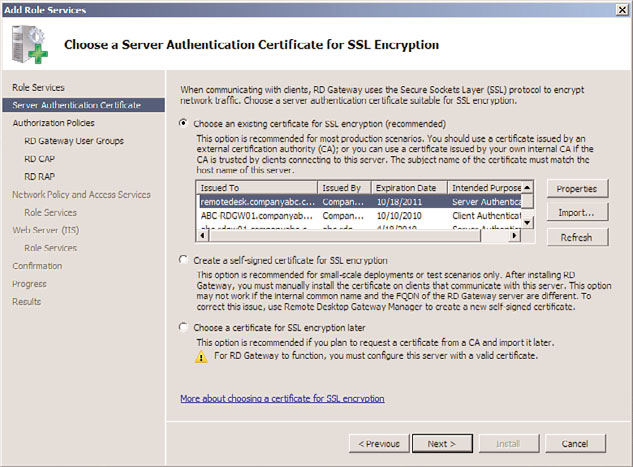
9. On the Choose a Server Authentication Certificate for SSL Encryption page shown in
Figure 25.16, choose one of the following certificate options:
. Choose an Existing Certificate for SSL Encryption (Recommended)
. Create a Self-Signed Certificate for SSL Encryption
. Choose a Certificate for SSL Encryption Later
10. On the Create Authorization Policies for RD Gateway page, select the Now option,
and click Next.
11. On the Select User Groups That Can Connect Through RD Gateway page, click the
Add button and define the local or domain groups that are allowed to connect
25
through RD Gateway, click OK, and then click Next.
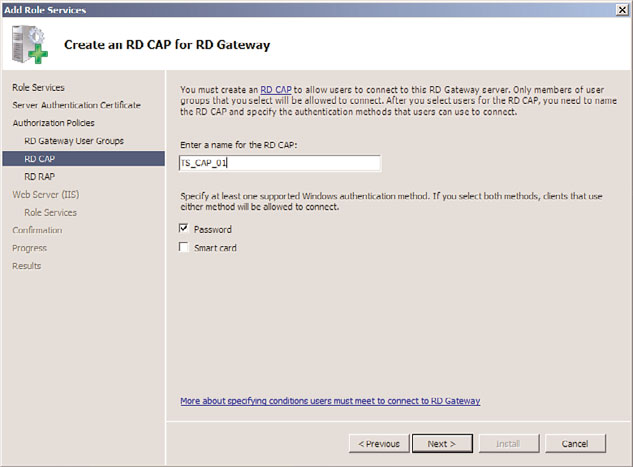
12. On the Create an RD CAP for RD Gateway page shown in Figure 25.17, either accept
ptg
the default RD CAP name or define a new one. Then select the supported Windows
authentication methods, and then click Next.
FIGURE 25.16
Choosing a server authentication certificate for SSL encryption.
974
CHAPTER 25
Remote Desktop Services
FIGURE 25.17
Creating an RD CAP.
ptg
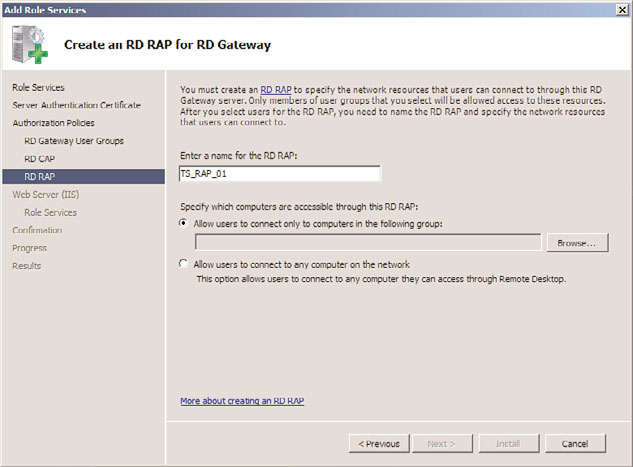
13. On the Create an RD RAP for RD Gateway page shown in Figure 25.18, either accept
the default RD RAP name or define a new one. Then select the Allow Users to
Connect to Any Computer on the Network option. Or, if security needs are greater,
use the Allow Users to Connect Only to Computers in the Following Groups option.
14. Click Next.
15. On the Network Policy and Access Services page, click Next. This page will be
displayed if the NPS role is not installed beforehand.
16. On the Select Role Services page, click Next.
17. On the Web Server (IIS) page, click Next. This page will be displayed if the Web
Server role is not installed beforehand.
18. On the Select Role Services page, click Next.
19. On the Confirm Installation Options page, verify the information presented and
click Install.
20. When the installation is finished, review the Installation Results page, and then
click Close.
To test RD Gateway, use the following steps to configure a Remote Desktop Connection
client:
1. Log on to the desired client.
2. Click Start, click Run, type in mstsc, and click OK.
3. After the Remote Desktop Connection client has loaded, click Options.
Deploying Remote Desktop Services
975
25
FIGURE 25.18
Creating an RD RAP.
ptg
4. Select the Advanced tab, and then click the Settings button.
5. In the Connection Settings dialog box, select the Use These RD Gateway Server
Settings option.
6. Set the server name equal to the FQDN of the RD Gateway server.
7. Unselect the Bypass RD Gateway Server for Local Addresses option.
8. Now, select the General tab, enter in the name of the RD Session Host server, and
click Connect.
9. When prompted, provide the Remote Desktop credentials, and click Submit.
10. When prompted for the RD Gateway credentials, provide the correct credentials, and
click Submit.
11. When connected to the specified RD Session Host server, the connection through
the RD Gateway is complete.
Deploying Virtual Desktops
The steps in this section describe how to deploy virtual desktops.
Installing the RD Virtualization Host Role Service
1. Log on to the desired Hyper-V server that will be hosting the RD Virtualization Host
role service with local administrator privileges.
2. Click Start, and then click Run.
3. In the Run dialog box, type in ServerManager.msc and click OK.
976
CHAPTER 25
Remote Desktop Services
4. In the Roles Summary section, click the Add Roles task.
5. After the Add Roles Wizard loads, click Next.
6. On the Select Server Roles page, select the Remote Desktop Services role, and click
Next, as shown in Figure 25.4.
7. On the Remote Desktop Services page, click Next.
8. Now, on the Select Role Services page, only select the Remote Desktop Virtualization
Host role service. This is the only role service that is being installed at this time.
Click Next.
NOTE
If Hyper-V is not installed, it will be installed automatically by the installation wizard.
9. On the Confirm Installation Selections page, review the selections made, and then
click Install.
10. On the Installation Results page, review the results, and click Close.
Configuring a Personal Virtual Desktop
ptg
Personal virtual desktops are specific virtual machines hosted on an RD Virtualization
Host server that have been assigned to a user account in Active Directory. The following
steps describe how to assign an existing virtual machine to a user. These steps should be
carried out on the server that has the RD Connection Broker role service installed:
