Windows Server 2008 R2 Unleashed (134 page)
Read Windows Server 2008 R2 Unleashed Online
Authors: Noel Morimoto

. Start or stop the services.
. Change the startup type to set the service to start automatically, be started manually,
or even prevent the service from starting at all.
. Change the account the service runs under.
. Set up recovery actions if the service stops, such as restarting the service or even
restarting the server.
Server Manager Storage Page
661
. View the configuration details of the service, such as what the executable is, what
the service name is (which is shown in the Task Manager window), and what depen-
dencies it has.
A feature that was added in Windows Server 2008 and still available in Windows Server
2008 R2 is the Automatic (Delayed Start) startup type. This is a setting used to reduce the
crunch of services starting all at once during bootup of the server. All the services with the
Automatic (Delayed Start) setting will be started after the services with the automatic
setting. This allows all the services to come up automatically, but allows essential services
to start first.
WMI Control
The last snap-in in the Configuration container of the Server Manager is the WMI Control
tool. This is a new tool that enables administrators to maintain the Windows
Management Instrumentation (WMI) configuration on the server. Interestingly, the tool is
not an integrated snap-in, but rather a separate tool.
With the WMI Control tool, an administrator can do the following:
. Back up and restore the WMI repository.
ptg
. Change the default scripting namespace (root\cimv2).
. Manage access to the WMI via the Security tab.
Before the introduction of the WMI Control tool, these tasks were difficult to accomplish.
For example, to back up the WMI repository, perform these steps:
1. Open the Server Manager console.
2. Expand the Configuration folder.
3. Select the WMI Control folder.
4. Select the Action menu and then Properties.
5. Select the Backup/Restore tab.
6. Select the Back Up Now option.
7. Enter a filename with a full path. The file type will be a WMI Recovery File (.rec).
8. Click Save to save the file.
9. Click OK to exit the tool.
20
The Storage folder in the Server Manager has two tools to support storage in Windows
Server 2008 R2. These pages allow the administrator to see the status of storage and the
backups of the storage.

662
CHAPTER 20
Windows Server 2008 R2 Management and Maintenance Practices
Windows Server Backup
The Windows Server Backup page shows a summary of the backup state of the server. This
includes information on the status of backups, how much disk space the backups are
using, and what the oldest and newest backups are. This allows an administrator to under-
stand how recoverable the server is at a glance. The backup subsystem in Windows Server
2008 R2 has fundamentally changed from a backup-to-tape job paradigm to a backup-to-
disk state paradigm, requiring a different understanding of where backup stands. It is not
enough to know that the latest backup job completed, but rather the span of the backups
and how much space they take up.
For the Windows Server Backup folder to be active, you need to install the Windows
Server Backup feature. To do this, perform the following steps:
1. Open the Server Manager console.
2. Select the Features folder.
3. Click on the Add Features link.
4. Select the Windows Server Backup Features check box.
5. Click Next and then click Install to install the new features.
6. Click Close to close the wizard.
ptg
Now the Server Manager Windows Server Backup folder will be active. Selecting the folder
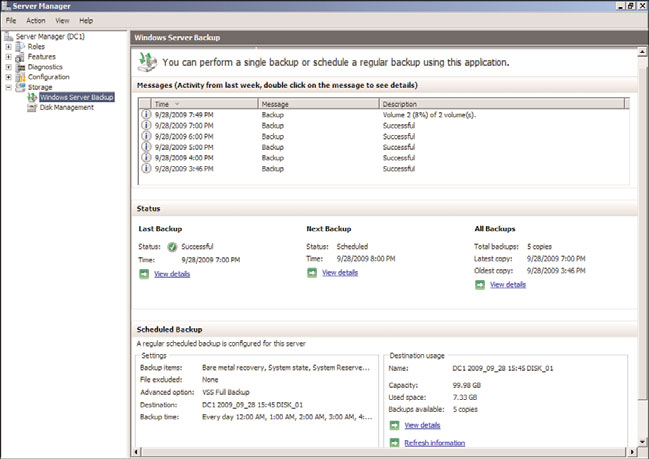
shows the Windows Server Backup summary page, shown in Figure 20.9. This figure shows
the latest active backup messages, status, scheduled backup, and disk usage. From this
page, the administrator can also click on links to set the backup schedules, run an imme-
diate backup, start a recovery, or perform other backup-related tasks.
FIGURE 20.9
Windows Server Backup summary page.

Server Manager Storage Page
663
The Messages section shows the active messages. You can see in the figure that a backup is
running and that Volume 2 is 8% complete. You can also see that backups completed
successfully at 3:46 p.m., 4:00 p.m., 5:00 p.m., 6:00 p.m., and 7:00 p.m., and that the
current one started at 7:49 p.m.
The Status section shows a summary of the backups, including the last backup, the next
scheduled backup, and for all backups. For each of these categories, you can click on the
View Details link to get additional information. This helps the administrator quickly
understand what backups are available for recovery.
The Scheduled Backup section shows a summary of the scheduled backups for the server
and the disk usage of the backups. The Settings box shows what is being backed up
(backup item), where it is being backed up to (the target disk), and when it is being
backed up (the backup time). The backup time can be modified using the Action, Backup
Schedule option.
The Destination Usage box shows the capacity, the used space, and the number of backups
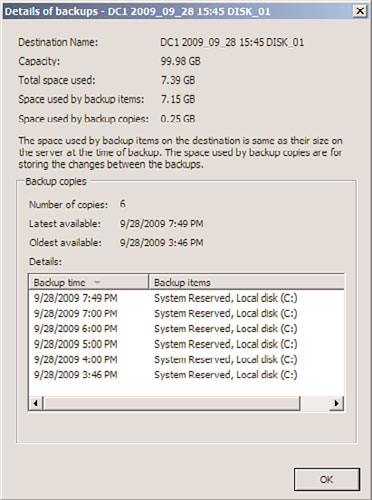
that are available on the target. You can click on the View Details link to see the disk
usage and details of the backups. Figure 20.10 shows the disk usage after the backup in the
previous figure completed.
ptg
20
FIGURE 20.10
Windows Server Backup disk usage.
Chapter 30, “Backing Up the Windows Server 2008 R2 Environment,” covers the use of
Windows Server Backup in more detail.

664
CHAPTER 20
Windows Server 2008 R2 Management and Maintenance Practices
Disk Management
The Disk Management snap-in is used to conduct storage disk-related tasks. The Disk
Management snap-in has not changed substantially from previous versions, and most
administrators will find it to be quite familiar. The snap-in allows administrators to
manage disks by doing the following:
. Creating and formatting partitions
. Creating and formatting volumes
. Extending, shrinking, and mirroring volumes
. Assigning drive letters
. Viewing the status of disks, partitions, and volumes
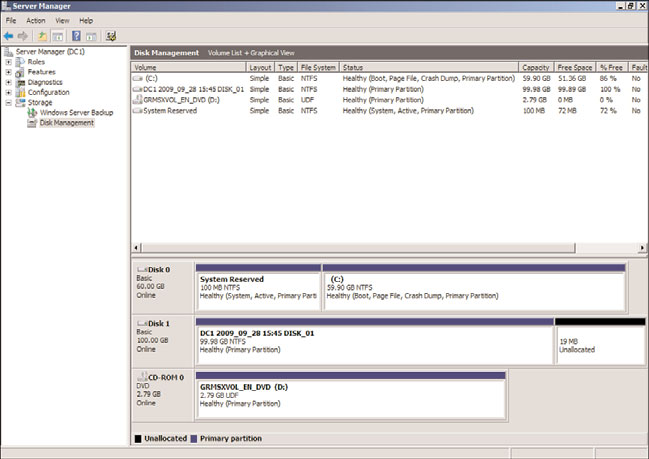
As shown in Figure 20.11, the snap-in shows volumes in the top window with capacity,
free space, and status information. This is a logical representation and is independent of
the physical media. The bottom window shows the physical disks as recognized by
Windows Server 2008 R2 and the position of the partitions and volumes within the
disks—that is, the layout of the partitions and volumes. The bottom window also shows
the status and the type of disks.
ptg
FIGURE 20.11
Disk Management console.
Auditing the Environment
665
NOTE
It should be stated that the physical disks shown in the Disk Management snap-in are
the disk configurations as recognized by Windows Server 2008 R2. The actual hard-
ware configuration of the disks might be very different, as it is abstracted by the hard-
ware controller.
For example, what the operating system recognizes as Disk 0 with 32.00 GB might
actually be a fault-tolerant RAID-1 configuration of two 32-GB physical disks that the
hard drive controller presents as one disk to the operating system.
Auditing is a way to gather and keep track of activity on the network, devices, and entire
systems. By default, Windows Server 2008 R2 enables some auditing, whereas many other
auditing functions must be manually turned on. This allows for easy customization of the
features the system should have monitored.
Auditing is typically used for identifying security breaches or suspicious activity. However,
auditing is also important to gain insight into how the network, network devices, and
ptg
systems are accessed. Windows Server 2008 greatly expanded auditing as compared with
previous versions of Windows. As it pertains to Windows Server 2008 R2, auditing can be
used to monitor successful and unsuccessful events on the system. Windows Server 2008
R2 auditing policies must first be enabled before activity can be monitored.
Audit Policies
Audit policies are the basis for auditing events on a Windows Server 2008 R2 system.
Depending on the policies set, auditing might require a substantial amount of server
resources in addition to those resources supporting the server’s functionality. Otherwise, it
could potentially slow server performance. Also, collecting lots of information is only as
good as the evaluation of the audit logs. In other words, if a lot of information is captured
and a significant amount of effort is required to evaluate those audit logs, the whole
purpose of auditing is not as effective. As a result, it’s important to take the time to prop-
erly plan how the system will be audited. This allows the administrator to determine what
needs to be audited, and why, without creating an abundance of overhead.
20
Audit policies can track successful or unsuccessful event activity in a Windows Server 2008
R2 environment. These policies can audit the success and failure of events. The policies
that can be monitored consist of the following:
.
Audit account logon events—
Each time a user attempts to log on, the successful
or unsuccessful event can be recorded. Failed logon attempts can include logon fail-
ures for unknown user accounts, time restriction violations, expired user accounts,
insufficient rights for the user to log on locally, expired account passwords, and
locked-out accounts.
666
CHAPTER 20
Windows Server 2008 R2 Management and Maintenance Practices
.
Audit account management—
When an account is changed, an event can be
logged and later examined.
.
Audit directory service access—
Any time a user attempts to access an Active
Directory object that has its own system access control list (SACL), the event is
logged.
.
Audit logon events—
Logons over the network or by services are logged.
.
Audit object access—
The object access policy logs an event when a user attempts
to access a resource (for example, a printer or shared folder).
.
Audit policy change—
Each time an attempt to change a policy (user rights,
