Read The Cook's Illustrated Cookbook Online
Authors: The Editors at America's Test Kitchen
Tags: #Cooking
The Cook's Illustrated Cookbook (373 page)

![]() WHY THIS RECIPE WORKS
WHY THIS RECIPE WORKS
Between the heavy cream, raw eggs, and alcohol, it’s easy for traditional eggnog to go wrong. We wanted to create a rich eggnog with a creamy texture and enough alcohol to provide its trademark kick without tasting too boozy. We started by comparing uncooked and cooked recipes. We ended up preferring the custardy flavor and creaminess of the cooked versions, so we started with a standard custard recipe (6 eggs, 4 cups milk, and ¹⁄
2
cup sugar) and tinkered around to find improvements. We added two extra egg yolks for richness, and a little more sugar and a bit of salt improved the flavor. Many recipes call for the milk to be added to the beaten eggs very gradually, and this technique did indeed make for a smoother texture. The custard base we now had was flavorful and thick, but it was not quite eggnog. Once we added softly whipped heavy cream, brandy, bourbon, or dark rum, and the simple flavorings of vanilla extract and nutmeg, we had the perfect indulgent holiday drink.
SERVES 12 TO 16
Adding the milk to the eggs in small increments and blending thoroughly after each addition helps ensure a smooth custard. To prevent curdling, do not heat the custard beyond 160 degrees. If it does begin to curdle, remove it from the heat immediately, pour it into a bowl set over a larger bowl of ice water to stop the cooking, and proceed with the recipe. You can omit the brandy to make a nonalcoholic eggnog, but you should also decrease the cream to ¹⁄
4
cup to keep the right consistency. Increase the cream to ³⁄
4
cup and add another ¹⁄
2
cup brandy for stronger eggnog.
6 | large eggs plus 2 large yolks |
¹⁄ | cup plus 2 tablespoons sugar |
¹⁄ | teaspoon salt |
4 | cups whole milk |
¹⁄ | cup brandy, bourbon, or dark rum |
1 | tablespoon vanilla extract |
¹⁄ | teaspoon ground nutmeg, plus extra for garnish |
¹⁄ | cup heavy cream |
1.
Whisk eggs, egg yolks, sugar, and salt together in heavy 3- or 4-quart saucepan. Stir in milk, ¹⁄
2
cup at a time, blending well after each addition. Heat slowly over lowest possible heat, stirring constantly, until custard registers 160 degrees, thickens, and coats back of spoon, 25 to 30 minutes. Pour custard through fine-mesh strainer into large bowl; stir in brandy, vanilla and nutmeg. Cover with plastic wrap and refrigerate until well chilled, at least 3 hours or up to 3 days.
2.
Just before serving, whip cream in medium bowl to very soft peaks and gently fold into custard mixture until incorporated. Serve in chilled punch bowl or cups, garnishing with nutmeg.
![]() WHY THIS RECIPE WORKS
WHY THIS RECIPE WORKS
Hot cocoa made from the ubiquitous “back-of-the-box” recipe is weak and thin, and the European tradition of melting bittersweet chocolate in milk and heavy cream is too lush and fattening. Our ideal hot cocoa would have serious chocolate flavor and a rich, satisfying consistency without requiring a day of fasting after drinking a cup. Six tablespoons of cocoa powder, lightly sweetened with sugar, added satisfying chocolate flavor without being overpowering. Many recipes recommend mixing cocoa powder and sugar with a little water before adding the milk, and we found this to be worthwhile. Water helps to release the cocoa powder’s fruit, chocolate, and coffee flavor nuances. We also discovered that heating this mixture for two minutes before adding milk further deepened the flavor. We preferred using low-fat milk; the reduced fat content in 1 or 2 percent milk allows for the greatest range of cocoa flavor. A splash of half-and-half added a pleasant richness, rounding out our perfect cup of cocoa.
SERVES 4
If you want to increase or decrease this recipe for hot cocoa, the key ratio to remember is 1¹⁄
2
tablespoons of cocoa and 1 heaping tablespoon of sugar to 1 cup of liquid. If you have whole milk on hand rather than low-fat, go ahead and use it, omitting the half-and-half. Top with whipped cream or marshmallows if desired
6 | tablespoons Dutch-processed cocoa |
¹⁄ | cup sugar |
Pinch salt | |
1 | cup water |
3 | cups 1 or 2 percent low-fat milk |
1 | teaspoon vanilla extract |
¹⁄ | cup half-and-half |
1.
In medium saucepan, whisk cocoa, sugar, salt, and water together over low heat until smooth. Simmer, whisking continuously, for 2 minutes, making sure whisk gets into edges of pan.
2.
Add milk, increase heat to medium-low, and cook, stirring occasionally, until steam rises from surface and tiny bubbles form around edge, 12 to 15 minutes. Do not boil.
3.
Add vanilla and half-and-half. Divide between 4 mugs and serve immediately.
Add seven 2-inch strips orange zest along with milk. Remove zest strips with slotted spoon before serving.
![]() WHY THIS RECIPE WORKS
WHY THIS RECIPE WORKS
Irish coffee should be the perfect dessert drink, combining coffee, whisky, whipped cream, and sometimes liqueur, but too often when you order it you get a shot of whiskey just barely spiked with coffee. We wanted a nicely balanced cup of great coffee with a light kick of whiskey that wouldn’t have us stumbling from the table. After experimenting with different amounts, we found that just a couple tablespoons gave us the right balance, allowing both the flavor of the coffee and the whisky to come through. The next step to making a good drink was to brew a really good cup of coffee. We used filtered water to prevent mineral flavors, heated it to the optimum temperature, and ground the beans fresh for the best flavor. All that was left was to top off our drink with whipped cream.
SERVES 4
For sweet and creamy coffee, add 1 tablespoon of Bailey’s Irish Cream to each mug.
¹⁄ | cup Irish whiskey |
4 | cups fresh brewed coffee, hot |
Sugar (optional) | |
1 | recipe |
Pour 2 tablespoons whiskey into each of 4 large mugs. Fill mugs with coffee. Season with sugar, if desired, and dollop with whipped cream before serving.
SECRETS TO MAKING GREAT COFFEE
You can spend upward of $20 per pound for premium coffee, but unless it’s fresh and you’re using proper brewing techniques, it’s a waste of money. Here’s what you need to know to make the perfect cup.
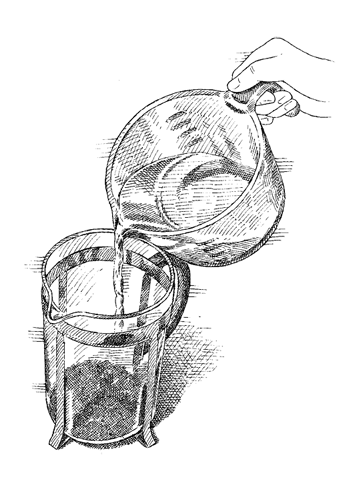
FRENCH PRESS
1.
Preheat pot with hot tap water. Add 2 tablespoons medium-coarse ground coffee for every 6 ounces water. Add just-boiled water steadily, saturating all grounds.
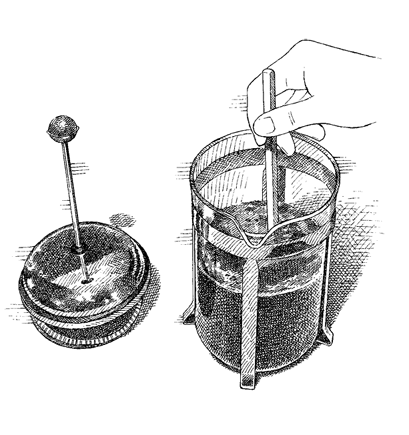
2.
Simply pouring boiled water over coffee grounds isn’t enough for great flavor. To aid flavor extraction, use long spoon or chopstick to gently stir coffee.
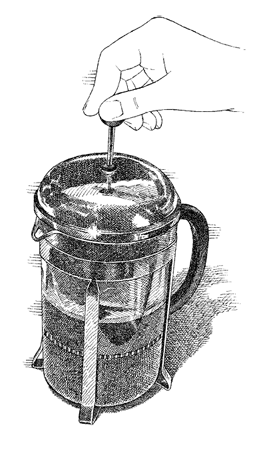
3.
Add lid and steep coffee for about 5 minutes (4 minutes for smaller pots). With even pressure, steadily press down filter.

MANUAL DRIP
1.
Warm thermos with hot tap water. Add 2 tablespoons medium ground (for paper filters) or medium-fine ground (for metal filters) coffee for every 6 ounces water to filter.

2.
Pour ¹⁄
2
cup just-boiled water over grounds, saturating thoroughly; let stand 30 seconds.

3.
Pour remaining hot water over grounds, in batches if necessary, stirring gently after each addition.
BUY FRESHLY ROASTED WHOLE BEANS:
Buying whole beans in small quantities is important because grinding speeds oxidation and the deterioration of flavor. Even grinding the night before can make a big difference; studies show the exposed coffee cells begin to break down within the hour.
STORE AWAY FROM HEAT AND LIGHT:
If you plan to finish a bag of beans in less than 10 or 12 days, you can store them at room temperature in the original bag or a zipper-lock bag away from heat and light. For longer-term storage, store the beans in the freezer to limit contact with air and moisture. (Skip the fridge because the beans will pick up off-flavors.) It’s also a good idea to buy coffee in a heat-sealed, aluminized Mylar bag with a one-way degassing valve (sometimes no more than a bump) that releases carbon dioxide while keeping out oxygen. Unopened, these bags keep beans as fresh as the day they were roasted for up to 90 days.
USE FILTERED WATER:
A cup of coffee is about 98 percent water, so it makes sense to pay attention to the water you’re using. If your tap water tastes bad or has strong mineral flavors, your coffee will, too. But don’t bother buying bottled water—just use a filtration pitcher.
MATCH BREWING TIME TO GRIND:
Brewing time will dictate how you grind the coffee. In general, the longer the brewing time, the coarser the grounds should be. To adjust the strength of your coffee, adjust the amount of grounds; the norm is 2 tablespoons of ground beans for every 6 ounces of water.
PAY ATTENTION TO TEMPERATURE:
The most desirable flavor compounds in coffee are released in water between 195 and 205 degrees. A panel of our tasters judged coffee brewed at 200 degrees as having the fullest, roundest flavor. Once the water has boiled (212 degrees), let it rest for 10 to 15 seconds to bring it down to this temperature.
