Make: Electronics (77 page)
Authors: Charles Platt

Making Plans
I like to use drawing software to create plans, and I try to print them at actual scale. I tape them to the smooth side of a piece of white or natural-color ABS, then use an awl to prick through the plan into the soft surface beneath. I remove the paper and connect the awl marks by drawing onto the plastic using a pencil or a fine-point water-soluble pen. Its lines can be wiped away later with a damp cloth. Don’t use a permanent marker, as the solvents that you will need to clean it may dissolve the plastic.
Because ABS will tend to open a fissure when you bend it at any inside corner where you don’t have a smooth radius, you need to drill holes at these locations, as shown in the cart plans in Figure 5-92 on
page 275
.
A regular half-inch drill bit is too aggressive; it will tend to jam itself into the plastic within one turn of the drill. Use Forstner bits (shown in Figures 5-83 and 5-84) to cut nice smooth circles.
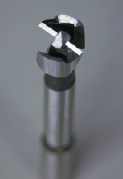
Figure 5-83.
A Forstner drill bit makes clean, precise holes; a large regular drill bit will chew up ABS plastic and make a mess.
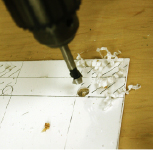
Figure 5-84.
By drilling holes at any location where two bends intersect, you reduce the risk of the plastic fissuring.
Note that the heat from bending will tend to make any marks on the plastic permanent.
Bending It
A big advantage of plastic over wood is that you can make complex shapes by bending them, instead of cutting separate pieces and joining them with nails, screws, or glue. Unfortunately, bending does require an appropriate bender: an electric heating element mounted in a long, thin metal enclosure that you place on your workbench. The bender I use is made by FTM, a company that offers all kinds of neat gadgets for working with plastic. Their cheapest bender, shown in Figure 5-85, is just over $200 with a 2-foot element. You can get a 4-foot model for about $50 more. Check them out at
http://thefabricatorssource.com
.

Figure 5-85.
Making clean, precise bends in ABS is simply a matter of resting the plastic over a bender that consists of an electric heating element.
 Avoid Burns While Bending
A plastic bender will inflict serious burns if you happen to rest your hand on it accidentally, and because it has no warning light, you can easily forget that you have left it plugged in. Use gloves!
To bend plastic, lay it over the hot element of a plastic bender for a brief time (25 to 30 seconds for 1/8-inch ABS, 40 to 45 seconds for 3/16-inch, and up to a minute for 1/4-inch). If you overheat the plastic, you’ll smell it, and when you turn it over you’ll find it looks like brown melted cheese. Naturally you should learn to intervene before the plastic reaches that point.
ABS is ready to bend when it yields to gentle pressure. Take it off the bender and bend it
away
from the side that you heated. If you bend it toward the hot side, the softened plastic will bunch up inside the bend, which doesn’t look nice.
You can work with it for about half a minute, and when you have it the way you want it, spray or sponge water onto it to make it set quickly. Alternatively, if you need more time, you can reheat it. The amount of force necessary to bend the sheet increases in proportion with the length of the bend, so a long bend can be difficult, and I usually insert it into a loose vise, push it a bit, move it along to the next spot, and push it again.
Because plastic bending is very similar to making shapes in origami, it’s a good idea to model your projects in paper before you commit yourself to ABS.
If you decide that you don’t want to spend money on a bender, don’t abandon plastic just yet—you can use screws to assemble separate sections with greater ease and convenience than if you were working with wood.
Making 90-Degree Joints
Driving screws into the edge of a piece of plywood will almost always separate its layers, but ABS has no layers (or grain, either), and never splits or shatters. This means that you can easily join two pieces at 90° using small screws (#4 size, 5/8-inch long).
Figures 5-86 through 5-90 show the procedure for joining 1/8-inch (or thicker) ABS to 1/4-inch ABS, which I regard as the minimum thickness when you’re inserting screws into its edge:
1.
Mark a guideline on the thinner piece of plastic, 1/8 inch from its edge. For #4 screws, drill holes using a 7/64-inch bit. If you’re using flat-headed screws, countersink the holes very gently.
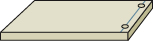
Figure 5-86
.
2.
Hold or clamp the pieces in place and poke a pen or pencil through the holes to mark the edge of the 1/4-inch plastic beneath.
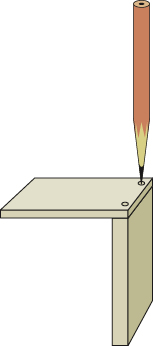
Figure 5-87
.
3.
Remove the thin plastic, clamp the 1/4-inch plastic in a vise, and drill guide holes for the screws at each mark, centered within the thickness of the plastic. Because ABS does not compress like wood, the holes must be larger than you may expect; otherwise, the plastic will swell around the screw. A 3/32-inch bit is just right for a #4 screw.
4.
Assemble the parts. Be careful not to overtighten the screws; it’s easy to strip the threads that they cut in the soft plastic.

Figure 5-88
.

Figure 5-89.
Figures 5-86 through 5-89 illustrate four steps to join two pieces of ABS using #4 sheet-metal screws. Cut 7/64-inch holes on a line 1/8 inch from the edge of the first piece, then mark through the holes to the edge of the second piece. Drill 3/32-inch holes that are precisely centered in the edge, then screw the pieces together.
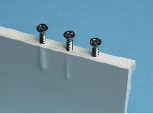
Figure 5-90.
Three #4 screws driven into the edge of ABS, using a 1/16-inch guide hole, a 5/64-inch guide hole, and a 3/32-inch guide hole. respectively Because the first two guides holes were too small, the plastic swelled around the screw (but did not break).