Help Me! Guide to iPhone 6: Step-by-Step User Guide for the iPhone 6 and iPhone 6 Plus (2 page)
Read Help Me! Guide to iPhone 6: Step-by-Step User Guide for the iPhone 6 and iPhone 6 Plus Online
Authors: Charles Hughes
Tags: #Encyclopedias

You must set up the phone when you turn it on for the first time, unless an Apple associate or another specialist has already done so for you. To set up the phone:
1. Turn on the phone by pressing and holding the
Power
button until the icon appears. The phone starts up and the Welcome screen appears, as shown in
Figure 7
.
2. Touch the screen anywhere and move your finger to the right to begin setting up your phone. The Language screen appears, as shown in
Figure 8
.
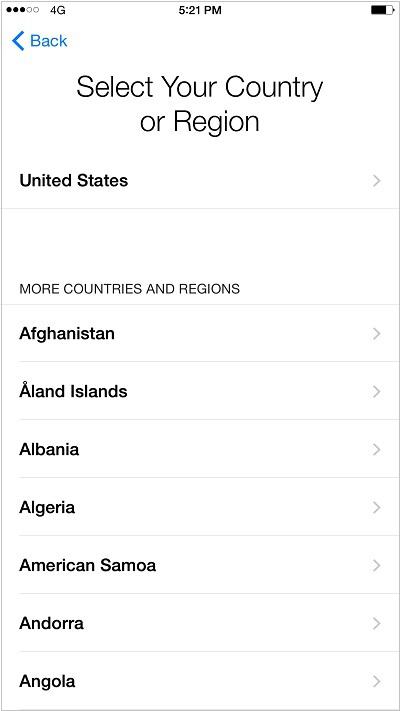
3. Touch a language in the list. The language is selected, and the Country screen appears, as shown in
Figure 9
.
4. Touch the country where you reside. The country is selected, and the Wi-Fi Networks screen appears.
5. Touch a Wi-Fi network. The Password prompt appears.
6. Enter the network password, which is usually found on your wireless router. Touch
Join
in the upper right-hand corner of the screen. The phone connects to the selected Wi-Fi network and the Location Services screen appears, as shown in
Figure 10
. If you did not activate your iPhone in the store, you may need to confirm your phone number before the Location Services screen appears. Enter your billing zip code and the last four digits of your social security number to confirm.
7. Touch
Enable Location Services
if you want to turn the feature on. Touch
Disable Location Services
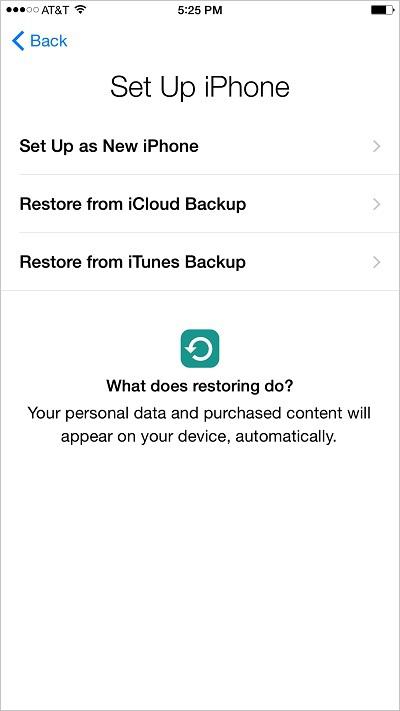
to leave the feature turned off. Some applications will not work with Location Services turned off. The Set Up iPhone screen appears, as shown in
Figure 11
.
8. Touch
Restore from iCloud Backup
or
Restore from iTunes Backup
if you have a data backup. You will need to connect the phone to your computer and run iTunes if you touch 'Restore from iTunes Backup'. Touch
Set Up as New iPhone
if you do not have an iCloud or iTunes backup. The Apple ID screen appears.
9. Touch
Sign In with your Apple ID
if you have an Apple ID or touch
Create a Free Apple ID
. The Terms and Conditions screen appears once you are signed in.
10. Touch
Agree
in the bottom right-hand corner of the screen. A confirmation dialog appears.
11. Touch
Agree
again. The iCloud screen appears.
12. Touch
Use iCloud
to use the feature or touch
Don't Use iCloud
to disable it. The Find My iPhone feature is turned on automatically when you use iCloud. The iMessage and FaceTime screen appears.
13. Touch a phone number or email address if you would like to enable it for iMessage or FaceTime. A blue check mark appears next to each selected address or number.
14. Touch
Next
in the upper right-hand corner of the screen when you are finished. The iCloud drive screen appears. iCloud Drive syncs all of your documents and images in iCloud, and updates them on all of your phone as you work.
15. Touch
Upgrade to iCloud Drive
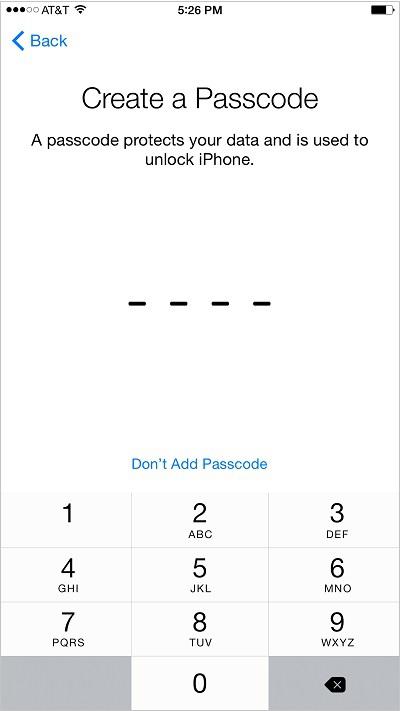
. iCloud Drive is turned on, and the Passcode Creation screen appears, as shown in
Figure 12
.
16. Enter a passcode to set up a security lock for your phone, or touch
Don't Add Passcode
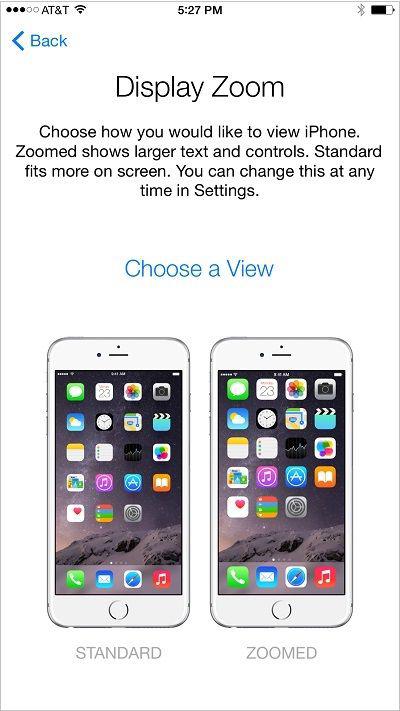
to do it later. The Display Zoom screen appears, as shown in
Figure 13
.
17. Touch the iPhone on the left to view the most amount of information on your screen. However, the fonts will be slightly harder to read. Touch the iPhone on the right to use your iPhone in zoomed view. Fonts will be easier to read, but the screen will not fit as much information. The Diagnostics screen appears.
18. Touch
Automatically Send
to have the phone send usage data to Apple or touch
Don't Send
to disable this feature. Usage Data contains anonymous statistics about the ways in which you use your phone.
19. Touch
Get Started
. The phone setup is complete.
 Figure 7: Welcome Screen
 Figure 8: Language Screen
 Figure 9: Country Screen
 Figure 10: Location Services Screen
 Figure 11: Wi-Fi Networks Screen
 Figure 12: Passcode Creation Screen
 Figure 13: Display Zoom Screen
There are many ways to navigate the phone. Use the following tips to quickly navigate the screens of the phone:
- Use the
Home
button to return to the Home screen at any time. Any application or tool that you were using will be in the same state when you return to it.
- At the Home screen, slide your finger to the left to access additional pages. If nothing happens, the other pages are blank.
- Touch the center of the Home screen and slide your finger down to access the phone's search feature. You may search any data stored on your phone, including application data, as well as the web, iTunes, Application Store, movie show times, locations nearby, and much more.
You may wish to re-order the location of the application icons on the screens. To organize application icons:
1. Touch an icon and hold it until all of the icons begin to shake. The icons can now be moved around the screen.
2. Move the icon to the desired location and let go of the screen. The icon is relocated and the surrounding icons are re-ordered accordingly. If an icon that used to be on the screen is gone, then it has been moved to a different Home screen in the process.
3. To move an icon to another screen, move the icon to the edge of the current one and hold it there. The adjacent screen appears. Drop the icon in the desired location.
4. Press the
Home
button. The icons stop shaking.
When there are many icons on the Home screens, you may wish to organize the icons into folders. Each folder can have a meaningful name to enable you to find the icons easily. To create a folder:
1. Touch an icon and hold it until all of the icons begin to shake. The icons can now be moved.
2. Move one icon on top of another and let go of the screen. A folder with the selected icons is created, as shown in
Figure 14
. Touch the button to enter a name for the folder.
3. Enter a name for the folder, and touch
Done
. The new name is saved.
4. To exit the folder, touch anywhere outside of it. The folder closes.
5. Press the
Home
button. The icons stop shaking.
