Foundation Game Design with ActionScript 3.0, Second Edition (77 page)
Read Foundation Game Design with ActionScript 3.0, Second Edition Online
Authors: Rex van der Spuy

timer.reset();
timer.start();
resetstops the timer and also resets currentCount to zero. To start the timer again, you need to use thestartmethod once more. (If you need to stop the timer completely in any of your games, you can use thestopmethod, which stops the timer without resetting currentCount.)
When you create aTimerobject, you can add a second argument, which is known as repeatCount. This is a number that tells the timer how many times it should repeat. You can see the effect of using repeatCount by updating the directive that creates thetimerobject so that it looks like this:
timer = new Timer(l000, 5);
If you recompile the program, you'll see that the numbers count up to five. After that, the handler is no longer called.
There are a few moreTimerclass properties that you should know about. If you need to change the interval between events, you can use the delay property. For example, if you want the timer event to be triggered every one-half second, you can set the delay to 500 milliseconds, like this:
timer.delay = 500;
If you need to know whether a timer is currently running, you can use the running property, which returnstruewhen the timer is running and isfalsewhen it isn't.
Finally, you can use theTimerEventclass'sTIMER_COMPLETEproperty to trigger an event when the timer finishes.
timer.addEventListener
  (TimerEvent.TIMER_COMPLETE, timerCompleteHandler);
This is a very basic introduction to how timers work. You can use aTimerobject to create a countdown timer, make an object move intermittently, or calculate a player's score based on how long it takes to complete a task.
Another feature of this example program, and of Time Bomb Panic, is that the text fields set their height and width automatically. This is done with theTextFieldAutoSizeclass, like this:
output.autoSize = TextFieldAutoSize.CENTER;
The timer in Time Bomb Panic is created and used in exactly the same way as the example program. Every second it fires theupdateTimeHandler, which looks like this:
public function updateTimeHandler(event:TimerEvent):void
{
  output.text = String(timer.currentCount);
  //Stop the timer when it reaches 10
  if(timer.currentCount == 10)
  {
    checkGameOver();
  }
}
It just does two things. First, it updates the output text field with the time.
output.text = String(timer.currentCount);
This is what displays the current time on the stage, as shown in
Figure 7-79
.
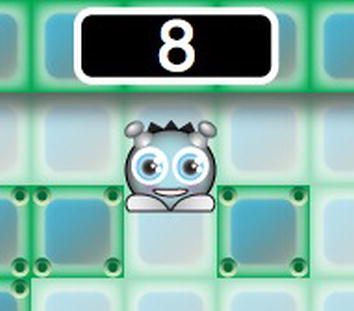
Figure 7-79
. The output text field displays the timer's currentCount property.
The second thing thatupdateTimerEventdoes is check for the end of the game.
if(timer.currentCount == 10)
{
  checkGameOver();
}
It only checks for the end of the game if the timer reaches 10. So what does that mysteriouscheckGameOvermethod actually do?
There are two ways the game can end: if the player defuses five bombs or if the timer reaches 10. Each time the player collides with a bomb, thecheckGameOvermethod is called. And, as you've just seen, it's also called when the value oftimer.currentCountequals 10. Here's thecheckGameOvermethod:
public function checkGameOver():void
{
  if(bombsDefused == 5)
  {
    gameOver.visible = true;
    gameResult.text = "You Won!";
    character.alpha = 0.5;
    background.alpha = 0.5;
    timer.removeEventListener(TimerEvent.TIMER, updateTimeHandler);
    stage.removeEventListener(Event.ENTER_FRAME, enterFrameHandler);
  }
  else if(timer.currentCount == 10)
  {
    gameOver.visible = true;
    gameResult.text = "You Lost!";
    character.alpha = 0.5;

background.alpha = 0.5;
    timer.removeEventListener(TimerEvent.TIMER, updateTimeHandler);
    stage.removeEventListener(Event.ENTER_FRAME, enterFrameHandler);
  }
}
You can see that it very simply checks for these two conditions. If the player defused five bombs, the game is won. If, on the other hand, the timer reaches 10, the game is lost.
If the player wins the game, these directives are displayed:
gameOver.visible = true;
gameResult.text = "You Won!";
character.alpha = 0.5;
background.alpha = 0.5;
timer.removeEventListener(TimerEvent.TIMER, updateTimeHandler);
stage.removeEventListener(Event.ENTER_FRAME, enterFrameHandler);
You can see the result of this in
Figure 7-80
.

Figure 7-80
. The gameOver object is displayed when the player wins the game.
The first thing that happens is that thegameOverobject is displayed.
gameOver.visible = true;
When the game was initialized in the constructor method, thegameOverobject's visible property was set tofalse. When the game ends, it's set totrue, and that's what makes it visible on the stage.
The code then displays “You Won!” in the gameResult text field.
gameResult.text = "You Won!";
The gameResult text field is actually a child of thegameOverobject. When it was created in the constructor method, it wasn't made a child of the stage. Instead, it was added directly togameOver, like this:
gameOver.addChild(gameResult);
gameResult.x = 145;
gameResult.y = 160;
This means it's part of thegameOverobject. The x and y position that it's been given are the local coordinates
inside
thegameOverobject. This is the same technique you used in
Chapter 6
to make subobjects inside a single Sprite. It's useful to do here because it means that the gameResult text field's visibility and its position will be determined by its parent, thegameOverobject. They're a single unit.
The directives in thecheckGameOvermethod also dim the background and character when the game is over with these two lines:
character.alpha = 0.5;
background.alpha = 0.5;
This is a visual cue to the player that the game is no longer active.
Finally, the code disables theenterFrameHandlerand removes theupdateTimerHandlerfrom the timer.
timer.removeEventListener(TimerEvent.TIMER, updateTimeHandler);
stage.removeEventListener(Event.ENTER_FRAME, enterFrameHandler);
Removing theenterFrameHandleressentially freezes the game, because the game character stops moving and the collision code stops running. Removing theupdateTimerEventfrom the timer also stops the timer from counting.
The only difference between the code that displays the winning or losing result is that when the player loses, “You Lost!” is displayed in thegameResulttext field, as shown in
Figure 7-81
.
gameResult.text = "You Lost!";

Figure 7-81
. “You Lost!” is displayed in the gameResult text field if the player looses.
And that's really all there is to it. Game over!
With your first real game in the bag, there's lots of fine-tuning you could do to make it better. You could add a Play Again button. You could make the game easier or harder by adjusting the timer. As a bigger challenge, you could even design and program new levels for the game that increase the difficulty. (You'll look at how to make games with more than one level in the next chapter.)
One obvious modification is that you could make a much bigger, scrolling game environment. In fact, you'll almost certainly want to; the ability to make a potentially huge game world is just too compelling. You learned how to make a scrolling game world in
Chapter 5
. But in that example, only the background scrolled. Things get a little more involved when you have other objects in your world, like boxes and bombs. That's because every time the background scrolls, the foreground game objects have to adjust their positions to compensate for this. This isn't difficult to do; you just have to get the object position numbers right. I'll show you how to do that next.
In the chapter's source files you'll find the TimeBombScroll project folder. Open and compile the application class (TimeBombScroll.as). You see that the game now occupies a playing field four times bigger than the original. Only a quarter of the playing field is visible at any one time. As the character moves around the game world, it scrolls to keep up with it.
Figure 7-82
shows what this looks like.
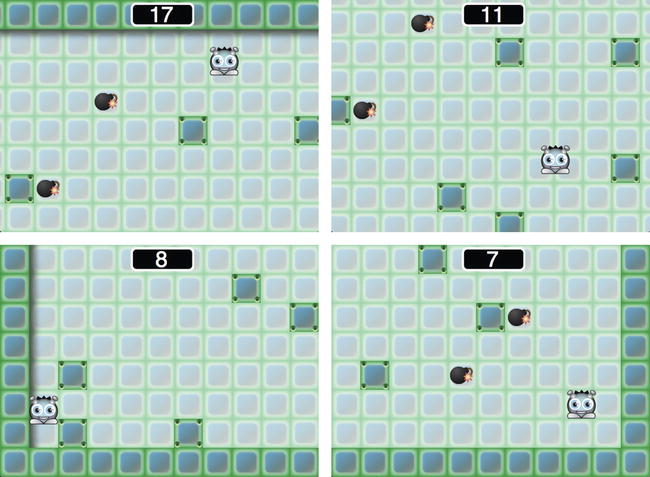
Figure 7-82
. A large scrolling game world
Let's see how this is done.
The first thing you need to do is make a big background image. The background image in this example is four times the size of the original: 1100 pixels by 800 pixels. I named it bigBackground.png, and you can see it in
Figure 7-83
.