Foundation Game Design with ActionScript 3.0, Second Edition (37 page)
Read Foundation Game Design with ActionScript 3.0, Second Edition Online
Authors: Rex van der Spuy

character.visible = false;
Like the other properties you've seen, thevisibleproperty is simply attached to the object using dot notation. Unlike them, however, this is the first property you've seen that uses thefalseBoolean value. This directive just means, “No, the character is not visible.”
After you clicked the vanish button, the little cat was not only gone, but gone for good. No amount of clicking the button could bring it back. The cat is still actually on the stage as an object you can program; you just can't see it. How can you make the cat visible again?
There are two ways. One way is to create another button and program it with exactly the same code as the visibility button, except that you give thevisibleproperty a value oftrue, like this:
character.visible = true;
The second way is a bit more fun: use a single button to make the cat both disappear and reappear.
If the two states that you're toggling between can be defined withtrueandfalsevalues, AS3.0 has a very easy way to make a toggle button using the
not operator
. The not operator is simply an exclamation mark, like this:
!
It literally means “not.” When used with Boolean values, it means “the opposite value of.” You can put the not operator in front of any Boolean value to read it as its opposite value. Let's use the not operator in thevanishButtonHandlerto turn the vanish button into a toggle button:
- Modify the directive in the
vanishButtonHandlerso that it looks like the following:public function vanishButtonHandler(event:MouseEvent):void
{
character.visible = !character.visible;
} - Compile the program and click the vanish button a few times. You should see the cat appear and disappear each time you click it.
This is the new value you gave thevisibleproperty:
!character.visible;
It literally means “the opposite of the character's current visibility state.” If the cat's current visibility state istrue, the opposite state will befalse. And if it'sfalse, the state will be read astrue.
When the program first runs, the character is (obviously) visible. Itsvisibleproperty istrue. When the vanish button is clicked, the program therefore reads!character.visibleasfalse. The character disappears! The second time the button is clicked, the character'svisibleproperty is nowfalse, so the program reads!character.visibleastrue. The character reappears!
The beauty of using the not operator in this way is that you never need to know whether thevisibleproperty istrueorfalse. The program keeps track of this for you. And you need only one button to toggle between these two states.
You can use this feature of the not operator to toggle between two states with any variables or properties that accept Boolean values (trueorfalse). Boolean values are extremely useful in game design for keeping track of things such as whether enemies are dead or alive, whether items have been picked up or not, and whether doors are locked or unlocked. Wherever you use Boolean values, you'll probably find a clever use for the not operator, like you've used it here.
The next thing we'll do is program the spin button to make the character rotate around its registration point. This will show you how to use therotationproperty.
- Add the following new code in bold text to the code you've already written:
package
{
  import flash.net.URLRequest;
  import flash.display.Loader;
  import flash.display.Sprite;
  import flash.events.MouseEvent;
  [SWF(width="550", height="400",
    backgroundColor="#FFFFFF", frameRate="60")]
  public class GameWorld extends Sprite
  {
    //All the variable declarations...
    public function GameWorld()
    {
      //All the code that creates, displays
      //and positions the objects...
      //Add the button listeners
      upButton.addEventListener(MouseEvent.CLICK, upButtonHandler);
      downButton.addEventListener
        (MouseEvent.CLICK, downButtonHandler);
      growButton.addEventListener
        (MouseEvent.CLICK, growButtonHandler);
      shrinkButton.addEventListener
        (MouseEvent.CLICK, shrinkButtonHandler);
      vanishButton.addEventListener
        (MouseEvent.CLICK, vanishButtonHandler);
      spinButton.addEventListener
        (MouseEvent.CLICK, spinButtonHandler);
    }
    public function upButtonHandler(event:MouseEvent):void
    {
      if(character.y> 0)
      {
        character.y -= 15;
      }
    }
    public function downButtonHandler(event:MouseEvent):void
    {
      if(character.y< 300)
      {
        character.y += 15;
      }
    }
    public function growButtonHandler(event:MouseEvent):void
    {
      character.height += 15;
      character.width += 15;
    }
    public function shrinkButtonHandler(event:MouseEvent):void
{
character.height -= 15;
character.width -= 15;
}
public function vanishButtonHandler(event:MouseEvent):void
{
character.visible = false;
}
public function spinButtonHandler(event:MouseEvent):void
{
character.rotation += 20;
}
}
} - Click the spin button. The character now spins around the axis of its top left corner, as shown in
Figure 3-45
.
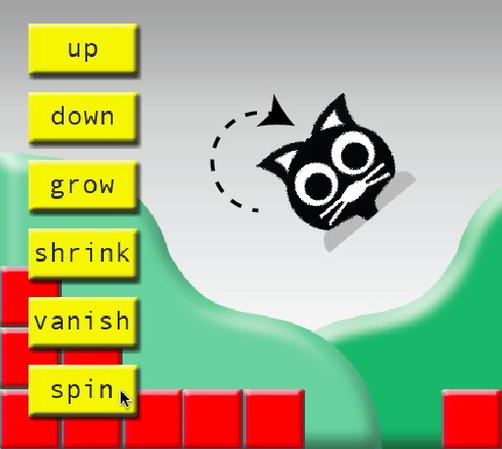
Figure 3-45.
Click to spin the character.
Therotationproperty works much like the other properties that you've looked at so far:
character.rotation += 20;
Therotationproperty accepts values in degrees of a circle, so you have 360 values that you can work with. Positive values rotate the object clockwise, and negative values rotate it counterclockwise. The center of the rotation is the object's own center registration point. In this case, it's my cat's left ear. In the next section I'll show you how you can create Sprite objects with a registration point at their very center.
There are two other important properties from the table at the beginning of this chapter that you haven't yet used in this little interactive toy:
alpha: controls the transparency of an object and accepts values from 0 (completely transparent) to 1 (completely opaque, or solid)x: controls the horizontal position of an object, and like its partner-in- crime, theyproperty, accepts values in pixels
The functionality of these properties is very similar to the properties you already used. So, here's a little assignment for you. How about building a pair of buttons that move the cat left and right, and another pair that gradually makes the cat disappear and reappear? I'm sure you can figure it out! Also experiment with the 3D properties: z, rotationX, rotationY, rotationZ, and scaleZ.
Have fun, and I'll meet you at the next section when you're done.
As you've just seen, the spin button works fine, but wouldn't it be nice if you could spin your character around its center point? The grow and shrink buttons also work, but your character grows and shrinks starting from its top left corner. For most games you'd want these effects to happen from the object's actual center point.
As we discussed earlier in the chapter, this has to do with the character's registration point being its top left corner. When you load a PNG image file into aSprite, AS3.0 automatically aligns it in this way.
But why? Let's take a few steps back and remind ourselves about what happens when you load an image into a program and display it on the stage.
You'll recall that the image is loaded intoLoaderobject. TheLoaderis then added to aSpriteobject. Finally, theSpriteis added to the stage.
Figure 3-46
illustrates this.
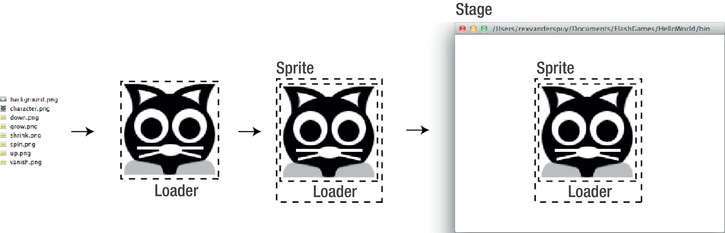
Figure 3-46.
Images are contained by three objects: The Loader, the Sprite, and the Stage.
So although you can only see the image of your character on the stage, it's actually surrounded by an invisible Sprite that contains an invisible Loader. It's our set of wooden Russian dolls again! Keep this in mind.
You know that the stage is a grid, and that you can position the Sprite object anywhere on that grid usingxandyproperties. But what you don't know is that the Sprite that contains the image is
also
a grid. When you add an image to a Sprite, the image loader's left corner is positioned at anxandyposition of 0,0
inside the Sprite's own grid
. 0,0 is the Sprite's registration point.
Figure 3-47
shows what this looks like.
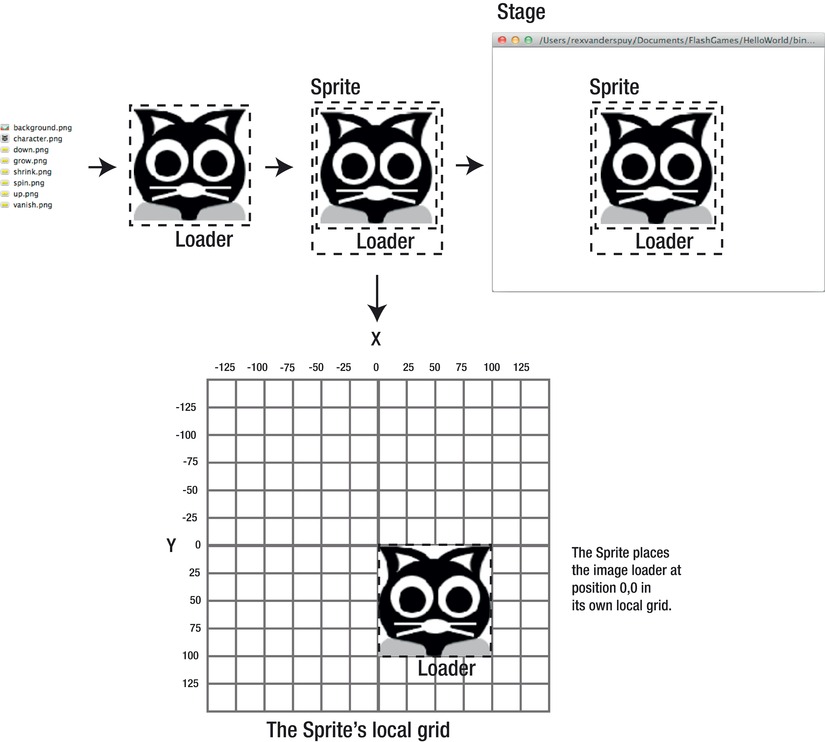
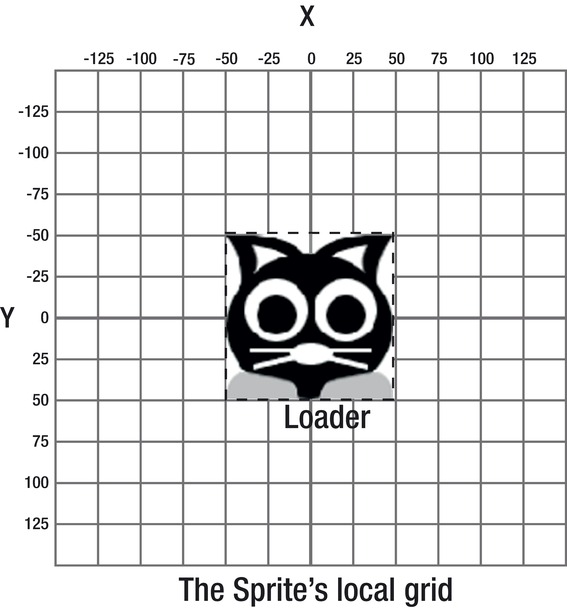
Figure 3-47.
Sprites place the image loaders at position 0,0 in their own local grid.
This highlights a very important concept. An image actually has two coordinates: its
stage coordinates
and its
local coordinates
inside the Sprite that contains it. Keep this in mind, because you'll often need to be aware of both these coordinates to fine tune the positioning of objects in your game.
Position 0,0 in the Sprite's local grid is its registration point. You can see this clearly in
Figure 3-47
. The cat's left ear is at the 0,0 point. If we want the registration point to be at the center of the cat image, we have to move the image loader inside the Sprite's grid so that it's centered over position 0,0.
Figure 3-48
illustrates what we have to achieve.