Foundation Game Design with ActionScript 3.0, Second Edition (93 page)
Read Foundation Game Design with ActionScript 3.0, Second Edition Online
Authors: Rex van der Spuy

If you test it, you'll see this output:
Mosquito found at position 1
Because you included abreakdirective, the loop stops at that point. It never checks element [2], which is a good thing. The loop has found what it's looking for so it doesn't need to check any further. Using for loops to search arrays is a basic programming technique that you'll be using frequently from now on.
You can store anything you like inside arrays, including other arrays. You know that a single, empty array looks like this:
[ ]
It's just a pair of square brackets. Let's say you want to put three new arrays inside that first empty array. You can do it like this:
[[ ],[ ],[ ]]
The first array now contains three new empty arrays. But it's confusing to look at it like this, so here's an easier way to visualize this:
[
  [ ],
  [ ],
  [ ]
]
It's now very clear to see that the surrounding array contains three new arrays inside it. This is called a
two-dimensional
array, or 2D array. They're arrays inside of arrays.
Let's imagine that your hobby as a bug collector has now expanded to include not only flying insects but also birds and slow crawling things. You'll need a bigger collection jar! You don't want your slugs and worms to get mixed up with your birds because they might get eaten. So you need a new jar that has internal compartments that separate the different types of creatures you're collecting. You could put the flying insects in one section, the birds in another, and the slow crawling things in the third. A 2D array is perfect for this, and here's what it would look like:
_collectionJar
  = [
      ["mosquito", "bee", "fly"],
      ["lark", "magpie", "albatross"],
      ["snail", "slug", "worm"]
    ];
You now have one array that contains three internal arrays—one for each type of creature. (Note that there's no comma after the last array. Also note that there's a semicolon after the last square bracket.)
Each of the internal arrays is no more than simple elements of the containing array. This means if you want to access the array that contains the slow crawling things, you can do it like this:
_collectionJar[2]
This would give yousnail,slug, andworm.
If you wanted to find out what the second element of that array was, you could do it like this:
_collectionJar[2][1]
This would give youslug.
Here's another example. If you want to find the third element of the second array, you could find it like this:
_collectionJar[1][2]
This would give youmagpie.
In the chapter's source file you'll find a project folder called ArraysInsideArrays with a working example of this new collection jar. Here's the application class:
package
{
  import flash.display.Sprite;
  public class ArraysInsideArrays extends Sprite
  {

//Declare the array
    private var _collectionJar:Array;
    public function ArraysInsideArrays()
    {

//Initialize the 2 dimensional array
      _collectionJar
        = [
            ["mosquito", "bee", "fly"],
            ["lark", "magpie", "albatross"],
            ["snail", "slug", "worm"]
          ];
//View the entire first array

//mosquito, bee, fly
      trace("Array 0: " + _collectionJar[0]);

//View the entire second array

//lark, magpie, albatross
      trace("Array 1: " + _collectionJar[1]);

//View the first element in the second array

//lark
      trace("First element of the second array: "
        + _collectionJar[1][0]);

//View the third element in the third array

//worm
      trace("Third element of the third array: "
        + _collectionJar[2][2]);

//View the second element in the first array

//bee
      trace("Second element of the first array: "
        + _collectionJar[0][1]);

//View the contents of the entire 2 dimensional array

//mosquito, bee, fly, lark, magpie,

//albatross, snail, slug, worm
      trace("Entire collection jar: " + _collectionJar);
    }
  }
}
Here's the trace output from this code:
Array 0: mosquito,bee,fly
Array 1: lark,magpie,albatross
First element of the second array: lark
Third element of the third array: worm
Second element of the first array: bee
Entire collection jar:
mosquito,bee,fly,lark,magpie,albatross,snail,slug,worm
Figure 9-12
illustrates how this two-dimensional array works.

Figure 9-12.
Understanding two-dimensional arrays
2D arrays are a very efficient way of organizing complex information, and you can see that it's very easy to find what you're looking for if you understand the system. In the next section you'll see how to use a 2D array to store the x and y positions of boxes so that you can easily add them to their correct positions on the stage.
You'll need a bit of practice with arrays before you start to feel comfortable using them in your own code. Spend a bit of time with these example files, make some changes, and observe the way your changes affect the output. These examples are the key to understanding the rest of the chapter, so make sure you understand them before continuing further.
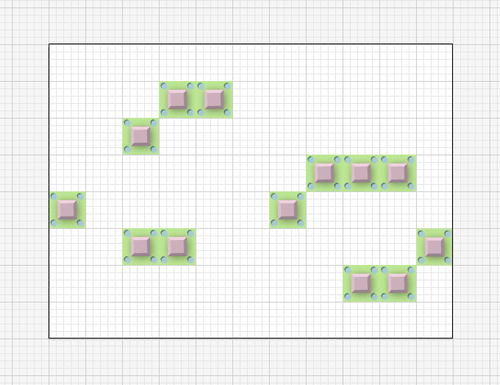
I've decided that I want my platform game to contain 13 boxes, positioned on the stage as shown in
Figure 9-13
.

Figure 9-13.
Adding lots of boxes to the stage
The first thing I did was plan this in Illustrator, which is a good way of sketching out level ideas. I made the grid visible (View Show Grid) and choose the Snap to Grid option, which makes it easier to position objects precisely on the grid (View Snap to Grid). (My boxes are 50 pixels wide and high, so I made sure that the gridlines were set to display every 50 pixels in Preferences Guides & Grid).
Figure 9-14
shows my level plan in Illustrator. You don't have to use Illustrator, of course; a pencil and graph paper works just as well. (Yes, a pencil and paper. Try it!)

Figure 9-14.
Using Illustrator to plan the positions of the game boxes
I then noted the x and y positions of each of the boxes, like this:
box1: x = 0, y  = 200
box2: x = 100, y = 100
box3: x =100, y = 250
...
I did this for all 13 boxes. I then had all the information I needed to use loops and arrays to create and add these boxes to the stage.
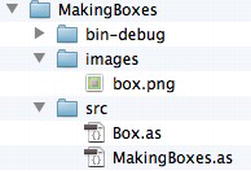
You'll find a project folder called MakingBoxes in the chapter's source files. The images folder contains a 50 by 50 PNG graphic of a box. The src folder contains the sameBoxclass you used in Time Bomb Panic from
Chapter 7
. You need both these elements in the project folder for the code to work.
Figure 9-15
shows what the MakingBoxes project folder looks like.

Figure 9-15.
The project folder contains a PNG image of the box and a Box class which embeds the image.
Here's the entireMakingBoxesapplication class and the result is what you can see in
Figure 9-13
.
package
{
  import flash.display.Sprite;
  [SWF(width="550", height="400",
  backgroundColor="#FFFFFF", frameRate="60")]
  public class MakingBoxes extends Sprite
  {

//An array to store the boxes
    private var _boxes:Array = new Array();

//A 2D array to store the box x and y positions
    private var _boxPositions:Array = new Array();
    public function MakingBoxes()
    {

//Set the box x and y positions
      _boxPositions
        = [
            [0, 200],
            [100, 100],
            [100, 250],
            [150, 50],
            [150, 250],
            [200, 50],
            [300, 200],
            [350, 150],
            [400, 150],
            [400, 300],
            [450, 150],
            [450, 300],
            [500, 250]
          ];

//Make the boxes
      for(var i:int = 0; i < _boxPositions.length; i++)
      {

//Create a box object
        var box:Box = new Box();

//Add the box to the stage
        addChild(box);
        box.x = _boxPositions[i][0];
        box.y = _boxPositions[i][1];

//Add it to the boxes array for future use
        _boxes.push(box);
      }
    }
  }
}
You need two arrays to make this code work.
private var _boxes:Array = new Array();
private var _boxPositions:Array = new Array();
The_boxesarray is a storage container for all thirteen boxes. The_boxPositionsarray will be a 2D array that stores the x and y positions of each box.
_boxPositions
  = [
      [0, 200],
      [100, 100],
      [100, 250],
      [150, 50],
      [150, 250],
      [200, 50],
      [300, 200],
      [350, 150],
      [400, 150],
      [400, 300],
      [450, 150],
      [450, 300],
      [500, 250]
    ];
_boxPositionscontains 13 arrays. Each array contains two elements: the first element is the box's x position and the second element is the box's y position.
[xPosition, yPosition]
These are the same numbers I scribbled down with my pencil when I was planning the level. There are 13 boxes, so there's one pair of x and y coordinates for each box.
Theforloop does the work of creating a box object, pushing it into the_boxesarray, adding it to the stage, and positioning it with the help of the_boxPositions2D array.
