Building Web Sites All-in-One For Dummies® (76 page)
Read Building Web Sites All-in-One For Dummies® Online
Authors: Claudia Snell

Figure 3-11:
Set parameters for an embedded Windows Media Video.

Figure 3-12:
A Windows Media Video embedded in a Web page.

_fmt.jpeg) If you attempt to test an embedded Windows Media Player and associated video file in the Mozilla Firefox browser on your local machine, it won't play. It will, however, play when you upload the HTML page and associated files to your server.
If you attempt to test an embedded Windows Media Player and associated video file in the Mozilla Firefox browser on your local machine, it won't play. It will, however, play when you upload the HTML page and associated files to your server.
Avoiding Digital Video Pitfalls
Nobody likes to wind up with egg on his face. For most, the additional cholesterol is unwelcome â not to mention the mess. But we digress. Egg on your face where Web video is concerned is a file that doesn't play, or doesn't play properly. Here are some handy tips and tricks to help you keep your client's Web video squeaky clean:
â¢
Don't copy video from other Web sites and use them on yours.
This violates copyright laws.
â¢
Don't use a video from one of your client's suppliers before reading the licensing rights to the video.
After you read the rights, make sure your client agrees to them. Being named as a second party in a copyright infringement suit isn't a good thing.
â¢
If your client is recording a video for his Web site, which you or someone else will later compress and encode for the Web, make sure he uses a good-quality camcorder and not some el cheapo Web cam.
Garbage in, garbage out.
â¢
Make sure your client's intended audience has the necessary plug-ins to view the video.
When in doubt, list the required plug-in (Flash Player, Windows Media Player, and so on) and include a link to the Web site from which visitors can download it.
â¢
Apply the right level of compression for your intended audience.
If your client's intended audience accesses the Internet with dialup modems, don't embed a video with a 756 Kbps data rate.
â¢
If your client's intended audience accesses the Internet at different connection speeds, create links to videos with different compression rates.
Have one file with a data rate of 40 Kbps for dialup access, one file with a data rate of 400 Kbps for DSL access, and another file with a data rate of 756 Kbps for cable access.
â¢
Don't embed more than one video per Web page.
If your client wants multiple videos to be accessible from a page, use a video editing application to export one frame of the video as an image. Do this for each video the client wants to be accessible from the page. On the Web page, each photo serves as a link to the full video.
Chapter 4: Active Slideshow Pro
In This Chapter
Introducing Active Slideshow Pro
Creating a slide show
Adding effects and links
Editing a slide show
The first chapter of this minibook covers using Flash to add interactivity to your Web pages. Some people love Flash. Others would rather have a tooth pulled than learn how to use a new application. If you fall in the latter group and still want to add cool interactivity to your Web pages, you can easily do so from within Dreamweaver by using the Active Slideshow Pro extension. Active Slideshow Pro enables you to easily add Flash slide shows â slide shows with special effects such as motion and frame overlays â to your designs. In this chapter, we show you some of the cool things you can do with Active Slideshow Pro.
About Active Slideshow Pro
Active Slideshow Pro is a Macromedia Dreamweaver extension created by the folks at DMXzone. The extension makes it possible for you to add compelling multimedia slide shows to your Web pages. Adding a slide show is as simple as invoking a menu command, navigating to a folder of images you want to include in the slide show, and then choosing the options you want in your slide show. The options you can include are lengthy. You can choose an overlay for your slide show, which, incidentally, is a Flash SWF file. You can add motion, cool transitions, dazzling text effects, and more to your slide shows.
If you want a truly custom slide show, you can add your slides one at a time, add a text overlay, control motion for the slide and text independently, add a custom fade between slides, and more. You can also add a music soundtrack to your slide show, complete with a Mute button that site visitors can opt for if they don't like your choice of music. The options allow you to create a one-of-a-kind slide show guaranteed to dazzle site visitors. As of this writing, Active Slideshow Pro sells for $149. For more information, visit
www.dmxzone.com/ShowDetail.asp
The Ken Burns effect
Ken Burns is a documentary filmmaker. He intersperses his documentaries with original prints and photographs. Many of his documentaries are about periods of history when only still photography was available. Burns often gives life to still photographs by slowly zooming in on subjects of interest and panning from one subject in the image to another. For example, in a photograph of a baseball team, he might slowly pan across the faces of the players and come to rest on the player whom the narrator is discussing. Ken Burns didn't originate this technique, but he is so associated with it that it is now known as the
Ken Burns effect
.
The effect is also used when transitioning from one clip to another. For example, to segue from one person in the documentary to another, he might open a clip with a close-up of one person in a photo and then zoom out to make another person in the photo visible. Burns used this technique extensively when creating documentaries about subjects who lived when video cameras weren't available or in wide use. The zooming and panning across photographs creates the feeling of motion and keeps the viewer visually entertained.
Active Slideshow Pro gives you the capability to pan across a photo and zoom in, thereby replicating the Ken Burns effect. This technique has become a staple of documentaries, slide shows, presentations, and even computer screen savers.
Installing the Extension
You purchase the Active Slideshow Pro extension from DMXzone.com, where it's available as a download. After you download the extension to your hard drive, follow these steps to install the extension:
1.
Double-click the extension.
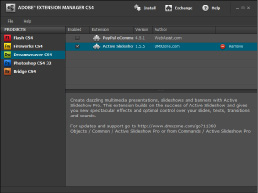
Active Slideshow Pro is an MXP file, which when double-clicked launches the Adobe Extension Manager CS4. After the Adobe Extension Manager CS4 launches, a dialog box appears with a disclaimer from Adobe. This is included because any developer can create extensions, and Adobe doesn't claim responsibility for them. However, you can safely install extensions from a reputable source like DMXzone.
2.
Click Accept to agree to the disclaimer.
Adobe Extension Manager CS4 begins installing the extension. After the extension is installed, the Adobe Extension Manager CS4 dialog box displays information about the extension. (See Figure 4-1.)
3.
Launch Dreamweaver.
The Install Active Slideshow Pro 1.5 dialog box appears. It looks like many other dialog boxes, so we won't waste valuable resources by including a picture of it. You need an Internet connection to complete the installation process.
Figure 4-1:
Installing the extension.

4.
Click Next.
The EULA (End User Licensing Agreement) appears.
5.
Click I Agree.
If you don't, you won't be able to install the extension. After agreeing to the EULA, the dialog box refreshes.
6.
Enter your serial number and then click Next.
The dialog box refreshes.
7.
Enter your DMX username and password, and then click Next.
The dialog box refreshes, with a message thanking you for registering the product.
8.
Click Next.
The installation process proceeds, and then a message appears telling you the installation is complete.
9.
Click Close and restart Dreamweaver.
When you restart Dreamweaver, the plug-in appears on the Commands menu.
Creating a Slide Show
After installing the extension, you're ready to rock and roll and create your first slide show. You access Active Slideshow Pro from within Dreamweaver. The resulting Flash file is linked to your HTML document. You can use a slide show anywhere, but a slide show is particularly effective on the home page of a Web site. It's a great way to pique Web site visitor interest and show people what your client does. If your client is a photographer, it's a really classy way to showcase his best pieces to potential customers.
Launching Active Slideshow Pro
To create a slide show, you begin with an HTML document. You can create the slide show anywhere in the document. However, a slide show is a thing of beauty, and a thing of beauty is a joy forever. Therefore, it makes sense to give your slide show a place of prominence on the page. To start your slide show, follow these steps:
1.
Create an HTML document.
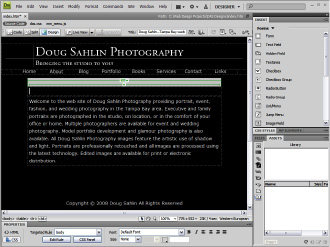
Start with a template from the site that includes the navigation menu, site banner, and all the other associated accoutrements. (See Figure 4-2.)
Figure 4-2:
Start with an HTML document.

2.
Save the document.
 The document must be saved prior to adding a slide show. If you omit this step, a warning dialog box to that effect appears.
3.
Position your cursor where you want the show to appear and then choose Commands
â
Active Slideshow Pro
.
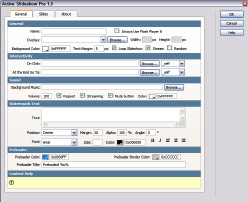
The Active Slideshow Pro dialog box appears. (See Figure 4-3.)
Figure 4-3:
Launching Active Slideshow Pro.

4.
Enter a name for the slide show.
5.
(Optional) Select the Always Use Flash Player 8 check box.
This option determines whether the slide show works in only the Flash 8 Player. If you choose this option, make sure you inform site visitors that the Flash 8 Player is required and provide a link they can use to download the player.
6.
(Optional) Choose an overlay from the Overlay drop-down menu.
Overlays
are SWF files that play over the slide show. They run the gamut from fancy frames to moving objects and frames. If you choose an overlay, the application fills in the Width and Height fields.
7.
Click the Background Color swatch to choose the background color for the slide show.
If you specify a border, choose a color that complements the background color of the HTML page; otherwise, choose the same color as the document. Alternatively, you can enter a hexadecimal value in the text field to specify the background color.
8.
Accept the default Text Margin value of 5 pixels or enter another value.
This option determines how far text is indented. If you choose an overlay, make sure you specify a large enough value so that the text isn't partially eclipsed by the overlay.
9.
(Optional) Select the Loop Slideshow check box.
If you choose this option, the slide show starts again at the beginning after it finishes.
10.
(Optional) Select the Stream check box.
This option begins playing the slide show and music while data is still streaming into the user's browser.
11.
(Optional) Select the Random check box.
This option plays the slides in a random manner.
12.
(Optional) If desired, enter a URL in the On Click field.
If you enter a URL, site visitors can launch the Web page by clicking the slide show. The option is available only if you deselect the Loop Slideshow option. (See Step 9.) You can also specify a file within the Web site, such as an image that is the same size as the slide show.
13.
(Optional) If desired, enter a URL in the At the End Go To field.
This option is available if you deselect the Loop Slideshow option. (See Step 9.) It loads the Web page when the slide show is finished. You can also specify a file within the Web site, such as an image that is the same size as the slide show. The file or Web page does, however, load in the same window if you choose
_self
. When you're creating a slide show for a Web page, we don't recommend using this option because it takes the viewer away from the client's Web site.
