Building Web Sites All-in-One For Dummies® (65 page)
Read Building Web Sites All-in-One For Dummies® Online
Authors: Claudia Snell

5.
Choose an option from the Dither Algorithm drop-down menu.
Dithering creates a facsimile of colors in the image but not in the palette by mixing colors in the palette. Your choices are as follows:
⢠Diffusion:
Dithers by creating a random pattern that, in most cases, is less noticeable than Pattern dither. Dithering is diffused across adjacent pixels.
⢠Pattern:
Dithers by creating a pattern that looks like halftone squares to simulate image colors not in the color table.
⢠Noise:
Dithers by creating a random pattern similar to the Diffusion method, but the pattern is not diffused across adjacent pixels. Seams don't show if you use this dithering method.
6.
Specify a Dither value.
This option determines the percentage of colors that are dithered. A higher values gives you greater detail at the expense of a higher file size. Drag the slider to the left until you notice image degradation in the bottom pane of the dialog box, and then drag the slider to the right until the image looks better. This will be the optimal dithering value for the image you're optimizing.
7.
Transparency is selected by default. Deselect this option if you don't want to optimize the image with areas of transparency.
Transparency is used when you want areas of the image to be transparent. This option is most often used when you want areas of a tiled background image to show through the image you're optimizing. However, even though transparency is enabled by default, you have to choose the transparent colors by specifying Matte and Transparency colors.
8.
If desired, choose an option from the Transparency menu.
You have the following options:
⢠No Transparency Dither:
Doesn't apply dithering to partially transparent pixels in the image.
⢠Diffusion Transparency Dither:
Dithers by applying a random pattern that is, in most cases, less noticeable than Pattern dither. Dithering is diffused across adjacent pixels. When selecting this option, specify a Dither percentage to control the amount of dithering applied to the image.
⢠Pattern Transparency Dither:
Dithers by applying a halftone-like square pattern to partially transparent pixels.
⢠Noise Transparency Dither:
Dithers by applying a random pattern similar to the Diffusion color-reduction algorithm, but the pattern isn't diffused across adjacent pixels. Seams don't show if you use this dithering method.
9.
The Amount option becomes available if you select Diffusion Transparency Dither.
Drag the slider to specify the percentage of dithering applied to the image. Alternatively, you can enter a value in the text field.
10.
Choose the Interlaced option to download the image in stages.
This option displays a low-resolution version of the image when the page loads. The fully optimized version is revealed when the image loads completely.
11.
Specify the Web Snap value.
This option determines the amount of nonâWeb-safe colors that are shifted to Web-safe colors. Choosing a higher value snaps more colors from the original image to the nearest Web-safe counterpart.
12.
Drag the Lossy slider to reduce file size.
This option discards color data to reduce file size. If you use this option, pay careful attention to the image in the right pane of the Save for Web & Devices dialog box. When the image begins to degrade, drag the slider to the left until you no longer see the degradation.
_fmt.jpeg) You can't use the Lossy option if you use the Interlaced option, or with the Noise or Pattern Dither option.
You can't use the Lossy option if you use the Interlaced option, or with the Noise or Pattern Dither option.
13.
Make sure you leave the Convert to sRGB option enabled.
This is the optimal color profile for monitor viewing.
14.
Choose an option from the Preview drop-down menu.
Your choices are Monitor Color, Macintosh (No Color Management), Windows (No Color Management), or Use Document Profile. In most cases, the default Monitor Color option works best.
15.
Choose an option from the Metadata drop-down menu.
Your options are None, Copyright, Copyright and Contact Info, All Except Camera Info, or All. Digital cameras add metadata to an image when a picture is taken. The information includes the camera make and model, exposure information, and so on. The photographer might have also added copyright and contact info in Photoshop, Photoshop Lightroom, or a similar image-editing application. If the image was supplied by a photographer, leave his contact and copyright image with the optimized image. Adding the camera data isn't necessary.
16.
Choose the desired options in the Image Size section.
You can resize the image proportionately by entering a value in the W or H text field. We don't advise clicking the link icon, which makes it possible to resize the width and not the height, or vice versa. This distorts the image. You can also resize the image by changing the value in the Percent text field, or by dragging the Percent scrubby slider. If you resize the image, you can choose an option from the Quality menu. In most cases, the Bicubic option works well.
17.
Click Save.
The Save Optimized As dialog box appears.
18.
Choose the desired option from the Save as Type drop-down menu.
If you're saving an image for a banner, accept the default Images Only option. If you sliced the image, choose HTML and Images to save an HTML file and image files in the specified file formats.
19.
Click Save.
Photoshop saves the image in the GIF format using the options specified.
 The Color Table at the bottom of the dialog box shows swatches of the colors that comprise the image color palette. You can modify the palette by adding colors to the palette, snapping colors to the nearest Web-safe color, and defining transparent pixels.
Creating a Photo Gallery
Many Web sites feature photo galleries. You can create a photo gallery the old-fashioned way by creating thumbnails and optimized full-sized images in an image-editing application, such as Photoshop or Fireworks. If you do this, you have to house all the thumbnails in an HTML table and create the links to the full-sized versions. If you do it right, the full-sized photos should be in their own HTML document. If that sounds like a lot of work, you're right. If you have Photoshop or Dreamweaver, you can create a photo gallery with a menu command.
Choosing your photos
If you're creating a Web site for a client, your assets should all be neatly assembled in a folder. If you're creating a Web gallery for yourself, your photos should also be in a folder. The easiest way to choose which photos you want to include in a Web gallery is to use an application like Adobe Bridge, or any application that lets you view a folder of photos as thumbnail images. The following steps show you how to choose your photos using Adobe Bridge:
1.
Launch Adobe Bridge.
Navigate to the folder that contains the candidates for your Web gallery.
2.
Choose Window
â
Workspace
â
Light Table.
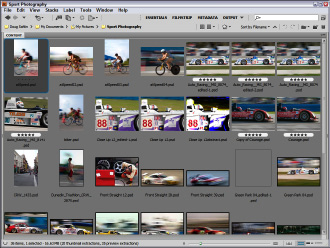
Adobe Bridge displays all images as thumbnails. (See Figure 4-15.)
3.
Examine all the images in the folder.
4.
When you see an image you want to include in the gallery, select the image and press Ctrl+5 (Windows) or
Ã
+5 (Mac).
This assigns a five-star rating to the photos. Continue assigning five-star ratings to images you want to include in the Web gallery.
5.
Press Ctrl+Alt+5 (Windows) or
Ã
+Option+5 (Mac).
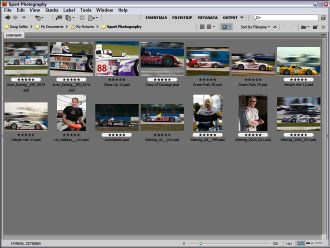
Adobe Bridge displays only the five-star images. (See Figure 4-16.)
6.
Choose File
â
New Folder.
Adobe Bridge creates a new folder.
Figure 4-15:
Separate the wheat from the chaff.

Figure 4-16:
Displaying the best images.

7.
Name the folder Web Gallery.
8.
Select the images and drag them into the Web Gallery folder.
Using Dreamweaver to create a photo gallery
If you prefer, you can create a Web gallery in Dreamweaver. When you choose this option, Fireworks creates the thumbnails and full-size images. When you create a Web gallery in Dreamweaver, your only option to resize the images is by using a percentage. We strongly recommend that you use Fireworks or Photoshop batch processing to resize the images to the desired size. To create a photo gallery in Dreamweaver, follow these steps:
1.
In Dreamweaver, create a new document.
2.
Choose Commands
â
Create Web Photo Album.
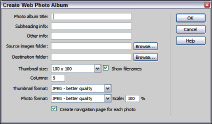
The Create Web Photo Album dialog box (see Figure 4-17) appears.
3.
Enter the following information: Photo Album Title, Subheading Info, and Other Info.
This is the information that will display for the title of your album. For the Subheading and Other Info, you might enter your client's name and contact information.
Figure 4-17:
Yet another way to create a Web gallery.

