Building Web Sites All-in-One For Dummies® (35 page)
Read Building Web Sites All-in-One For Dummies® Online
Authors: Claudia Snell

Use the icons in the gradient tool contextual menu at the top of the screen to experiment with the different types to see what they look like.
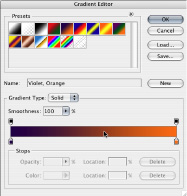
The contextual menu also contains a drop-down menu at the upper left that features a gradient sample, instead of words, as the menu choice. This is the menu that you use to select the colors of your gradient. Click the menu button to see all the available preset gradients. The more exciting way to work with gradients is to click the color swatch in the menu itself, which launches the Gradient Editor (shown in Figure 4-12). In the Gradient Editor, you can change the colors of the gradient, add colors to the gradient, change the position of the colors within the gradient, and save gradients that you create (as a preset).
To change colors, select one of the presets that are available to start, and then either double-click one of the color chips that are displayed under the sample of that gradient or click the Color drop-down menu. Either path launches the Color Picker tool. You can move the position of the colors within the gradient by clicking and dragging the color chips or by clicking a color chip and then changing the number in the Location box. The “right” way depends on your personal tastes. Experiment with it and have fun.
To use the Gradient tool, follow these steps:
1.
Select a layer or create a layer or select an area of a layer.
2.
Click the Gradient tool.
3.
Click the Click to Edit menu at the top of the screen to open the Gradient Editor. (See Figure 4-12.)
Figure 4-12:
Calling up the Gradient Editor tool.
4.
Select a Preset or adjust the settings to create your own gradient; then click OK.
5.
Click and drag across the layer you want to fill with the gradient.
The layer is filled with the gradient you create in Step 4.
 If you don't like the result, try again. Adjust the gradient, or keep the one you already have and just drag again. Repeat until you get what you want.
The Text tool and panel
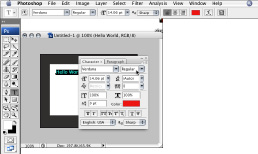
You can add text to your graphics with the Text tool. To use this tool, click it, click in the work area where you want your text to appear, and type. A new layer is automatically created with your new text. The Text tool has its own menu bar and a panel that contains more options for formatting, including options for handling paragraphs. Figure 4-13 shows the Text menu bar and panel.
Figure 4-13:
Use the Text menu bar and panel to set the properties of your text.
Vector tools: Shape, Pen, and Path Selection tools
Photoshop has a few vector graphics tools, and these can be tricky to use. We recommend experimenting with them until you feel comfortable using them. Here are the highlights:
â¢
Shape tool:
Draw shapes, such as rectangles and ellipses. To use it, just select the tool, and then click and drag in the work area. The Shape tool has an option that allows you to draw a variety of preset shapes, see Figure 4-14.
â¢
Pen tool:
Draw lines, curves, and shapes. With the Pen tool, click in the work area to create points; after you create all your points, Photoshop connects them to create a shape.
â¢
Path Selection tool:
Edit
paths
â the lines in a vector graphic â that you have created.
Figure 4-14:
Using the Shape tool.

The Magnify and Hand tools and the Navigator panel
Use the Magnify and Hand tools, along with the Navigator panel, to help you move around your document and zoom in or out for a better look.
â¢
Magnify tool:
To zoom in on a portion of the work area, choose the Magnify tool and then click that area. Double-click the Magnify tool icon to go directly to 100 percent. Use the Navigator panel (by sliding the small red triangle under the preview window) or enter a percent value into the box at the lower left of the document window to zoom back out.
â¢
Hand tool:
This tool moves your viewing area around the document; it doesn't move any of the artwork. Select the tool, click within the document work area, and then drag the work area around. The whole Photoshop file appears to move around within the document window area. You're not actually moving the graphics â only the visible area. This is particularly helpful if you are zoomed in far enough that your whole document is no longer visible in your document window. You can drag the area that you're looking at without having to move the actual graphics around.
â¢
Navigator panel:
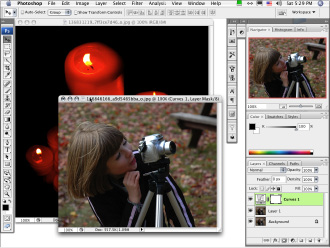
This panel performs the same functions as the preceding two. The slider zooms in and out, and the red box indicates your viewing area. You can also use the Navigator to orient yourself in the document. Click the red box and drag it around the document thumbnail so that you can change the viewing area as you work. See Figure 4-15 for an example of how the Navigator works. If you can't see the Navigator on your screen, open it by choosing WindowâNavigator.
Figure 4-15:
Use the Navigator to zoom in and out and move around your work area without moving the artwork.
Chapter 5: Getting Started with Dreamweaver
In This Chapter
Touring the Dreamweaver interface
Creating a Web site
Creating pages and supporting files in Dreamweaver
Testing your pages and validating the code
Publishing your Web site
Dreamweaver CS4, the industry standard software for Web design, has some great features and some very useful tools to help designers and developers to be more efficient. Some of the features include code formatting, comment features to help keep code understandable, and code collapsing to help you focus on an area of your code. The handy placement and functionality these features add are great assets when you start to work with your first Web pages and HTML code. This chapter gives you a quick-and-dirty tour of Dreamweaver before delving into using this very handy tool.
Before you start working in Dreamweaver, make sure you have a Web host and a URL. Sure, you can work on your site before you do these things, but that's not a great idea because you must be sure you can find and afford hosting that will accommodate your site. A word to the wise: Not all hosts are the same. The URL is important, especially if the name of the site will be the URL. Designing a site only to discover later that someone else already owns the name is a real drag. This scenario has happened more often than you'd think, so don't let it happen to you. Book I has information about choosing hosts and URLs.
Exploring the Dreamweaver Interface
Before you dive right in to Dreamweaver and start making pages, you'll probably want to get acquainted with the interface. The following section gives you the quick rundown of the key features and a little information about how they work. After you get familiar with Dreamweaver's default set of features, you can look for additional features to download at the Adobe Exchange at
www.adobe.com/exchange
.
The first time you launch Dreamweaver, you see the Welcome Screen (shown in Figure 5-1, a bit later in the chapter). You can select the check box that asks not to show the Welcome Screen when you launch Dreamweaver again. If you do not select that box, you will see the Welcome Screen each time you launch Dreamweaver. The next thing that happens the very first time you launch Dreamweaver is that you're asked to set up a Web site. A dialog box opens, giving you Manage Sites and Cancel options. Dreamweaver is trying to
index
and keep track of the files that will make up your Web site. This is important. Dreamweaver helps you with site maintenance (uploading, synchronizing versions, checking links, and so on) â
if
you set it up properly, that is. More on that later in this chapter.
 You can work in Dreamweaver without creating a site; just be aware that Dreamweaver can't help you keep track of the files and their relation to each other. Either way, you need to deal with Dreamweaver's request to set up a site.
â¢
To set up a Web site, click Dreamweaver Site.
 The benefit of setting up a site is that Dreamweaver keeps track of all the files associated with your Web site on your local machine, on your Web server, and on your (optional) test server.
â¢
To skip this step and begin working with Dreamweaver, just open a file.
Sometimes, you just want to work on one file that's not part of a whole Web site. Simply open that file and proceed. If you choose to work this way, Dreamweaver warns you that you aren't working with files that are part of a single site whenever you try to insert secondary files. This comes in handy when you want to borrow a bit of code from another site you worked on. You may want to open some files from that site to access that code but not include them in the site you're working on at the moment.
The Welcome Screen
When you launch Dreamweaver, you're presented with the Welcome Screen. (See Figure 5-1.) This screen gives you the option to open a file you recently worked on, create a new file, create a file from a sample, take a tour, or follow a tutorial. It also provides information about updates or new products. Adobe sends these updates to your Welcome Screen when you're connected to the Internet.
The Dreamweaver Welcome Screen gives you tons of options for getting started, organized into three lists: Open a Recent Item, Create New, and Top Features. Open a Recent Item and Create New are lists of files you can open or create. Top Features is a list of links to information about the top features in Dreamweaver CS4. In the Getting Started area, at the bottom of the Welcome Screen, you can find additional resources and information to help you build sites in Dreamweaver. And in the same window, you see some of the menus and panels that we discuss later in this chapter. If you haven't used Dreamweaver before, the Open a Recent Item list has only one item in it: the Open folder button. If you've worked in Dreamweaver and saved some files, you see a list of the ones you used most recently. To open a recent item, just click the filename. Or, you can click Open to see a list of the files in the last site worked on.
Figure 5-1:
The Dream-weaver Welcome Screen.
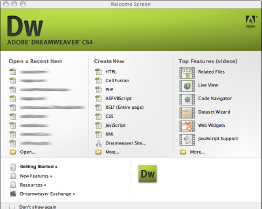
In the middle of the Welcome Screen, the Create New list gives you the option to create an HTML, ColdFusion, PHP, or CSS document, among others. To immediately create a file, just click the type of file you need. To see more options, click More at the bottom of the list.
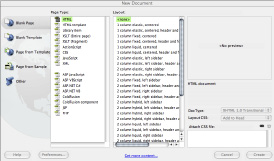
Dreamweaver comes with a large number of sample or starter files that can get you going quickly. To access them, click More in the Create New list and then select Page from Sample to launch the New Document dialog box. (See Figure 5-2.) From that dialog box, you can select the type of file you would like to create, make some optional selections, or choose to start your document from a premade template. Read the next sections for more information about that.
Figure 5-2:
The New Document dialog box.
What's in a name? Local site, remote site, testing servers . . .
The following terms keep popping up throughout the site creation and management process:
Server:
A
server
is just a computer hooked up to the Web but that also has server software running on it.
Server software
receives requests for information from other computers and “serves” the requested information back to the requesting machine.
Local site:
This folder on your own computer is where you keep all your working files for a Web site. It's your unpublished Web site.
Remote site (or live site):
This is the site that's on the Web server. It's the collection of files that have been copied to the Web server. The remote site has your URL (Web address) pointed to it. This site is visible to anyone who has your URL or finds your site via a search engine or a link.
Testing server (optional):
A very good thing to have, the testing server is where you can publish the site so people within your team can see it, but it isn't visible to the whole world. It can be the same machine as your live server, but the files are put into a different folder than the live files â or you can put the files on a totally different machine. The testing server needs to be equipped with the same server software (or server software that supports the same features) as the live environment.
Note:
If your testing server and live server are too different, you can end up with content that works on one server but not on the other. That's not a big deal if your Flash video doesn't work correctly on your test server but looks great on the live server. However, this is a very bad thing if it's the other way around. You could end up with content that took a lot of time and effort to produce, but that you can't use. That's no fun!
The New Document dialog box
You can also access the New Document dialog box by choosing FileâNew from the menu. Click the appropriate item from the navigation choices on the left side of the screen: Blank Page, Blank Template, Page from Template, Page from Sample, or Other. Your choice depends on whether you're starting from scratch to build a page or template; using a template you built; needing a little help from prebuilt samples and templates; or creating a CSS, JavaScript, or other type of file. A
new document
creates one document; a
new template
creates a file that you can use to make and maintain multiple files. Dreamweaver has many degrees of assistance to help you get started.
The Page from Template option holds any custom templates you build, listed by the site they're associated with. For more on custom templates, see Book III, Chapter 6. In the following sections, we describe the Blank Page options as well as a few of the Page from Sample options. If you are just starting out, you may want to open a few of the Starter Page Theme pages under the Page from a Sample menu. By starting with one of these prebuilt designs, you can get a look at how the whole page, CSS and graphics, fits together. It's a great learning tool and can get you off to a quick start on building your pages.
The New Document dialog box is divided into a left navigation area and three fields (refer to Figure 5-2), starting with the Page Type field to the right of the navigation area. The Page Type field lists groups of files that you typically want to build to start your HTML, CSS, or other site files. Next to the Page Type field is the Layout Field, which shows more options for each page or file type. On the right side of the dialog box is the Preview pane. After you select an item in each of the two fields to the left, the Preview pane gives you a rough sketch of what your selections translate to on the actual page (
Note:
Selections show only if a preview is available. Some file types don't have a preview.)
Blank Page starter files
Use the Blank Page starter files to create HTML files, HTML templates, Library items (see Book III, Chapter 6 for more), ActionScript files (for use with Flash), ASP, JSP, ColdFusion, PHP, CSS files, and JavaScript files. These starter files include just the basics (tags for DTD, HTML, head, title, and body). For more about these initial tags, see Book III, Chapter 2.
