Build Your Own ASP.NET 3.5 Website Using C# & VB (86 page)
Read Build Your Own ASP.NET 3.5 Website Using C# & VB Online
Authors: Cristian Darie,Zak Ruvalcaba,Wyatt Barnett
Tags: #C♯ (Computer program language), #Active server pages, #Programming Languages, #C#, #Web Page Design, #Computers, #Web site development, #internet programming, #General, #C? (Computer program language), #Internet, #Visual BASIC, #Microsoft Visual BASIC, #Application Development, #Microsoft .NET Framework

Figure 12.7. We’re not refreshing the GridView fields
PageSize specifies the number of records the GridView should display on every
product page. Normally, we’d want this number to be greater than three, but we’ve
set it to a low number here so that we can test the paging functionality with our
sample data. AllowPaging enables GridView’s paging functionality, which will
cause paging links to be displayed. When we set AllowSorting to True, it will allow
Licensed to [email protected]
496
Build Your Own ASP.NET 3.5 Web Site Using C# & VB
us to change the column names into links that users can click to sort the data on
the basis of that field; we’ll do this in a moment.
After the above properties have been set, the GridView control source should look
like this:
Dorknozzle\VB\04_AddressBook.aspx
(excerpt)
DataSourceID="employeesDataSource" PageSize="3"
>
⋮
Let’s also deal with style issues by adding the lines below to the skin file,
SkinFile.skin
. The PagerStyle defines the style used by the cells that contain the paging buttons;
we’ll see these buttons in a moment:
Dorknozzle\VB\05_SkinFile.skin
(excerpt)
CellPadding="4" GridLines="None">
To enable column sorting, you need to click the grid’s smart tag in
Design
view and
choose
Edit Columns…
. We want to allow sorting by name and by city, so we’ll alter
these columns only. Start by selecting the Name column from the
Selected fields
box.
Licensed to [email protected]
Advanced Data Access
497
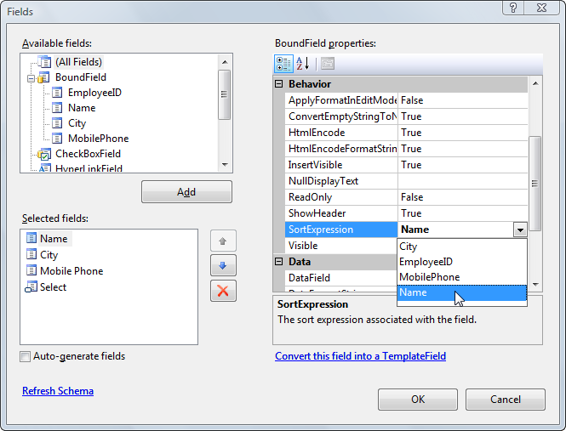
Then, from its properties box on the right, choose Name for its SortExpression
property as depicted in Figure 12.8.
Figure 12.8. Selecting a SortExpression value for column sorting
Then select the City column and set its SortExpression property to City. After
clicking
OK
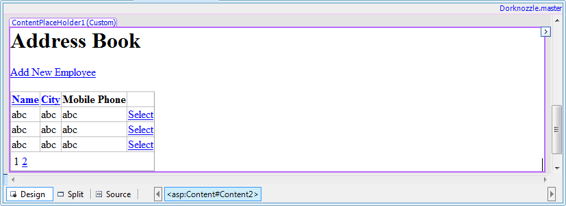
, the Name and City column headers should appear as links in Visual
Web Developer’s
Design
view, as shown in
Figure 12.9
.
Figure 12.9. Column headers as links in Visual Web Developer
Finally, use Visual Web Developer to generate the signature for the grid’s Sorting
event, and add the following single line to the generated code:
Licensed to [email protected]
498
Build Your Own ASP.NET 3.5 Web Site Using C# & VB
Visual Basic
Dorknozzle\VB\06_AddressBook.aspx.vb
(excerpt)
Protected Sub grid_Sorting(ByVal sender As Object,
➥ ByVal e As System.Web.UI.WebControls.GridViewSortEventArgs)
➥ Handles grid.Sorting
grid.DataBind()
End Sub
C#
Dorknozzle\CS\06_AddressBook.aspx.cs
(excerpt)
protected void grid_Sorting(object sender, GridViewSortEventArgs e)
{
grid.DataBind();
}
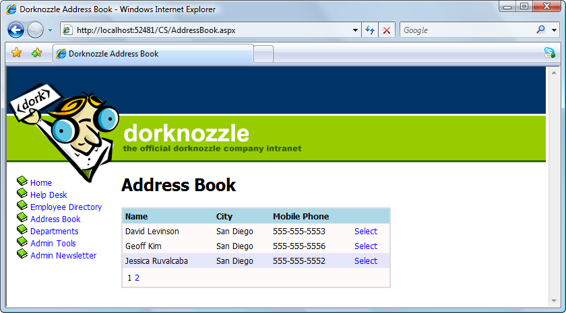
Execute the project. If everything goes well, you should see a functional GridView,
with working paging buttons, like the one in Figure 12.10.
Figure 12.10. Address Book paging in action
Yes, paging works, and you didn’t write a single line of C# or VB code to implement
it! You can even select rows—although when you do, nothing happens (other than
the appearance of shading that acts as a visual cue that the row has been selected),
because we haven’t implemented any functionality for the DetailsView control as
yet. (Remember that at the beginning of the chapter, we deleted all the code.)
Licensed to [email protected]
Advanced Data Access
499
Binding the DetailsView to a SqlDataSource
Here, our aim is to replicate the functionality the DetailsView
gave us in Chapter 11,
and to add functionality that will allow users to add and delete employees’ records.
Let’s start by adding another SqlDataSource control, either next to or below the
existing one, in
AddressBook.aspx
. Give the new SqlDataSource the name employeeDataSource. Click its smart tag, and select
Configure Data Source
. The Configure Data Source wizard will appear again.
In the first screen, choose the
Dorknozzle
connection string. Click
Next
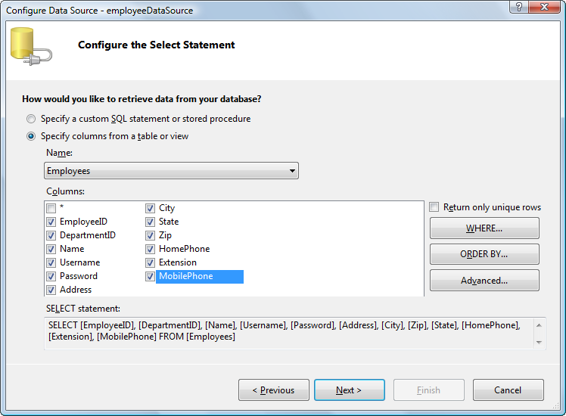
, and you’ll be taken to the second screen, where there’s a bit more work to do. Start by specifying
the Employees
table and checking all of its columns, as shown in Figure 12.11.
Figure 12.11. Choosing fields
Licensed to [email protected]
500
Build Your Own ASP.NET 3.5 Web Site Using C# & VB
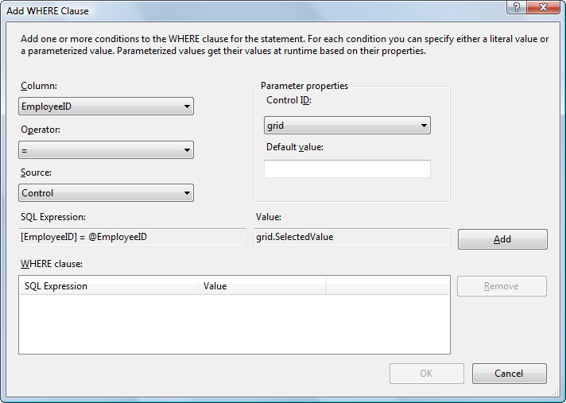
Figure 12.12. Creating a new condition
Next, click the
WHERE…
button. In the dialog that opens, select the EmployeeID
column, specify the
=
operator, and select
Control
in the
Source
field. For the
Control
ID
select grid, and leave the default value empty, as
Figure 12.12 shows.
Finally, click
Add
, and the expression will be added to the
WHERE clause
list. The SQL expression that’s generated will filter the results on the basis of the value selected in the GridView control. Click
OK
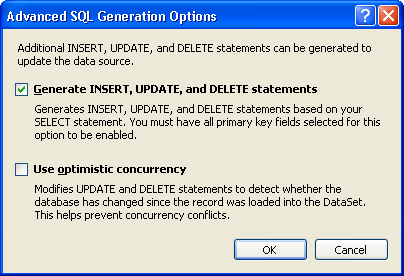
to close the dialog, then click the
Advanced…
button. Check the
Generate INSERT, UPDATE, and DELETE statements
checkbox, as
Click
OK
to exit the Advanced SQL Generation Options dialog, then click
Next
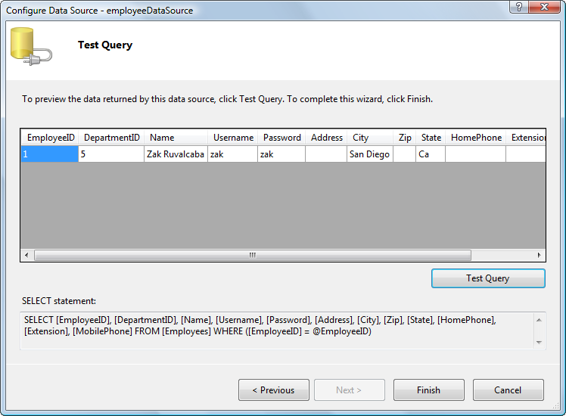
. In the next screen, feel free to click on
Test Query
to ensure everything’s working as
expected. If you click
Test Query
, you’ll be asked for the Employee ID’s type and
value. Enter
1
for the value, leave the type as
Int32
, then click
OK
. The row should
display as it does in Figure 12.14
.
Click
Finish
.
Congratulations! Your new SqlDataSource is ready to fill your DetailsView. Next,
we need to tie this SqlDataSource to the DetailsView and specify how we want
Licensed to [email protected]
Advanced Data Access
501
Figure 12.13. Generating INSERT, UPDATE, and DELETE statements
